Sitefinity How-tos
Learn how to add content to a page
Page Settings
Create and Edit settings of a Page
-
Create a new Page
- Click the Pages navigation menu item and then click the Create a page button.

- Type the page name. The page name will autogenerate the URL. You can edit the autogenerated URL if needed.
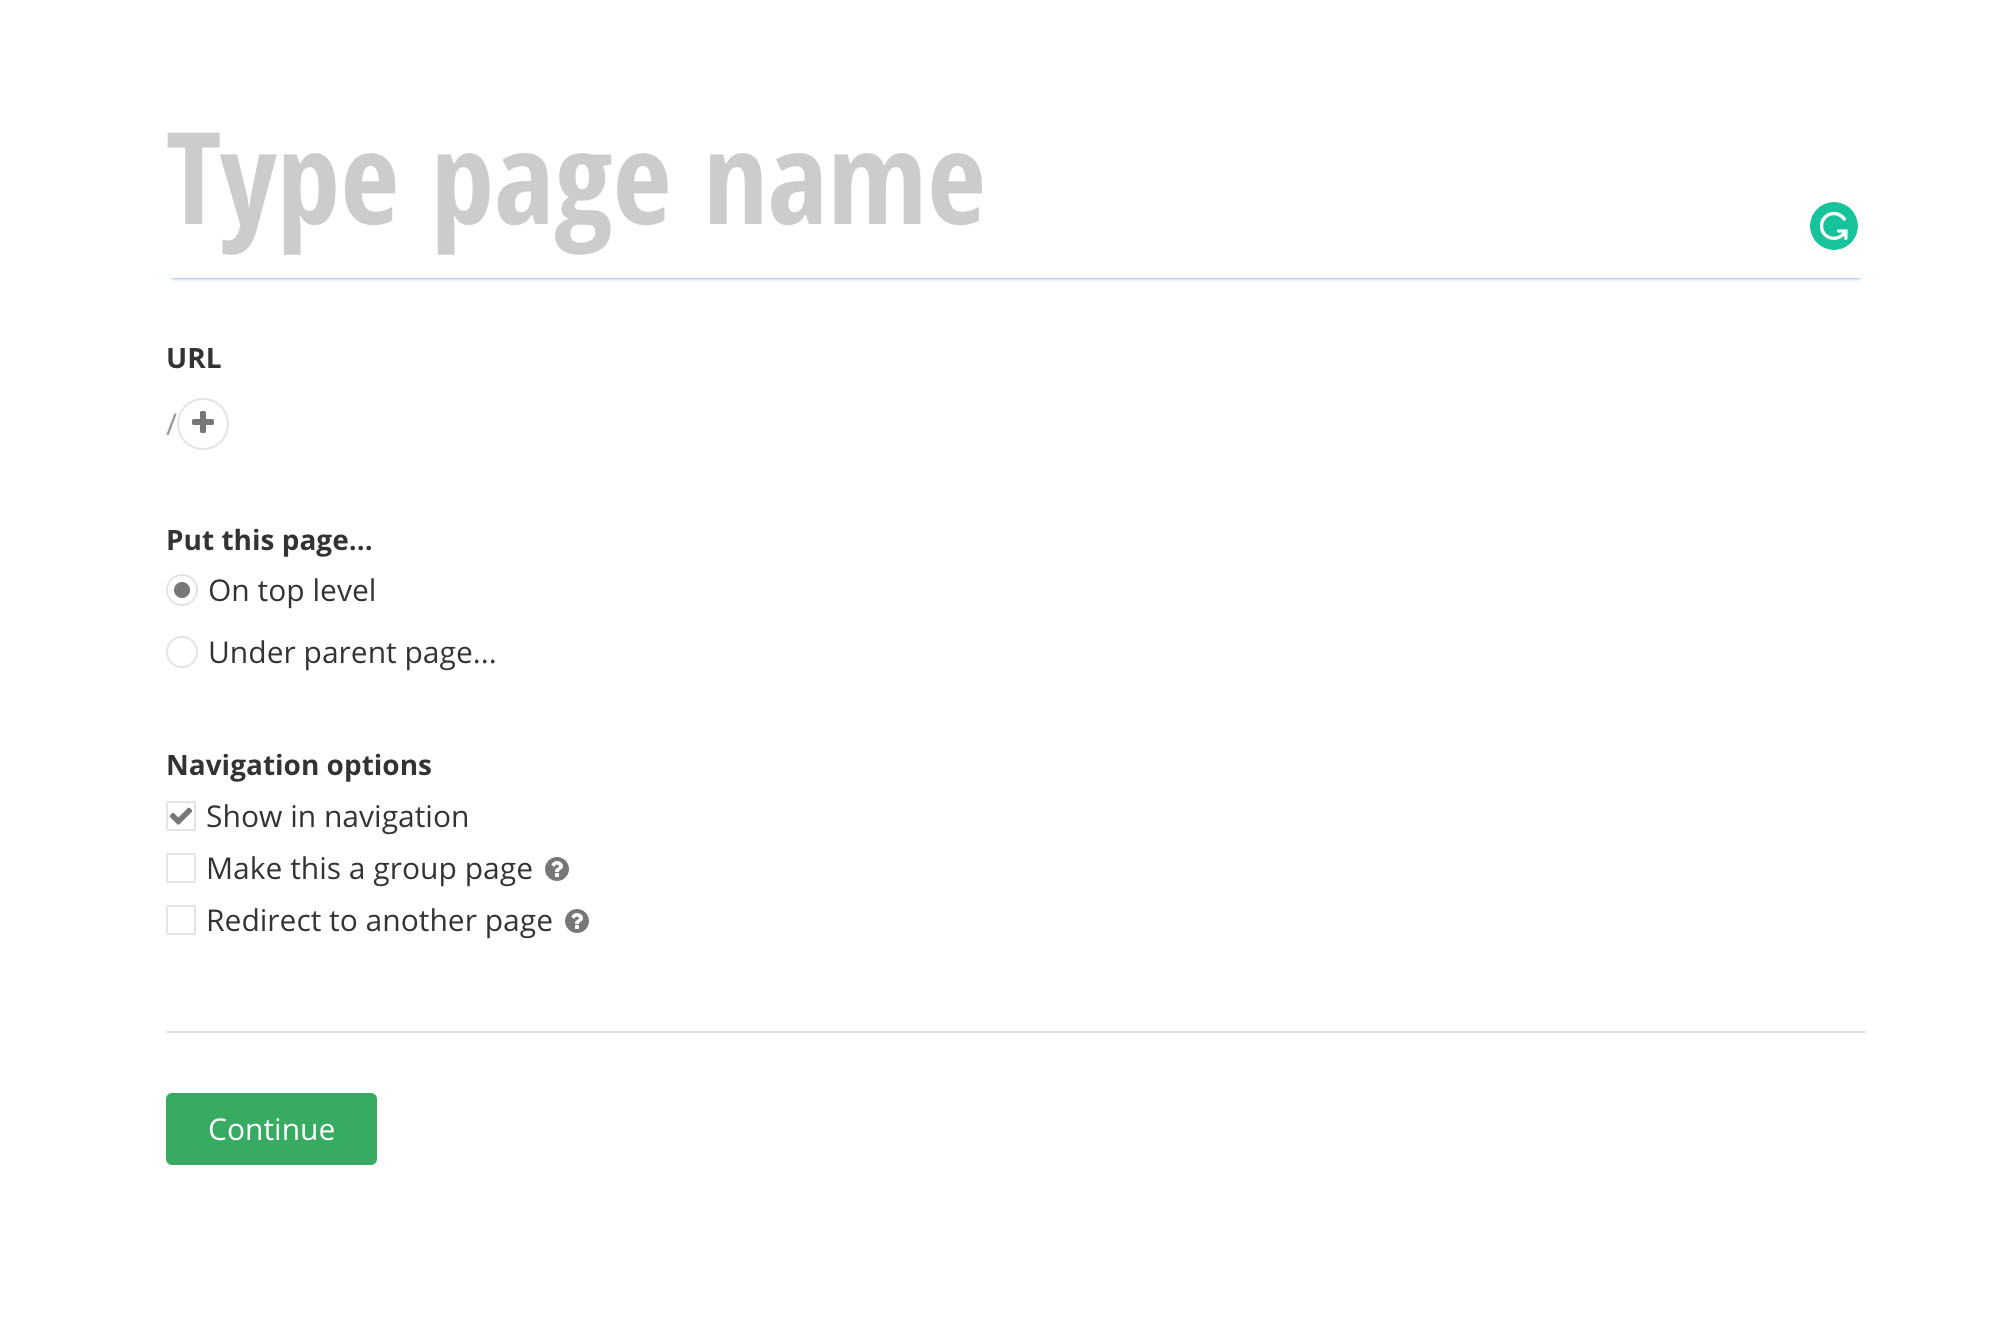
- Select where to put the page
- On top level: This will make it a parent page
- Under parent page: This will make the page a subpage of a parent page
- In the Navigation options section make a selection
- Show in Navigation:
Select this checkbox to make the page show up in the automatically generated navigation widgets. If the Show in navigation checkbox is deselected, the page is not displayed in the automatically generated navigation, and it can be viewed only if linked or accessed directly. - Make this a group page:
Select this checkbox to specify that the page is a group page. Group pages serve as containers for other pages. Group pages do not have their own content. When a visitor opens a group page, it redirects to its first subpage (child). - Redirect to another page:
Select this checkbox to specify that the page you are creating will not have its own content but will serve as a redirect page instead. Redirect pages serve as a placeholder in the sitemap, and redirect to another page from your website, or an external URL. To specify where your page redirects to, click (Select page). On the next screen, select a page from your site or use the Web address tab to specify an external URL to redirect to. Once finished, click Done.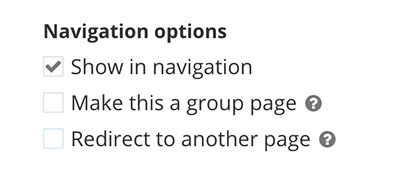
- Show in Navigation:
- Click the Continue button
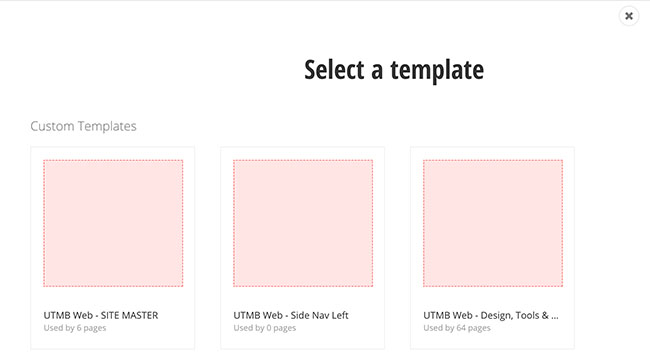
- Select a template
- You can now start adding content to the page.
- Click the Pages navigation menu item and then click the Create a page button.
-
Page title and properties
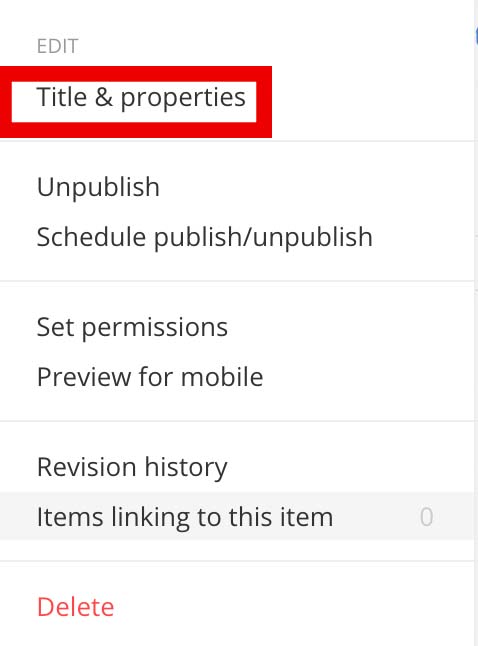
- Within the edit view of the page click the ellipsis symbol on the upper right-hand corner.

- Select the Title & properties option
- You can modify these page settings:
- Page title
- Page URL
- Select where to put the page
- Select Navigation options
- Add additional URLs: this will create redirect links to the page
- Within the edit view of the page click the ellipsis symbol on the upper right-hand corner.
-
Make a page a parent page or subpage
- Within the edit view of the page click the ellipsis symbol on the upper right-hand corner.
- Select the Title & properties option
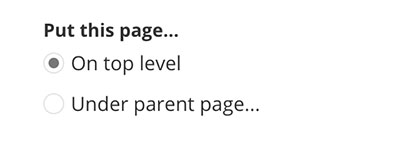
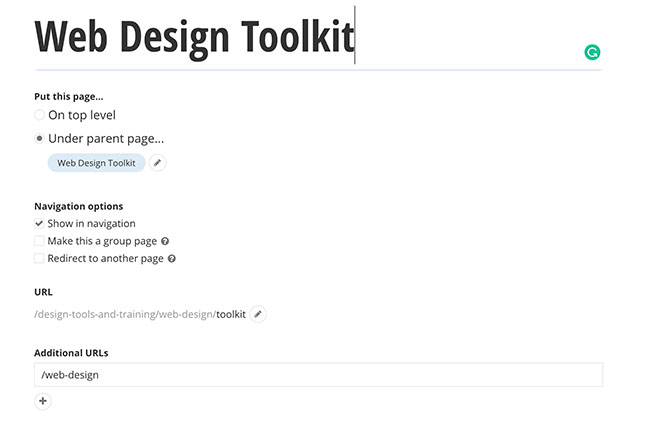
- In the Put this page... section:
- On top level:
This selection will make the page a parent page - Under parent page...:
This selection will make the page a subpage page of the page selected (click the pencil icon)
- On top level:
- Click the Save changes button when complete.
- Within the edit view of the page click the ellipsis symbol on the upper right-hand corner.
-
Page navigation settings (including redirects & group pages)
- Within the edit view of the page click the ellipsis symbol on the upper right-hand corner.
- Select the Title & properties option
- In the Navigation options section make a selection:
- Show in navigation:
Select this checkbox to make the page show up in the automatically generated navigation widgets. If the Show in navigation checkbox is deselected, the page is not displayed in the automatically generated navigation, and it can be viewed only if linked or accessed directly. - Make this a group page:
Select this checkbox to specify that the page is a group page. Group pages serve as containers for other pages. Group pages do not have their own content. When a visitor opens a group page, it redirects to its first subpage (child). - Redirect to another page:
Select this checkbox to specify that the page you are creating will not have its own content but will serve as a redirect page instead. Redirect pages serve as a placeholder in the sitemap, and redirect to another page from your website, or an external URL.
To specify where your page redirects to:- Click (Select page).
- On the next screen, select a page from your site or use the Web address tab to specify an external URL to redirect to.
- Optional: select the Open this link in a new window checkbox
- Once finished, click Done.
- Show in navigation:
- Click the Save changes button when complete.
- Within the edit view of the page click the ellipsis symbol on the upper right-hand corner.
-
Page URL settings
- Within the edit view of the page click the ellipsis symbol on the upper right-hand corner.
- Select the Title & properties option
- The page title automatically populates the page URL
- Type page name – enter the desired name of your page. The page name is used to identify your page in the Sitefinity CMS backend. It is displayed in the list of pages, different page selectors, navigation widgets and so on.
- In the URL section:
This is the URL name of your page. As you type the page name, URL is automatically populated. Sitefinity uses this URL to dynamically build the full URL of the page, so it can be accessed by website visitors.- If you need to change the auto-generated URL name:
- Click the Edit (pencil icon) next to it. Type in the new URL name
- DO NOT click the Edit Structure button to change the structure. This could cause issues with your page.
- If you need to change the auto-generated URL name:
- Click the Save changes button when complete.
- Within the edit view of the page click the ellipsis symbol on the upper right-hand corner.
-
Additional URLs for pages (shortened links)
- Within the edit view of the page click the ellipsis symbol on the upper right-hand corner.
- Select the Title & properties option
- In the Additional URLs section:
Configure additional URLs this page resolves on. The additional URLs resolve from the website root.- Add one URL per line. Add the URLs as relative URLs, (i.g. /contacts)
- Add one URL per line. Add the URLs as relative URLs, (i.g. /contacts)
- Click the Save changes button when complete.
- Within the edit view of the page click the ellipsis symbol on the upper right-hand corner.
-
Page Search Engine Optimization - SEO
The title tag and meta description (otherwise known as the "SEO title" and "SEO description") inform Google and other search engines about what the topic of your website is about. This information also shows up in the search results for users to see, and optimizing it can help them click through to your site.
- Within the edit view of the page click the ellipsis symbol on the upper right-hand corner.
- Select the Title & properties option
- Under the Search engine optimization section update per the guidelines below:

- Title for search engine:
This will autogenerate based on the page title. There is a 70 character limit.- Tips for title optimization:
- Aim for titles that are 50-60 characters
- Make your title tags unique on your website and on the SERP
- Follow basic writing etiquette and be honest
- Use keywords in your title tag (where appropriate)
- Tips for title optimization:
- Description:
There is a 150 character limit- Tips for description optimization:
- Use active voice and make it actionable
- Include a call-to-action
- Use your focus keyword
- Make sure it matches the content of the page
- Tips for description optimization:
- Keywords:
- Under the Custom fields section add concise comma-separated values to the Keywords field.

- Under the Custom fields section add concise comma-separated values to the Keywords field.
- Title for search engine:
- Click the Save changes button when complete.
- Within the edit view of the page click the ellipsis symbol on the upper right-hand corner.
-
Index page for site search and search engines
- Within the edit view of the page, click the ellipsis symbol on the upper right-hand corner.
- Select the Title & properties option
- Under the Advanced Options section:
- Allow site search to index this page:
This option is selected by default and you must deselect it, only if you do not want the internal site search to find your page in case, for instance, you have sensitive information on the page. - Allow external search engines to index this page:
This option is selected by default and you must deselect it, only if you do not want search engines, such as Google, to find your page in case, for instance, you have sensitive information on the page.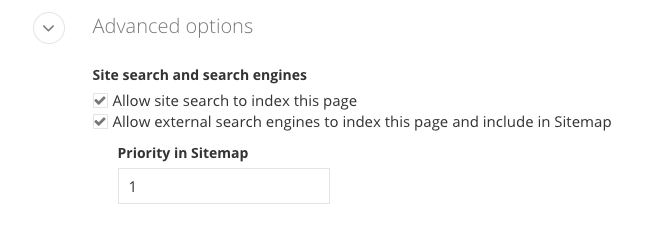
- Within the edit view of the page, click the ellipsis symbol on the upper right-hand corner.
-
Set a page as a homepage
On Pages page, the homepage of your website is represented by a home icon .
To set a home page, follow the instructions below:
- In the navigation, click Pages.
The pages management screen opens. - Click Settings for pages button
- Click the Set homepage.
- In the pages selector, select the page you want to set as homepage.
- To save your selection, click Use selected button.
The system sets the page as the website’s homepage and displays the icon above.
NOTE: If you do not explicitly set a page as homepage, the first page you have created is automatically set as your homepage. You cannot set a group page as a homepage.
IMPORTANT: You cannot delete the page set as homepage, unless it is the last page in the sitemap. To delete this page, set another page as homepage.
- In the navigation, click Pages.
-
Edit and save page content
You can edit the content of a page, such as layout elements and widgets.
- To do this, on the Pages screen, perform one of the following:
- Click the name of the page.
NOTE: If the page you have clicked is a group page, the system opens the Page title and properties dialog, where you can edit the properties of the page. - Click the (Actions) context menu of the respective page and click Content.
The page opens in content editing mode. In content editing mode you can Design a layout template and Apply a template to a page.
NOTE: A group page has no content and under Actions there is no Content link.
- Click the name of the page.
- When you are finished editing the page, perform one of the following:
- Save as Draft
- Publish
- Schedule Publish
NOTE: In page content editing mode, to see a preview of the page, click Preview button in the toolbar. The preview of the page is not a fully functioning page as it will appear on the live site. Use it to get an overall idea of how the page will look like. If you want to test how the page will look like and work of the live site, publish the page and click Live site in the upper-right corner of the screen. For example, if you use the preview mode, links to content items do not work.
- To do this, on the Pages screen, perform one of the following:
-
Delete pages
To delete a page, perform one of the following:
- On the Pages screen, select one or more pages to delete and from the Actions or Bulk Actions dropdown (depending on how many items you have selected), available in the upper left-hand side of the screen select Delete.
- On the Pages page, click the (Actions) link of the page you want to delete and click Delete.
A dialog box appears where you must confirm the deletion.
If you activated the Recycle bin module, the page is not permanently deleted, but moved to the Recycle bin. You can later restore or permanently delete the page from the recycle bin.
IMPORTANT: You cannot delete a parent page. If you want to do this, you must first move or delete all of its children.
IMPORTANT: If the page has translations, the system asks you, if you want to delete only the current translation of the page or all translations of this page.
-
Apply page templates to pages
You can base a page on a page template in one of the following ways:
- When creating the page, you choose from the set of Sitefinity CMS page templates.
NOTE: You can select from MVC only templates. - Change the template of a page later
You change a template of a page in one of the following ways:
- On Pages page, click the Actions link of the page, whose template you want to change, click Template.
- In page content editing mode, click Layout in the toolbar and then click Select another Template button.
- Click one of the templates displayed.
Both predefined and custom page templates are listed and you can further customize or change the layout template later.
NOTE: MVC templates are designated with an MVC label. - Click Done.
The template is applied to the page.
- Click one of the templates displayed.
You can change between different templates of the same type. Placeholders with the same name or ID get the same widgets. If there is no such placeholder, new template widgets will be orphaned and you need to manually place them in another placeholder.
IMPORTANT: If you want to change the existing page template of a page, the system replaces the old template with the new one. All modifications of layout and content are preserved, and the new layout is appended to the existing.
- When creating the page, you choose from the set of Sitefinity CMS page templates.
-
Make a page viewable by UTMB employees only
- On the Pages page, click the (Actions) link of the page you want to lock down to UTMB employees only.

- Select Set permissions from the drop-down menu.

- Click the Break inheritance button

- Click the Change button under the View this page and its child pages section.
IMPORTANT: DO NOT edit any other settings
- Click the Selected roles or users radio button and then click the Add roles or users button

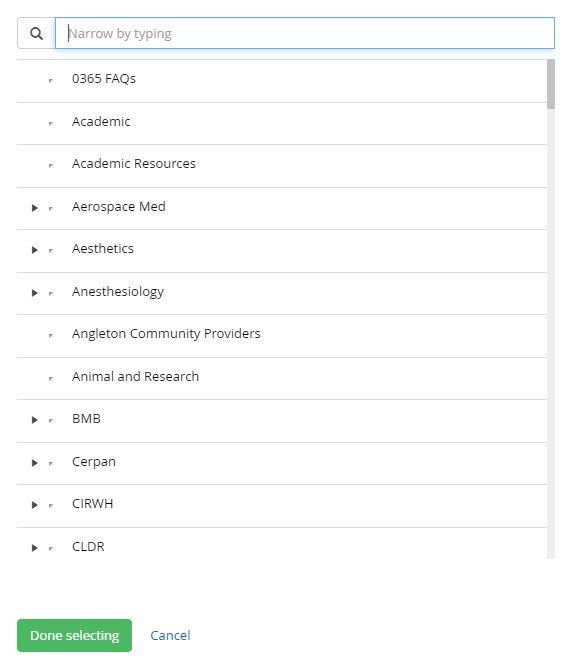
- Type in Authenticated in the search and then select that option. Click the Done selecting button.

- Click the Back to pages link at the top of the page and your page will now be locked down to UTMB employees only.
- On the Pages page, click the (Actions) link of the page you want to lock down to UTMB employees only.
Add Content
Navigation
-
Add a Navigation widget to a page
Within the edit view of a page, you can add the navigation widget to a page.
- On the right side menu, click the Content tab, click the Navigation drop-down menu and find the Navigation widget. Click, hold and drag the Navigation widget onto the desired part of the
page, and then release the navigation widget
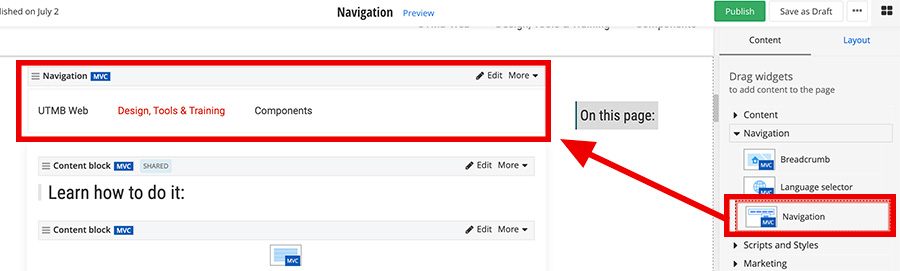
- On the right side menu, click the Content tab, click the Navigation drop-down menu and find the Navigation widget. Click, hold and drag the Navigation widget onto the desired part of the
page, and then release the navigation widget
-
Select which pages to display as links in the navigation
- In the edit view of the page, click edit on the navigation widget.

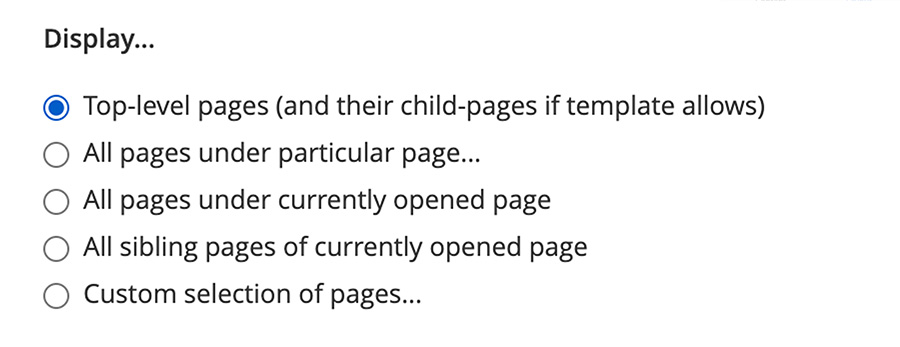
- To choose which pages to display as links in the navigation, select one of the following options:
- Top-level pages (and their child-pages if the widget template allows this)
The Navigation widget displays links to pages that are on top level in the pages' hierarchical structure and have no parent. - All pages under particular page
The Navigation widget displays links to pages that are children of just one specific page.- In the treeview, select the parent page and click Done selecting.
- All pages under currently opened page
The Navigation widget displays links to pages that are children of the currently opened page. - All sibling pages of currently opened page
The Navigation widget displays links only to pages that are siblings of the currently opened page. - Custom selection of pages…
The Navigation widget displays links only to specific pages you select.- In the treeview, select the checkboxes next to the pages that you want to be part of the navigation.
- To add external pages:
- Click the External URLs tab
- Click the Add external URL button
- Enter the title to be displayed on the navigation and the full URL
- Optional: Open external URLs in new tab/window

- When finished, click Done selecting.
- Top-level pages (and their child-pages if the widget template allows this)
- In the edit view of the page, click edit on the navigation widget.
-
Select the depth of the navigation nodes
- In the edit view of the page, click edit on the navigation widget.
- Under Levels to include, choose one of the following options:
- All
When you select a parent or a group page, the Navigation widget always displays its children pages as well. - Number
The Navigation widget displays the children pages only up to a level of your choice. Choose a level from the Number dropdown menu. For example, if you select 2, the system displays only the top two levels of navigation - the top pages and their immediate children.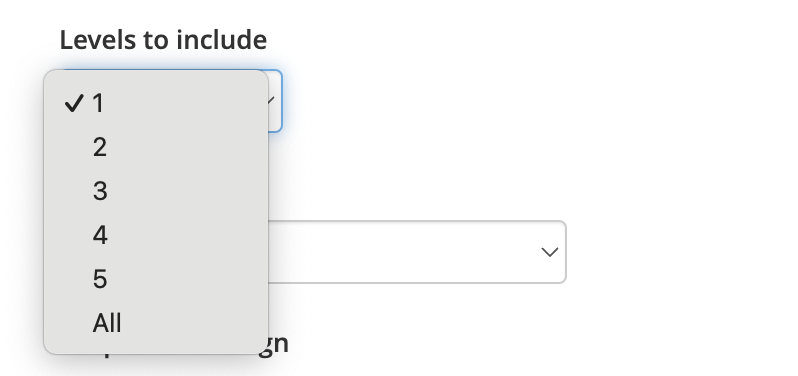
- All
- In the edit view of the page, click edit on the navigation widget.
-
Select the template you want to use for displaying navigation
- In the edit view of the page, click edit on the navigation widget.
- From the Template dropdown menu, select the template you want to use for displaying navigation:
- In the edit view of the page, click edit on the navigation widget.
-
Add CSS classes to a navigation widget on a page
- In the edit view of the page, click edit on the navigation widget.
- Click More options and insert CSS classes in the CSS classes field. Multiple CSS classes can be added but must be separated by a space.
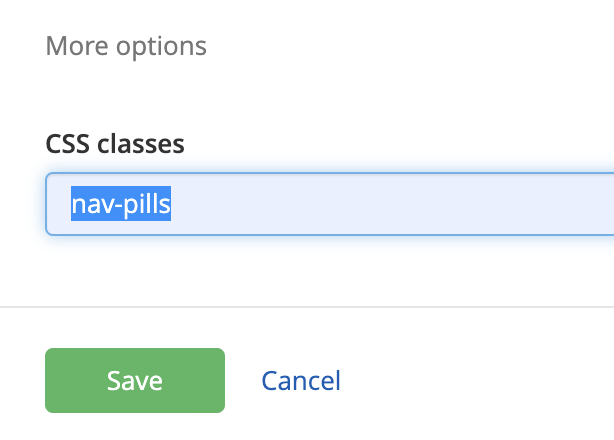
- In the edit view of the page, click edit on the navigation widget.
Breadcrumb Navigation
-
Add a Breadcrumb widget to a page
Within the edit view of a page, you can add the breadcrumb widget to a page.
- On the right side menu, click the Content tab, click the Navigation drop-down menu and find the Breadcrumb widget. Click, hold and drag the Breadcrumb widget onto the desired part of the
page, and then release the widget
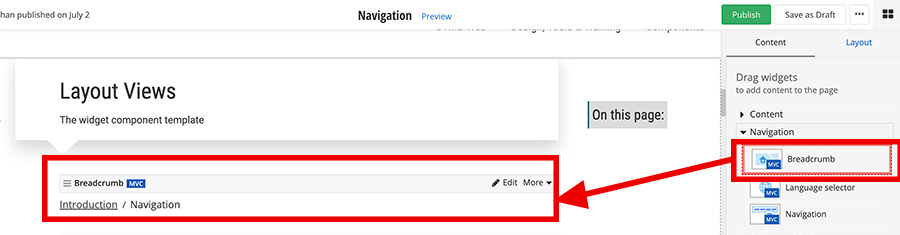
- On the right side menu, click the Content tab, click the Navigation drop-down menu and find the Breadcrumb widget. Click, hold and drag the Breadcrumb widget onto the desired part of the
page, and then release the widget
-
Breadcrumb setup
In the edit view of the page, click edit on the breadcrumb widget.

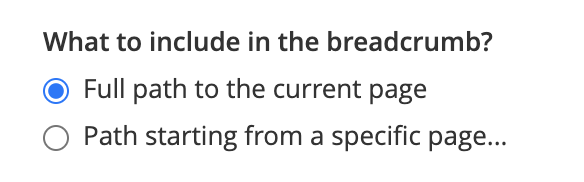
- Under What to include include in the breadcrumb…, choose one of the following radio buttons:
- Full path to the current page
The system displays the full path to the current page, starting from the homepage. - Path starting from a specific page...
The system displays the path from a selected page to the current page.Click Select page and select the page where you want the breadcrumb to begin from.
NOTE: For the breadcrumb to fulfill its purpose, you should select a page that is the parent to the current page.
- Full path to the current page
- Under Show…, choose one or more of the following options:
- Home page link
Displays the home page at the beginning of the breadcrumb. - Current page in the end of the breadcrumb
This displays the current page as a link at the end of the breadcrumb. - Group pages in the breadcrumb
A group page is a container for pages and does not have its own content. It redirects to its first child page.
NOTE: For this option to function as intended, you must also have selected Current page in the end of the breadcrumb.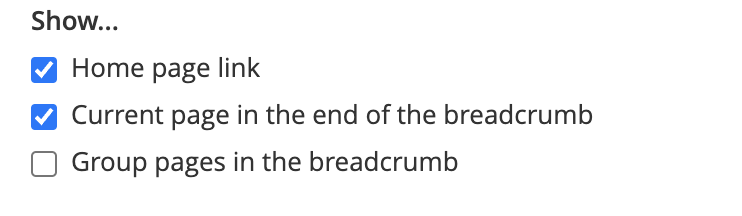
- Home page link
- Under What to include include in the breadcrumb…, choose one of the following radio buttons:
Images
-
Add Image widget to a page
Within the edit view of a page, you can add the image widget to a page.
- On the right side menu, click the Content tab, click the Content drop-down menu and find the Image widget. Click, hold and drag the Image widget onto the desired part of the
page, and then release the image widget
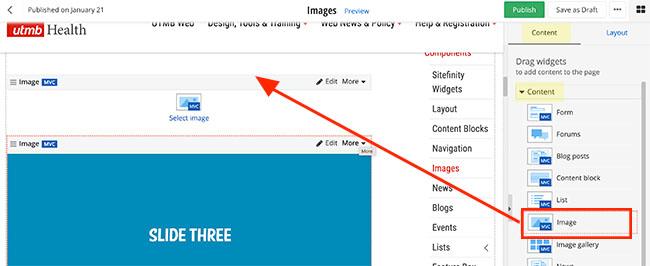
- On the right side menu, click the Content tab, click the Content drop-down menu and find the Image widget. Click, hold and drag the Image widget onto the desired part of the
page, and then release the image widget
-
Add an image using the Image widget
- After you have added the image widget to a page, click the Edit button on the widget

- You can either upload an image from your computer or select a preloaded image. Review how to upload images to a gallery.
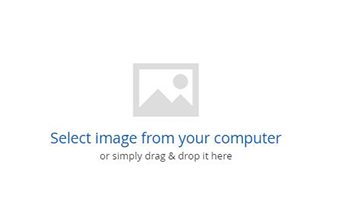
- Upload an image from your computer
- Click the Upload image link in the upper-right-hand corner of the screen
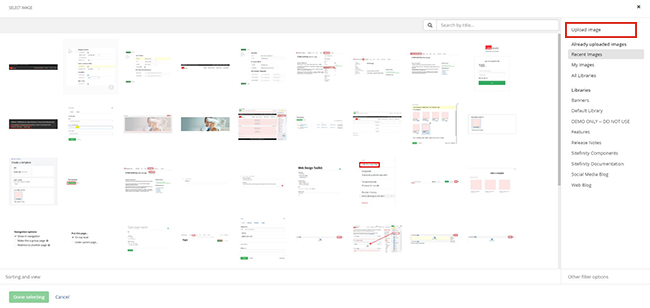
- Click the Select image from your computer link to select a photo or simply drag and drop an image.
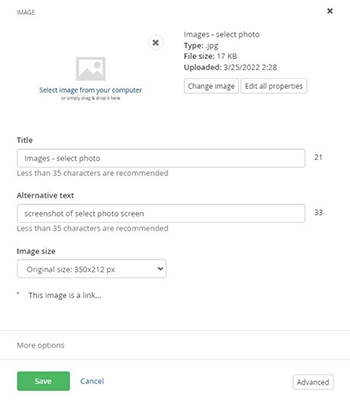
- Select where to store the uploaded image, add a meaningful title and alternative text and click the Upload button
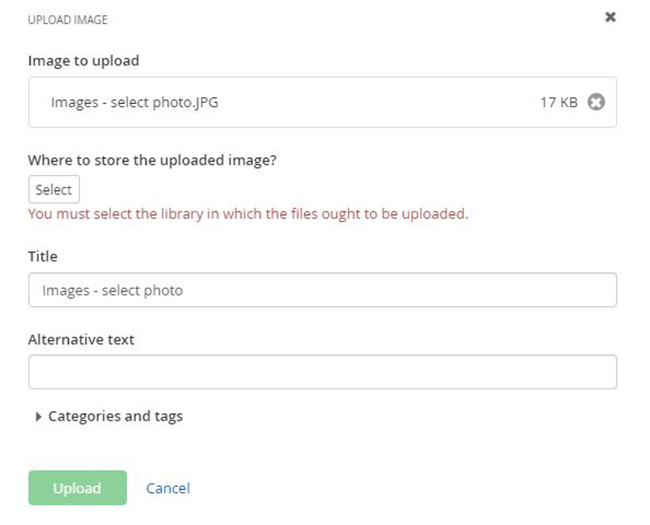
- You can adjust the title and alternative text if needed. Do not adjust the image size on this screen. All cropping and image optimization should be done before it is uploaded to Sitefinity. Click the Save button when complete.
- Click the Upload image link in the upper-right-hand corner of the screen
- Upload an image from your computer
- After you have added the image widget to a page, click the Edit button on the widget
Lists
-
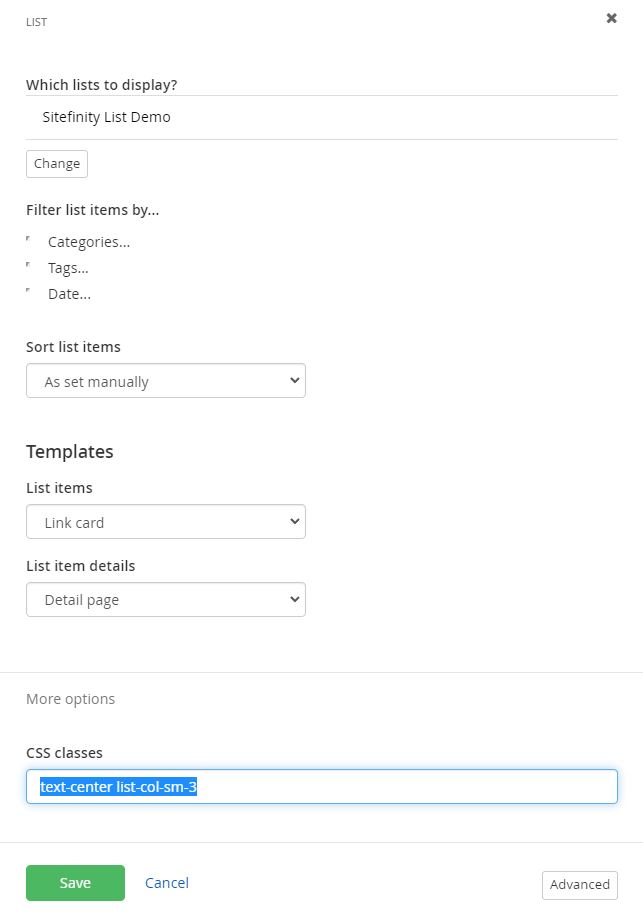
Add CSS classes to a list widget on a page
- In the edit view of the page, click edit on the list widget.
- Click More options and insert CSS classes in the CSS classes field. Multiple CSS classes can be added but must be separated by a space. List widget helper classes can be found on the Sitefinity Cheatsheet.
- In the edit view of the page, click edit on the list widget.
-
Add List widget to a page
Within the edit view of a page, you can add lists to a page. You must create a list first.
- On the right side menu, click the Content tab, click the Content drop-down menu and find the List widget. Click, hold and drag the List widget onto the desired part of the
page, and then release the list widget
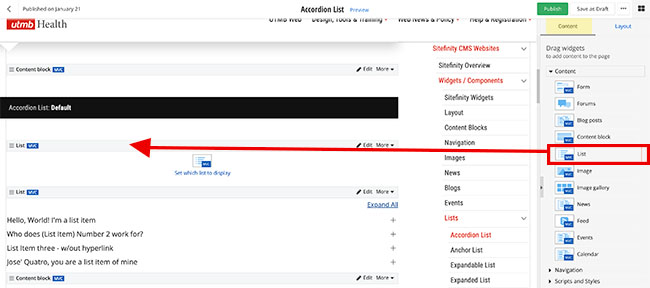
- On the right side menu, click the Content tab, click the Content drop-down menu and find the List widget. Click, hold and drag the List widget onto the desired part of the
page, and then release the list widget
-
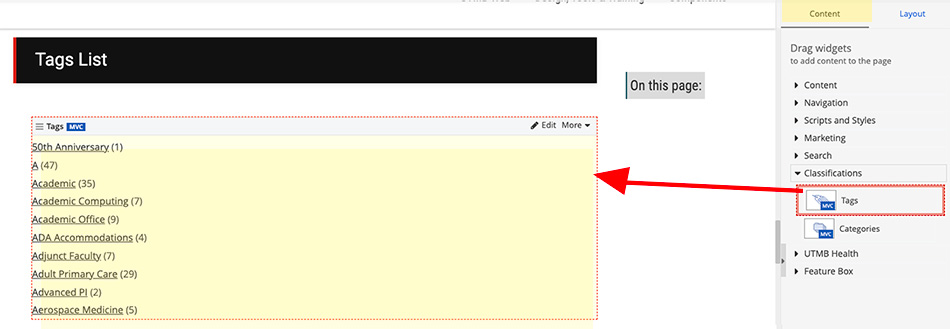
Selecting a List widget template to be displayed on a page
- In the edit view of the page, click edit on the list widget.
- Click the List items drop-down menu under the Templates section
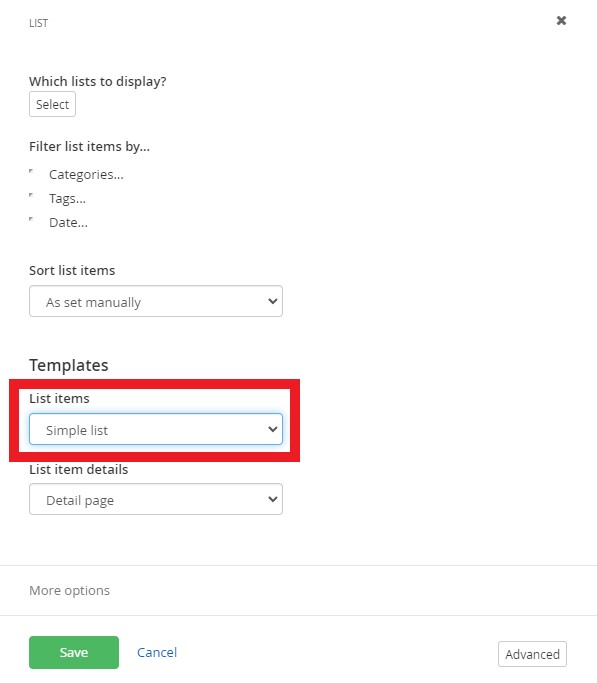
- Select the desired list widget template.
- Click the Save button when complete.
List widget template examples:
Accordion List | Anchor List | Expandable List | Expanded List | Link List | Link Card List | Panel List | Simple List | Tabs List
- In the edit view of the page, click edit on the list widget.
-
Filtering list items with Categories & Tags
You must add categories or tags to a list item before you can apply them to the list widget.
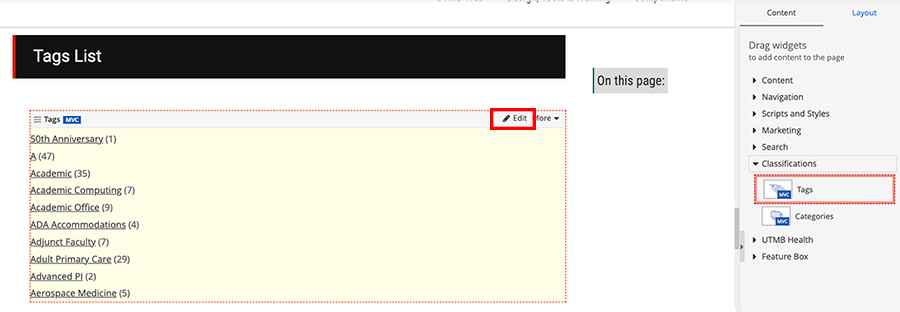
- In the edit view of the page, click edit on the list widget.
- Under the Filter list items by section click the words Categories to filter by categories or Tags to filter by tags.
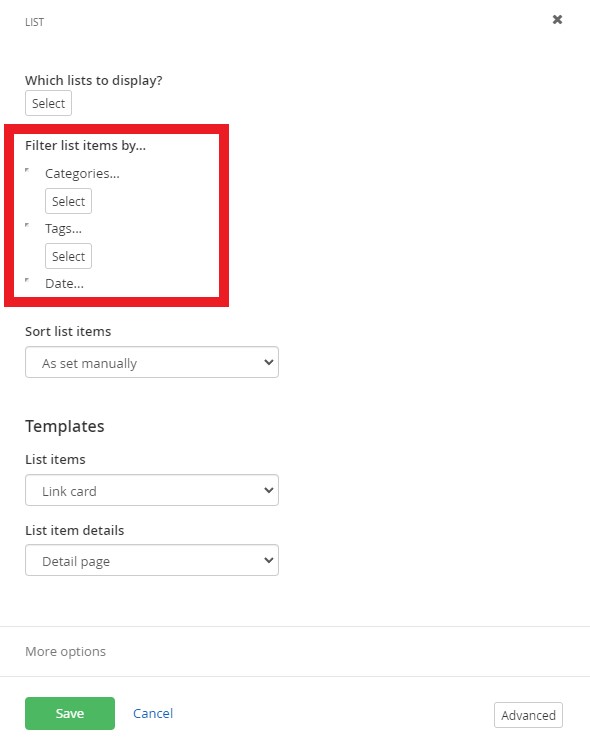
- Click the Select button
- Search for and select the desired category or tag name. You can select multiple categories and tags.
- Click the Done selecting button.
- Click the Save button when complete.
- In the edit view of the page, click edit on the list widget.
Blogs
-
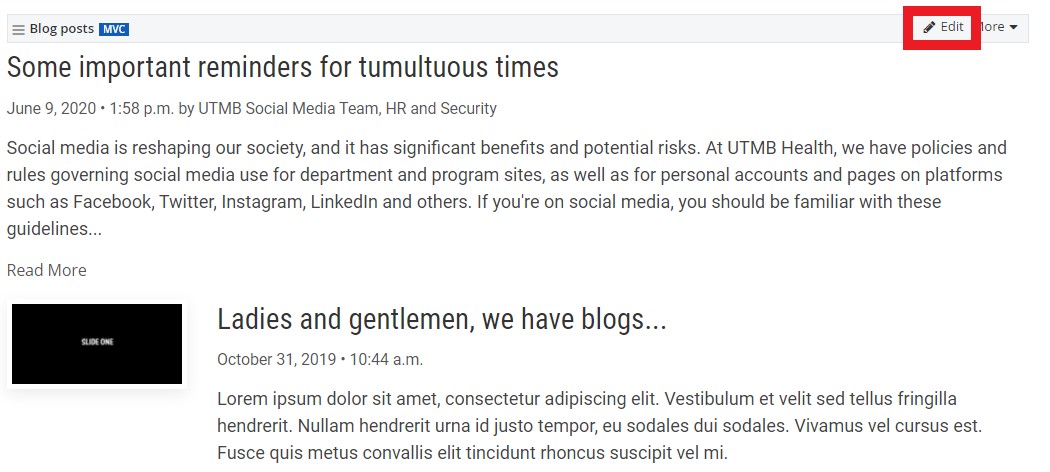
Add Blog widget to a page
Within the edit view of a page, you can add the blog post widget and display blog posts.
- On the right side menu, click the Content tab, click the Content drop down menu and find the Blog posts widget. Click, hold and drag the Blog post widget onto the desired part of the
page, and then release the blog post widget.

- On the right side menu, click the Content tab, click the Content drop down menu and find the Blog posts widget. Click, hold and drag the Blog post widget onto the desired part of the
page, and then release the blog post widget.
-
Selecting which Blogs to display
Within the edit view of a page, you can select which blog post(s) to display.
- After you have added the blog post widget to a page, click the Edit button on the widget
- Under the Content tab, select which blog posts to display
- From all blogs: This is the default setting. This will display all blog posts from all blogs on the website.
- From selected blogs only: you can specify which blogs to display
- From currently open blog: do not use this setting
- Selected blog posts: you can select one or more individual blog posts to display
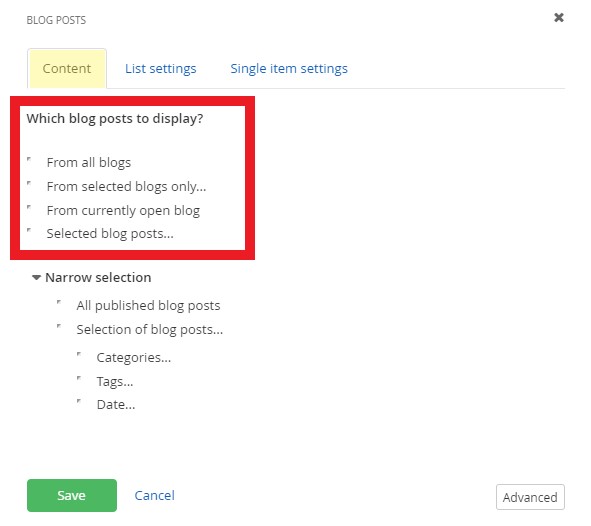
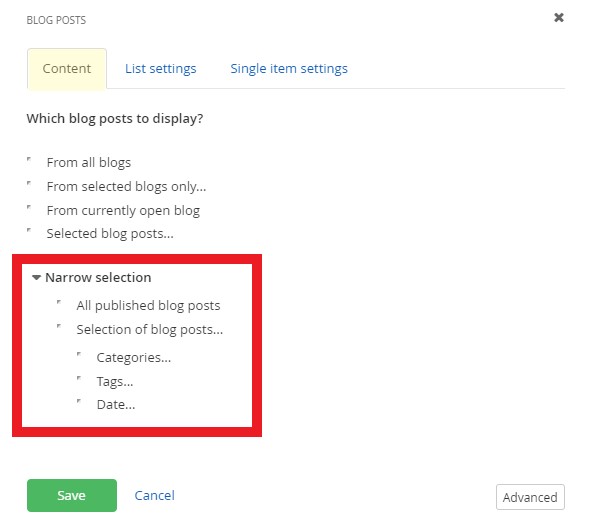
- Narrow selection further
- All published blog posts: This is the default setting. This will display all published blog posts.
- Selection of blog posts: you can add filters for categories, tags, and/or published dates. You must add categories and/or tags to the blog posts before you can add the filter to the blog post widget.
- Click the Save button when finished.
- After you have added the blog post widget to a page, click the Edit button on the widget
-
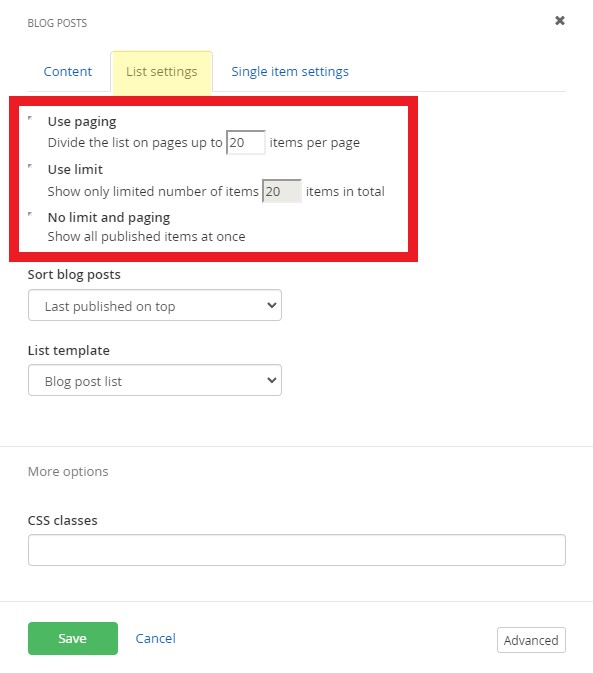
Set the blog post paging & limit the number of items to display
Within the edit view of a page, you can customize how blog posts display.
- After you have added the blog post widget to a page, click the Edit button on the widget
- Under the List settings tab, select the paging and limit settings.
- Use paging: This is the default setting with up to 20 items per page displaying. You can edit the number of items displayed.
- Use Limit: You can limit the number of items displayed.
- No limit and paging: Shows all published items at once. This setting is not recommended.
- After you have added the blog post widget to a page, click the Edit button on the widget
-
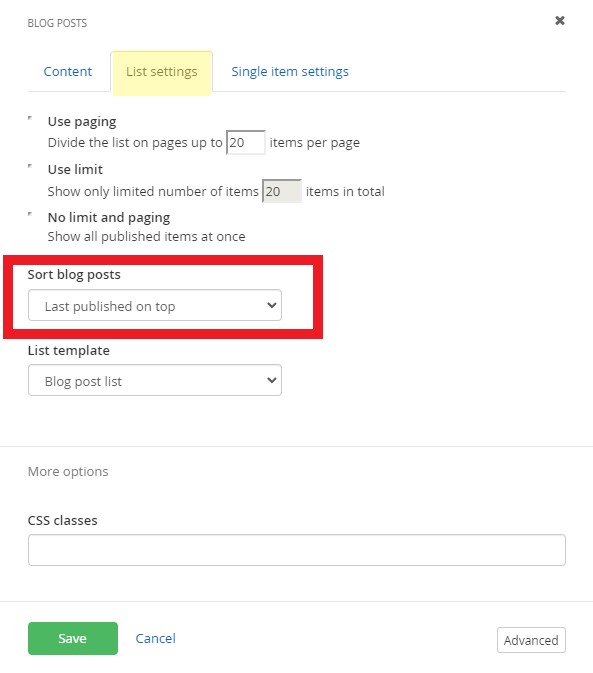
Sort blog posts on a page
Within the edit view of a page, you can sort blog posts with these settings:
- After you have added the blog post widget to a page, click the Edit button on the widget
- Under the List settings tab, select limit settings:
- Last published on top: This is the default setting. Sorts the latest articles that have been published in descending order by date.
- Last modified on top: Sorts the latest articles that have been edited and saved in descending order by date.
- By Title (A-Z): Sorts by the title field of the blog post.
- By Title (Z-A): Sorts by the title field of the blog post.
- As set manually: Sorts by the the order of the blog posts in the blog. You can manually reorder blog posts.
- As set in advanced mode: Do not use this setting
- After you have added the blog post widget to a page, click the Edit button on the widget
-
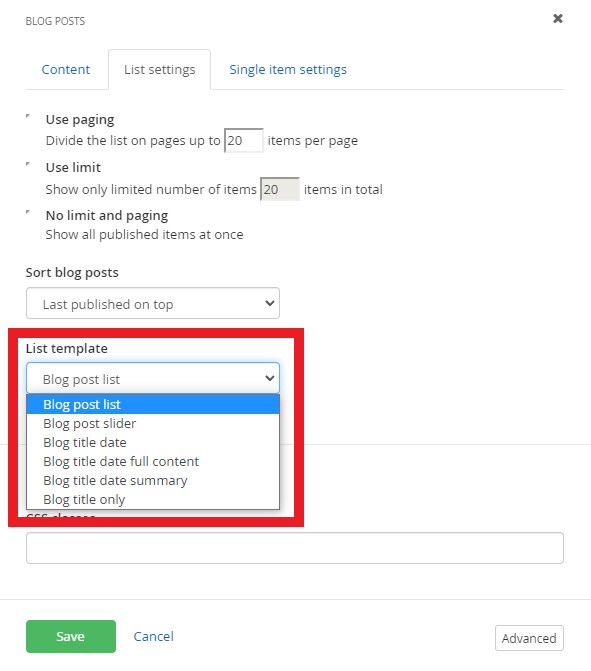
Select the blog post list template (layout)
Within the edit view of a page, you can customize how blog posts display.
- After you have added the blog post widget to a page, click the Edit button on the widget
- Under the List settings tab, select the list template. Learn more about the available templates.
- After you have added the blog post widget to a page, click the Edit button on the widget
-
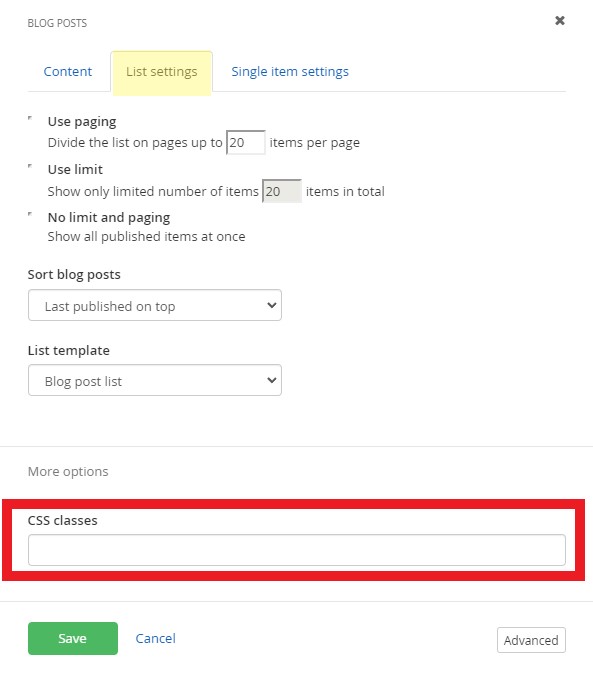
Add CSS classes to a blog widget
Within the edit view of a page, you can customize the style of the blog posts with pre-written CSS classes.
- After you have added the blog post widget to a page, click the Edit button on the widget
- Under the List settings tab, add CSS classes in the More options section.
- Insert CSS classes in the CSS classes field. Multiple CSS classes can be added but must be separated by a space. View pre-written classes for each available template.
- Insert CSS classes in the CSS classes field. Multiple CSS classes can be added but must be separated by a space. View pre-written classes for each available template.
- After you have added the blog post widget to a page, click the Edit button on the widget
-
Customize how the blog post article displays
Within the edit view of a page, you can customize how blog post articles display and select the page that it opens in. You must create a separate page with the blog post widget on it first.
- After you have added the blog post widget to a page, click the Edit button on the widget
- Under the Single item settings tab, select the page that the full article opens in.
- Auto-generated page: This is the default setting and will open the article within the same page. This setting is not recommended.
- Selected existing page: Select the article page with the blog post widget on it.
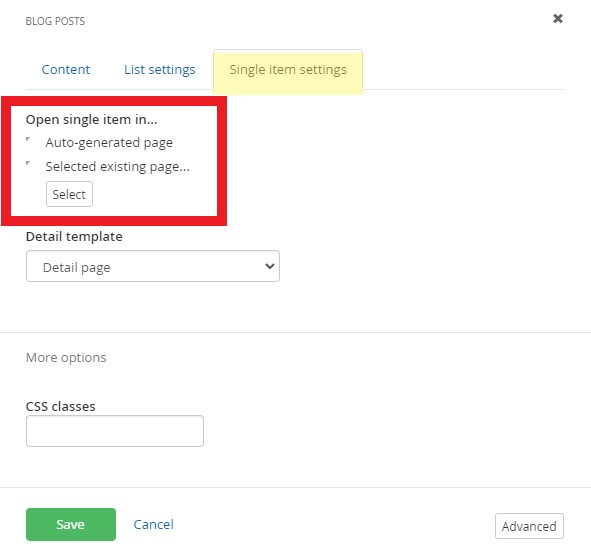
- You can also add custom CSS classes to the article under the More options section. View the blog posts classes and examples.
- After you have added the blog post widget to a page, click the Edit button on the widget
News
-
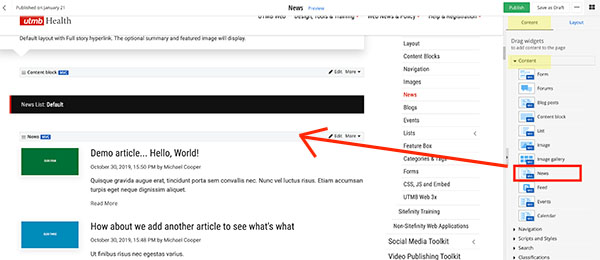
Add News widget to a page
Within the edit view of a page, you can add the news widget and display news posts.
- On the right side menu, click the Content tab, click the Content drop-down menu and find the News widget. Click, hold and drag the News widget onto the desired part of the page, and
then release the news widget
- On the right side menu, click the Content tab, click the Content drop-down menu and find the News widget. Click, hold and drag the News widget onto the desired part of the page, and
then release the news widget
-
Selecting which News items to display
Within the edit view of a page, you can select which news post(s) to display.
- After you have added the news widget to a page, click the Edit button on the widget
- Under the Content tab, select which news to display
- All published news: This is the default setting. This will display all news.
- Selected news: you can specify which news items to display
- Filtered news: you can add filters for categories, tags, and/or published dates. You must add categories and/or tags to the blog posts before
you can add the filter to the blog post widget.
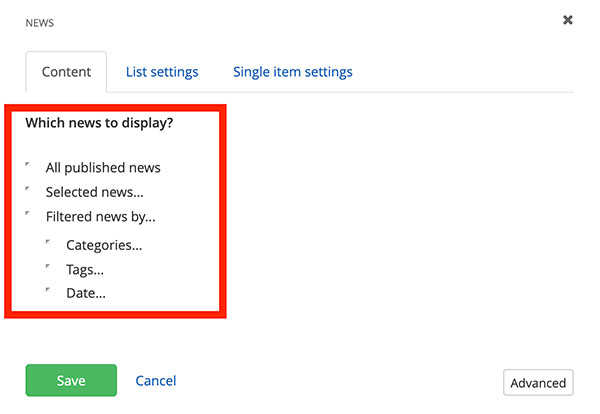
- Click the Save button when finished.
- After you have added the news widget to a page, click the Edit button on the widget
-
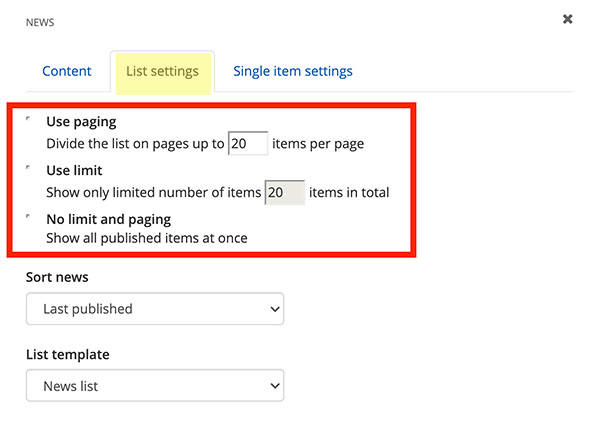
Customize News widget settings
Within the edit view of a page, you can customize how news items display.
- After you have added the News widget to a page, click the Edit button on the widget
- Under the List settings tab, select the paging and limit settings.
- Use paging: This is the default setting with up to 20 items per page displaying. You can edit the number of items displayed.
- Use Limit: You can limit the number of items displayed.
- No limit and paging: Shows all published items at once. This setting is not recommended.
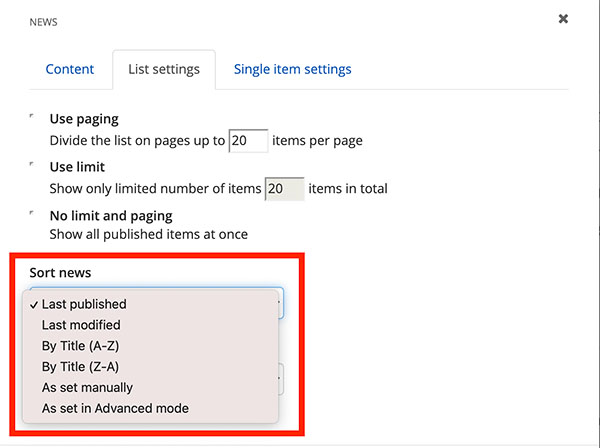
- You can sort news items with these settings:
- Last published on top: This is the default setting. Sorts the latest articles that have been published in descending order by date.
- Last modified on top: Sorts the latest articles that have been edited and saved in descending order by date.
- By Title (A-Z): Sorts by the title field of the blog post.
- By Title (Z-A): Sorts by the title field of the blog post.
- As set manually: Sorts by the order of the blog posts in the blog. You can manually reorder blog posts.
- As set in advanced mode: Do not use this setting.
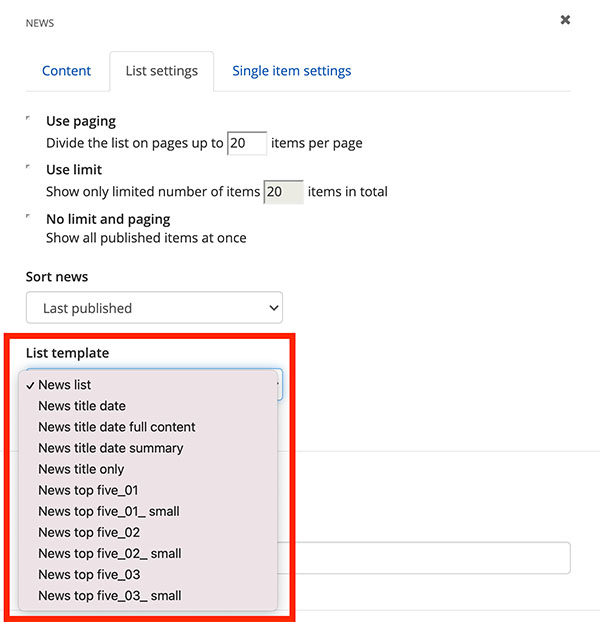
- Select the list template
- News list: This is the default setting. Displays the news item title, date, time, author, summary, and featured image
- News title date: Displays news item title, date, time, author, and featured image
- News title date full content: Displays news item title, date, time, author, content, and featured image
- News title date summary: Displays the news item title, date, time, author, summary, and featured image
- News title only: Displays the news item title and featured image
- News top five_01: See examples on the News widget page
- News top five_01_small: See examples on the News widget page
- News top five_02: See examples on the News widget page
- News top five_02_small: See examples on the News widget page
- News top five_03: See examples on the News widget page
- News top five_03_small: See examples on the News widget page
- Add CSS classes
- Insert CSS classes in the CSS classes field. Multiple CSS classes can be added but must be separated by a space. View the news widget classes and examples.
- Insert CSS classes in the CSS classes field. Multiple CSS classes can be added but must be separated by a space. View the news widget classes and examples.
- Click the Save button with complete.
- After you have added the News widget to a page, click the Edit button on the widget
-
Customize how the news article displays
Within the edit view of a page, you can customize how news articles display and select the page that it opens in. You must create a separate page with the news widget on it first.
- After you have added the news widget to a page, click the Edit button on the widget
- Under the Single item settings tab, select the page that the full article opens in.
- Auto-generated page: This is the default setting and will open the article on the same page. This setting is not recommended.
- Selected existing page: Select the article page with the news widget on it.
- You can also add custom CSS classes to the article under the More options section. View the news widget classes and examples.
- After you have added the news widget to a page, click the Edit button on the widget
Events
-
Add the UTMB events widget to a page
Within the edit view of a page, you can add the UTMB events widget and display a filtered set of events on a page.
- On the right side menu, click the Content tab, click the Scripts and Styles drop-down menu and find the Embed code widget. Click,
hold and drag the Embed code widget to the desired section of the page, and then release the widget

- On the Embed code widget, click edit

- Paste the widget embed code from the UTMB Widget Builder and add a description under more options section

- Preview the page to ensure the events populate and publish when finished
- On the right side menu, click the Content tab, click the Scripts and Styles drop-down menu and find the Embed code widget. Click,
hold and drag the Embed code widget to the desired section of the page, and then release the widget
Content Blocks
-
Add Content Block widget to a page
Within the edit view of a page, you can add the content block widget on a page.
- On the right side menu, click the Content tab, click the Content drop-down menu and find the Content blocks widget. Click, hold and drag the Content blocks widget onto the desired part of
the page, and then release the widget.
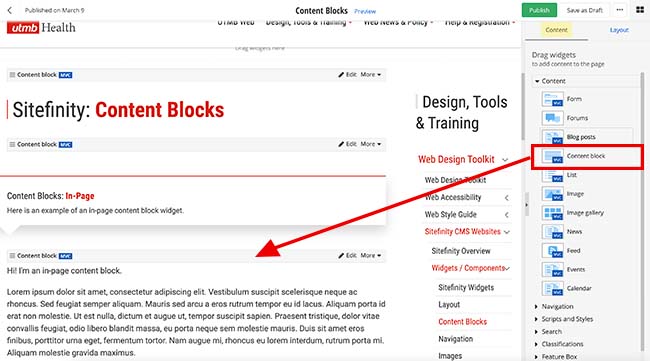
- On the right side menu, click the Content tab, click the Content drop-down menu and find the Content blocks widget. Click, hold and drag the Content blocks widget onto the desired part of
the page, and then release the widget.
-
Edit a Content Block
- After you have added the content block widget to a page, click the Edit button on the widget.

- Click in the content area to add content. Format content using the WYSIWYG Editor (formatting toolbar) and/or edit the HTML by selecting the </> option on the far right of the toolbar. Formatting options include:
- Make the text a paragraph, quotation, heading, bold, or italic
- Change the text color
- Create an unordered and ordered list
- Indent or outdent text
- Create a link
- Add an image
- Create a table
- Align content
- Make text a subscript and a superscript
- Add a horizontal rule
- Remove formatting
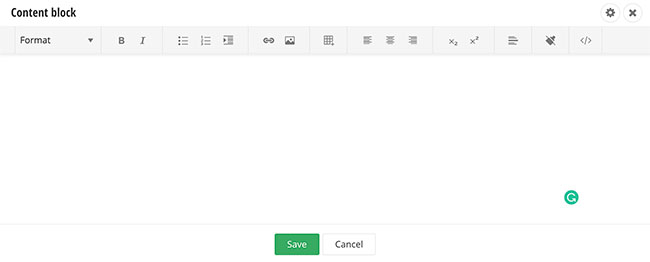
- Click the Save button when finished
- After you have added the content block widget to a page, click the Edit button on the widget.
-
Duplicate, Share or use a Shared Content Block
- After you have added the content block widget to a page, click the More button on the widget
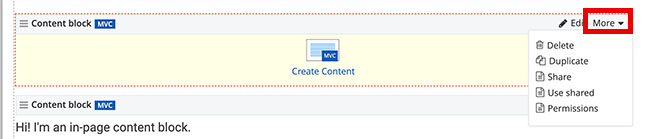
- More options include:
- Delete: This deletes the content block
- Duplicate: This duplicates the content block
- Share: This will create a shared content block. Learn more about shared content blocks.
- Use Shared: You can select a shared content block that has already been created
- Permissions: You can set permissions on who can see and edit the content block
- After you have added the content block widget to a page, click the More button on the widget
-
Adding a background color to a content block
- In the edit view of the page, click edit on the content block.
- Click the advance settings gear icon in the top-right of the content block
- Under the Classes tab, add the desired background CSS classes to the Wrapper CSS class field. Multiple CSS classes can be added but must be separated by a space.
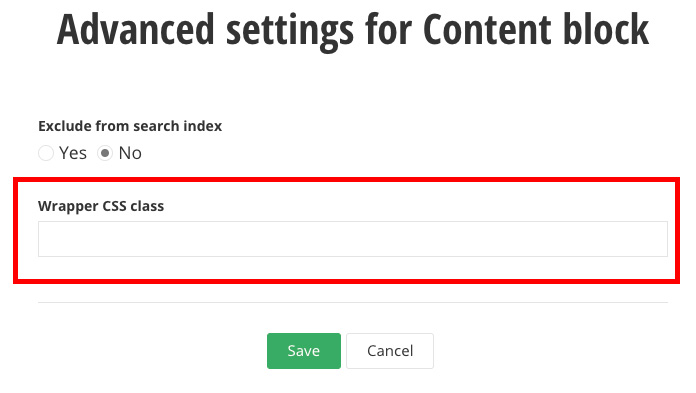
- Click the Save button and then click Save again on the content block.
- In the edit view of the page, click edit on the content block.
Forms
-
Add a Form widget to a page
Within the edit view of a page, you can add the form widget on a page.
- On the right side menu, click the Content tab, click the Content drop-down menu and find the Form widget. Click,
hold and drag the Form widget onto the desired part of the page, and then release the widget.

- On the right side menu, click the Content tab, click the Content drop-down menu and find the Form widget. Click,
hold and drag the Form widget onto the desired part of the page, and then release the widget.
-
Select the Form to display
- After you have added the form widget to a page, click the Edit button on the widget

- Select a form.
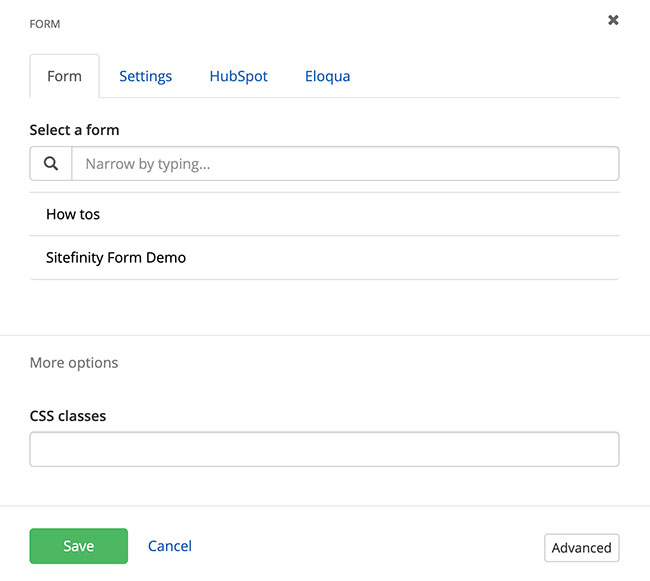
- Click the Save button when complete.
- After you have added the form widget to a page, click the Edit button on the widget
Categories
-
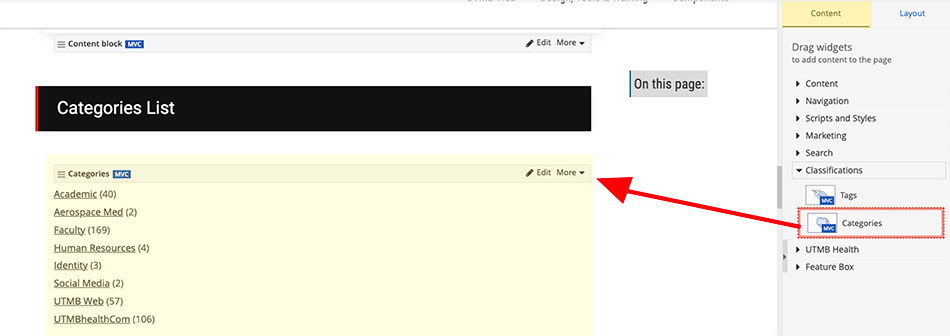
Add Categories widget to a page
Within the edit view of a page, you can add a categories filter to a page. You must apply the categories to a content item first.
- On the right side menu, click the Content tab, click the Classifications drop-down menu and find the Categories widget. Click, hold and drag the Categories widget onto the desired part of the page, and then release the widget.
-
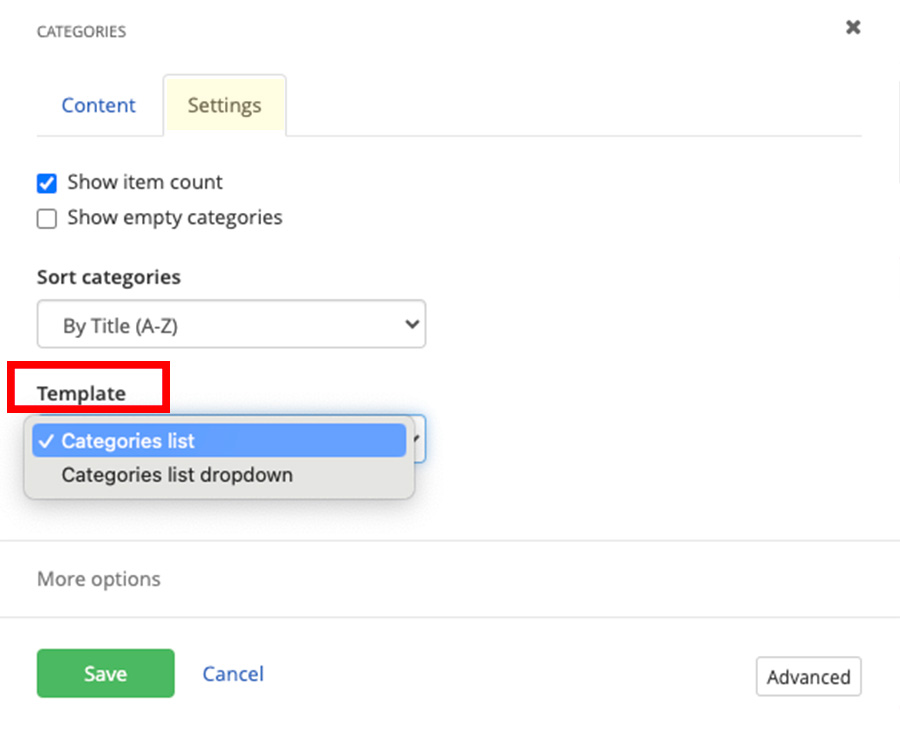
Selecting a Categories widget template to be displayed on a page
Within the edit view of a page, you can add a categories filter to a page. For the filter to be effective, you should have content on the page that has the categories applied to them (i.e. blog posts, list items, events).
- In the edit view of the page, click edit on the Categories widget.
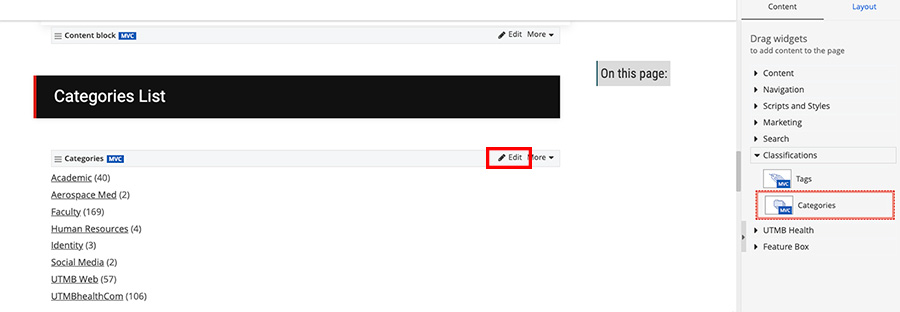
- Click the Setting tab and then select the desired layout under the Template drop-down menu.
- In the edit view of the page, click edit on the Categories widget.
-
Choose which categories to display
After you place the Categories widget on a page, open the widget designer by clicking the Edit button in the upper-right corner of the widget.
Under Which categories to display? select one of the following:
All categories
All categories are displayed in the list.Top level categories only
All top level categories are displayed in the list.All categories under paritcular category
All direct children of a specifically selected category are displayed in the list.
To select a category, click the Select button.Selected categories...
A custom selection of categories is displayed. To select one or more categories you want to display, click the Select button.Only categories used by content type...
A custom selection of categories is displayed. Only categories assigned to the content type items selected are displayed in the list.
In the Settings tab, you can modify the widget behavior:
Show item count
The number of items, to which the category is assigned is displayed.Show empty categories
Categories that are not assigned to any item are displayed.Sort categories
By default, the categories are sorted by category title (A-Z). You can select a different sorting criterion:- By Title (A-Z)
- By Title (Z-A)
- As set manually
This option is available only when you selected specific categories using Selected categories… option. If you select As set manually, categories are displayed in the selected order. - As set in Advanced mode
DO NOT use this setting
-
Create a Categories/tags Subpage
For the categories/tags filtering to function properly, you must build a subpage so that when a user clicks the filter it'll render the filtered results in a separate page.
- Create a page
- You can name this page Categories or Tags, but the page title is your preference
- Put the page under the page with the categories/tags widget on it. This will be the categories/tags subpage.
- Be sure to uncheck Show in navigation
- Drag and drop the content widget that you will be adding categories/tags to. For instance, if you applied categories to blog posts, add the blog widget to this page.
- It is best practice to add the categories/tags widget again to this page in a right or left column. This allows the user to filter when they are on the filtered results page.
- Create a page
-
Render filtered results in the categories/tags subpage
Within the edit view of the categories/tags parent page, you'll need to select where the filtered results are rendered.
- Click edit on the categories/tags widget.
- On the Categories widget:
- Click the Setting tab and then click the Advanced button.
- Click the Model button.
- In the Base URL field add the URL to the page to the categories/tags parent page (i.e. https://www.utmbhealth.com/health-blog)
- In the UrlKeyPrefix field add _
- Click the Save button when finished
- On the tags widget:
- Click the Advanced button.
- Click the Model button.
- In the Base URL field add the URL to the page to the categories/tags parent page (i.e. https://www.utmbhealth.com/health-blog)
- In the UrlKeyPrefix field add _
- Click the Save button when finished
-
Make categories/tags a link
You can make the category/tag link to the subpage to display all content items with the selected category/tag.
- Go to the live category/tag subpage (created in the previous step), click on a category/tag filter, then copy that link. (i.e., https://www.utmb.edu/accessibility/digital/accessibility-news/!_/-in-category/categories/a11y/topics/)
- Add the link (without the specific category/tag) to the blog properties:
- Open the Blog or List properties:
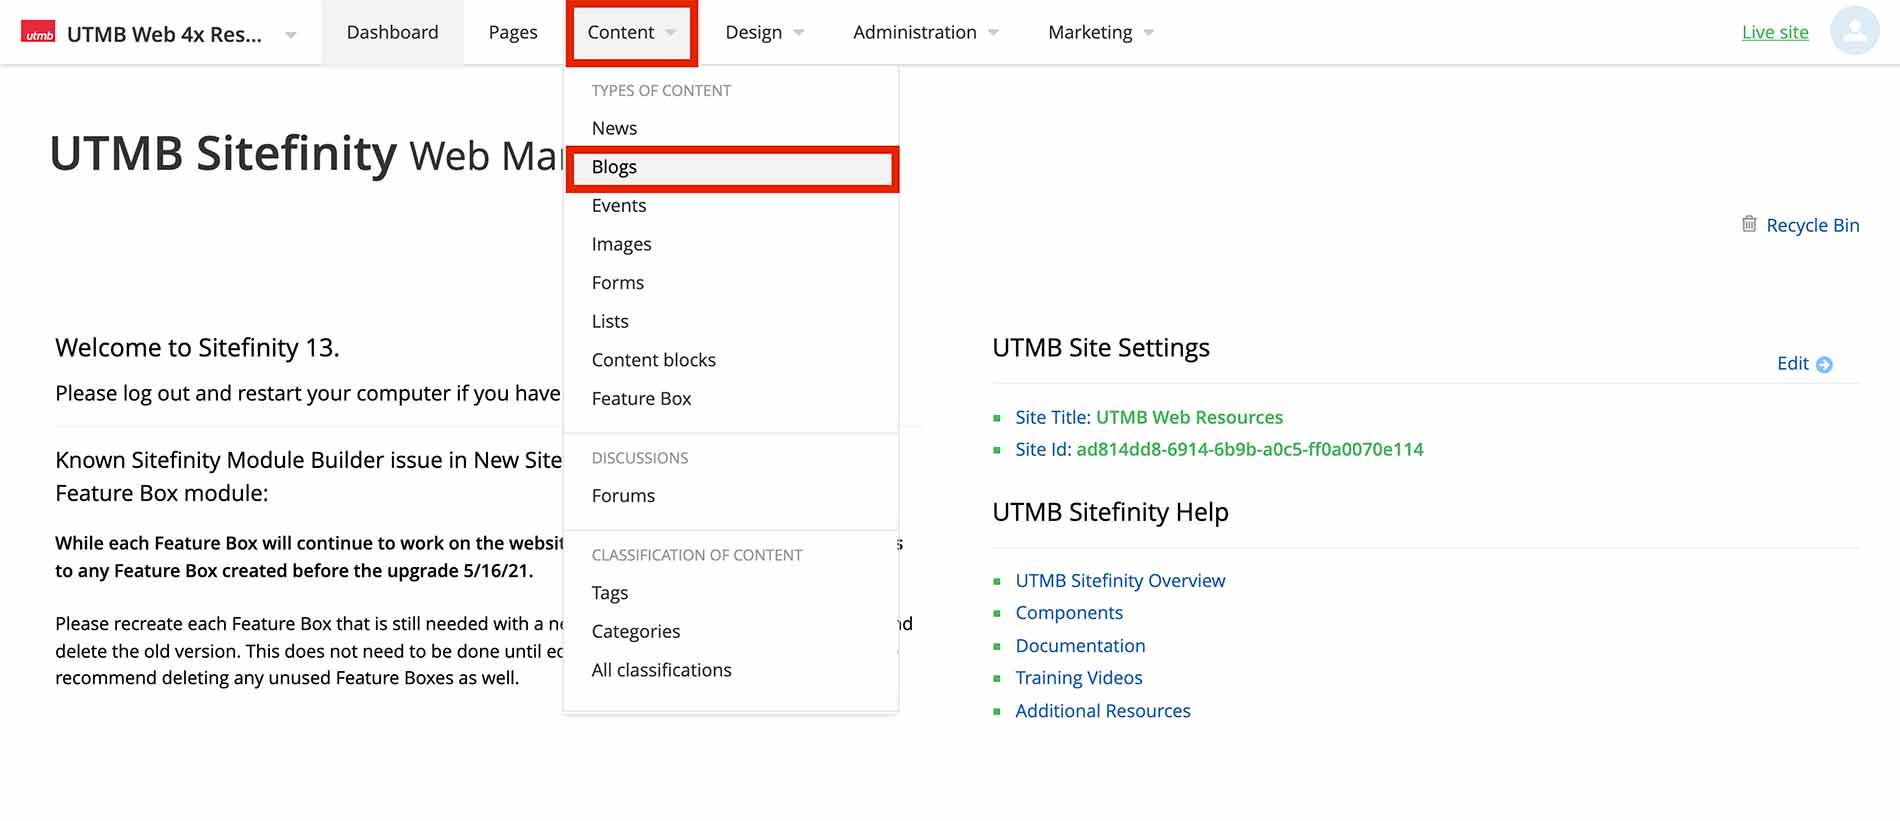
- For Blogs: Click the Content navigation menu item and then select Blogs.
- For Lists: Click the Content navigation menu item and then select Lists.
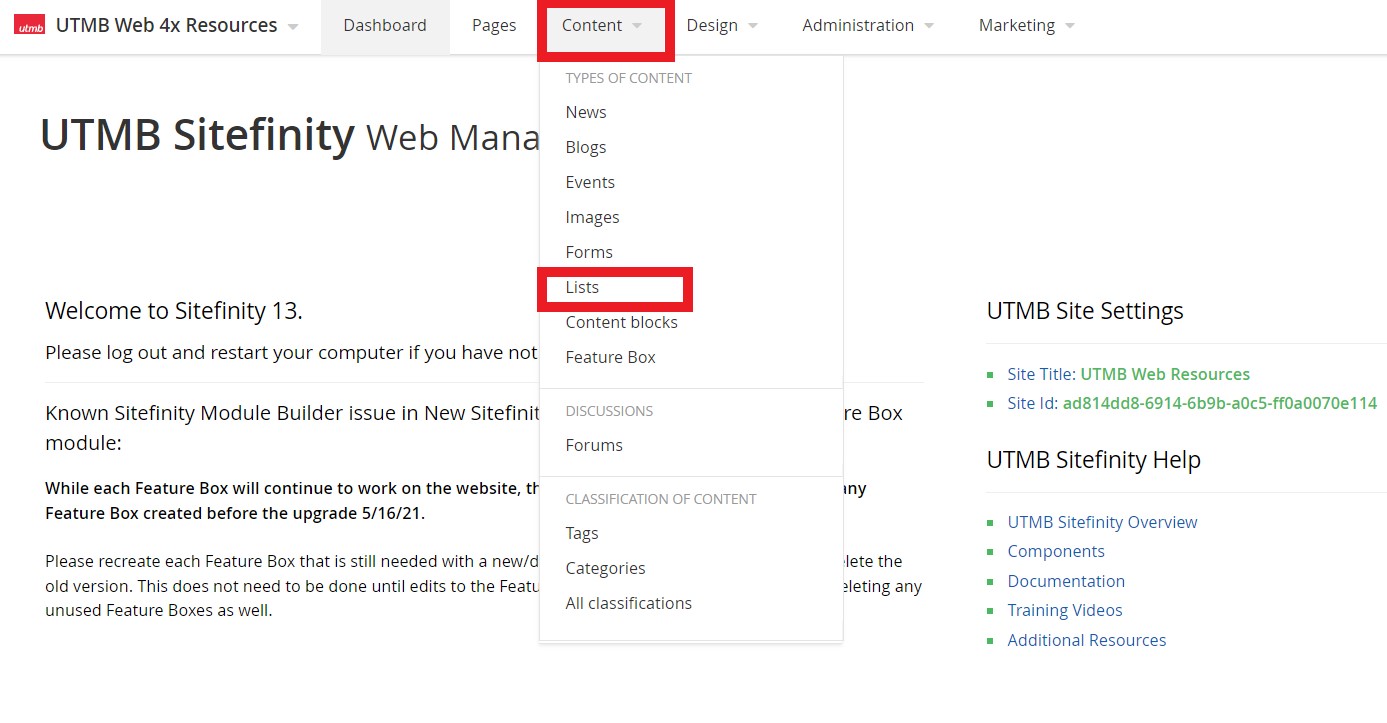
- For Blogs: Click the Content navigation menu item and then select Blogs.
- To the far right of the blog/list that you are filtering, click the three dots under Actions and select Title & properties from the drop-down menu.

- Under the Custom fields section, paste the URL in the Categories URL or Tags URL fields. Be sure to remove any specific categories/tags from the URL and leave off the trailing "/".

- Click Save Changes
- Open the Blog or List properties:
Tags
-
Add Tags widget to a page
Within the edit view of a page, you can add a tags filter to a page. You must apply the tags to a content item first.
- On the right side menu, click the Content tab, click the Classifications drop-down menu and find the Tags widget. Click, hold and drag the Tags widget onto the desired part of the page, and then release the widget.
-
Selecting a Tags widget template to be displayed on a page
Within the edit view of a page, you can add a tag filter to a page. For the filter to be effective, you should have content on the page that has the tags applied to them (i.e. blog posts, list items, events).
- In the edit view of the page, click edit on the Tags widget.
- Select the desired layout under the Template drop-down menu.
- In the edit view of the page, click edit on the Tags widget.
-
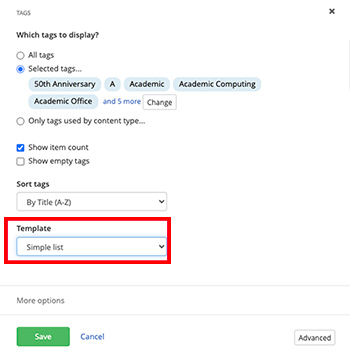
Choose which tags to display
After you place the Tags widget on a page, open the widget designer by clicking the Edit button in the upper-right corner of the widget.
Under Which tags to display? select one of the following:
- All tags
All tags will be displayed in the list. - Selected tags...
A custom selection of tags is displayed. To select one or more tags you want to display, click the Select button. - Only tags used by content type...
A custom selection of tags is displayed. Only tags assigned to the selected content type items will be displayed in the list.
- All tags
- Show item count
The count of all items to which the tag is assigned is displayed. - Show empty tags
Tags that are not assigned to any item are displayed. - Sort tags
By default, tags are sorted by their title (A-Z). You can select a different sorting criterion:- By Title (A-Z)
- By Title (Z-A)
- As set manually
This option is available only when you have selected specific tags using Selected tags… option. If you select As set manually, tags are displayed in the selected order. - As set in Advanced mode
DO NOT use this setting
-
Create a Categories/tags Subpage
For the categories/tags filtering to function properly, you must build a subpage so that when a user clicks the filter it'll render the filtered results in a separate page.
- Create a page
- You can name this page Categories or Tags, but the page title is your preference
- Put the page under the page with the categories/tags widget on it. This will be the categories/tags subpage.
- Be sure to uncheck Show in navigation
- Drag and drop the content widget that you will be adding categories/tags to. For instance, if you applied categories to blog posts, add the blog widget to this page.
- It is best practice to add the categories/tags widget again to this page in a right or left column. This allows the user to filter when they are on the filtered results page.
- Create a page
-
Render filtered results in the categories/tags subpage
Within the edit view of the categories/tags parent page, you'll need to select where the filtered results are rendered.
- Click edit on the categories/tags widget.
- On the Categories widget:
- Click the Setting tab and then click the Advanced button.
- Click the Model button.
- In the Base URL field add the URL to the page to the categories/tags parent page (i.e. https://www.utmbhealth.com/health-blog)
- In the UrlKeyPrefix field add _
- Click the Save button when finished
- On the tags widget:
- Click the Advanced button.
- Click the Model button.
- In the Base URL field add the URL to the page to the categories/tags parent page (i.e. https://www.utmbhealth.com/health-blog)
- In the UrlKeyPrefix field add _
- Click the Save button when finished
-
Make categories/tags a link
You can make the category/tag link to the subpage to display all content items with the selected category/tag.
- Go to the live category/tag subpage (created in the previous step), click on a category/tag filter, then copy that link. (i.e., https://www.utmb.edu/accessibility/digital/accessibility-news/!_/-in-category/categories/a11y/topics/)
- Add the link (without the specific category/tag) to the blog properties:
- Open the Blog or List properties:
- For Blogs: Click the Content navigation menu item and then select Blogs.
- For Lists: Click the Content navigation menu item and then select Lists.
- For Blogs: Click the Content navigation menu item and then select Blogs.
- To the far right of the blog/list that you are filtering, click the three dots under Actions and select Title & properties from the drop-down menu.
- Under the Custom fields section, paste the URL in the Categories URL or Tags URL fields. Be sure to remove any specific categories/tags from the URL and leave off the trailing "/".
- Click Save Changes
- Open the Blog or List properties:
Feature Box
-
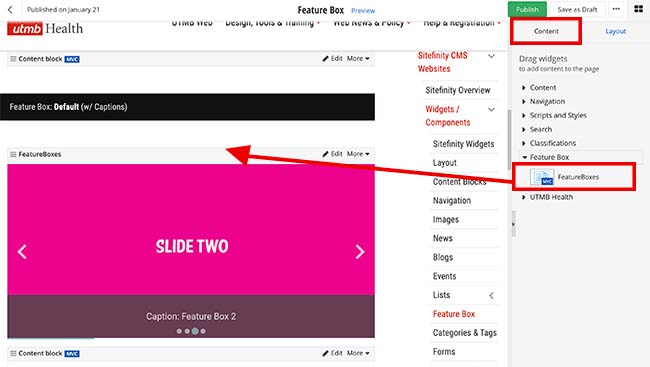
Add Feature box to a page
Within the edit view of a page, you can add the Feature box widget to a page.
- On the right side menu, click the Content tab, click the Feature Box drop-down menu and find the FeatureBoxes widget.
Click, hold and drag the FeatureBoxes widget onto the desired part of the page, and then release the FeatureBoxes widget
- On the right side menu, click the Content tab, click the Feature Box drop-down menu and find the FeatureBoxes widget.
Click, hold and drag the FeatureBoxes widget onto the desired part of the page, and then release the FeatureBoxes widget
-
Selecting which Feature boxes to display
Within the edit view of a page, you can select which feature boxes to display
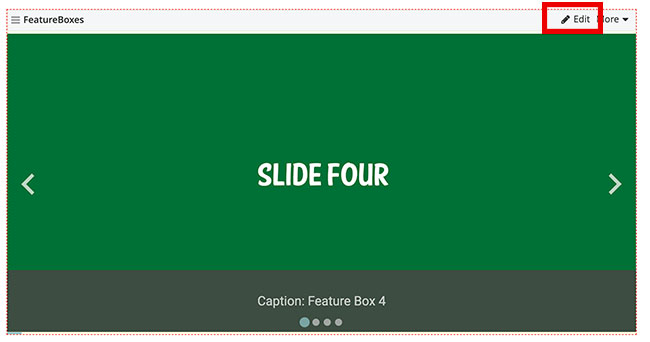
- After you have added the FeatureBoxes widget to a page, click the Edit button on the widget
- Under the Content tab, select which feature boxes to display
- From all featurecollections: This is the default setting. This will display all feature boxes from all feature collections on the website.
- From selected featurecollections only: This will display all feature boxes from a selected feature collection
- From currently open featurecollection: Do not use this setting
- Selected featureboxes: you can select one or more individual feature boxes to display
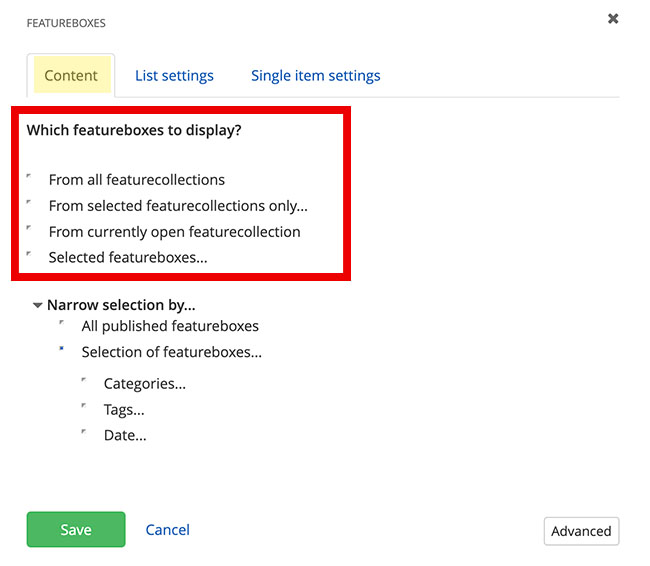
- Narrow selection further
- All published featureboxes: This is the default setting. This will display all published feature boxes.
- Selection of featureboxes: you can add filters for categories, tags, and/or published dates. You must add categories and/or tags to the feature boxes before you can add the filter to the feature boxes widget.

- Click the Save button when finished.
- After you have added the FeatureBoxes widget to a page, click the Edit button on the widget
-
Customize Feature box settings
Within the edit view of a page, you can customize how feature boxes display.
- After you have added the feature box widget to a page, click the Edit button on the widget
- Under the List settings tab, select the paging and limit settings.
- Use paging: This is the default setting with up to 20 items per page displaying. You can edit the number of items displayed. This setting does not work.
- Use Limit: You can limit the number of items displayed.
- No limit and paging: Shows all published items.
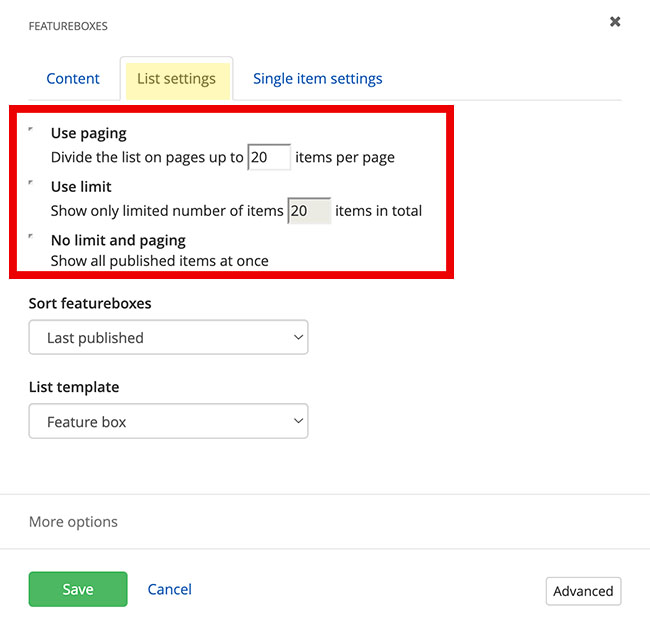
- You can sort feature boxes with these settings:
- Last published: This is the default setting. Sorts the latest feature boxes that have been published in descending order by date.
- Last modified: Sorts the latest feature boxes that have been edited and saved in descending order by date.
- By Title (A-Z): Sorts by the title field of the feature box.
- By Title (Z-A): Sorts by the title field of the feature box.
- As set manually: Sorts by the the order of the feature boxes in the feature collection. You can manually reorder feature boxes.
- As set in advanced mode: Do not use this setting
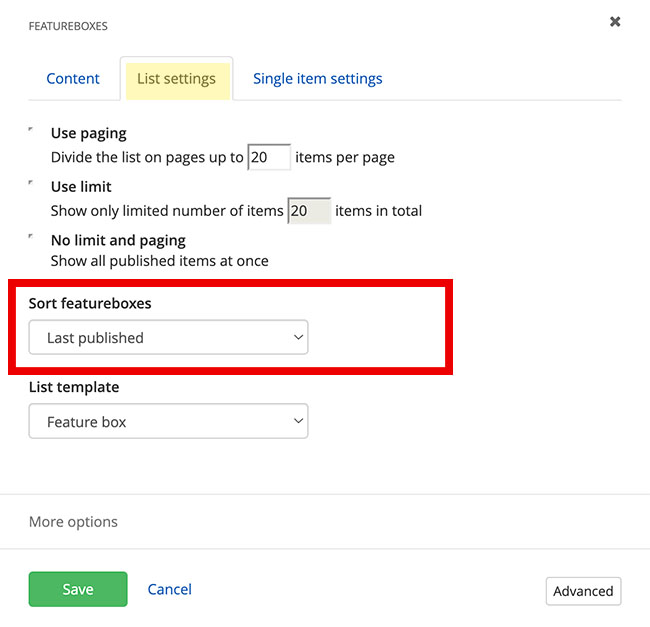
- Click the Save button when finished.
- After you have added the feature box widget to a page, click the Edit button on the widget
Related Training Videos
Always click the Publish, Save as Draft or Schedule when you are finished editing a list item or page to save your work.