Classify Content: Categories & Tags
Categories and tags help organize and filter content items, such as lists, blogs, events, and images. After categories and/or tags have been created and applied to content items, the category or tag widget can be added to a page, allowing the user to click on a desired category/tag to filter the content on the page.
Categories and tags can also be applied to content items to only display specific content items on a page.
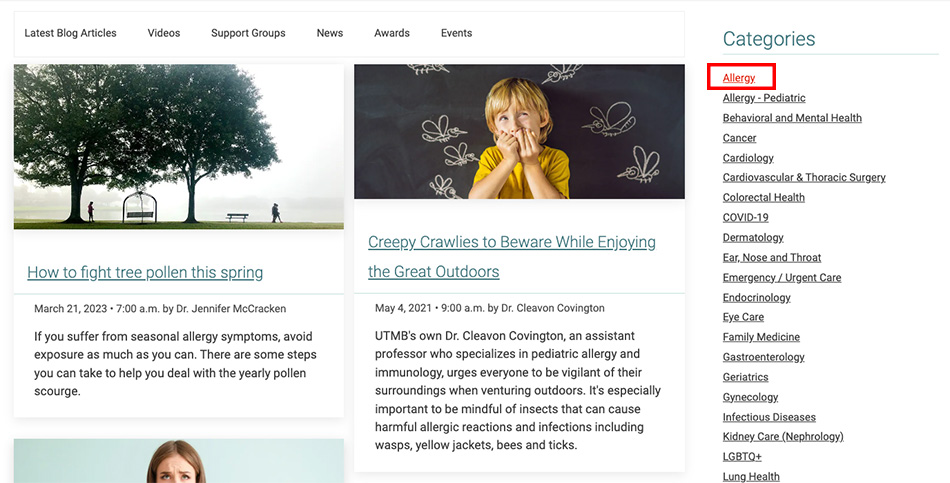
The Health Blog example below displays the category widget in the right column with the Allergy category selected. The blog list in the left column shows only blog posts with the Allergy category applied to them. When a specific category is selected, a unique URL will be rendered in the browser's address bar. This example created the URL: https://www.utmbhealth.com/health-blog/!_/-in-category/categories/utmbhealthcom/health-blog/allergy.
Before getting started learn the basics:
-
Add Categories and Tags
Adding categories/tags allows the user to click on a desired category/tag to filter the content on the page. It can also filter specific items to be displayed on a page. You can add multiple categories and tags to content items such as lists, blogs, events, and images.

Adding Categories
- Click the plus symbol under the Categories section.
- Begin typing a category name to choose a predefined category, select create a category* (see note below), or select show all categories to select from the category list
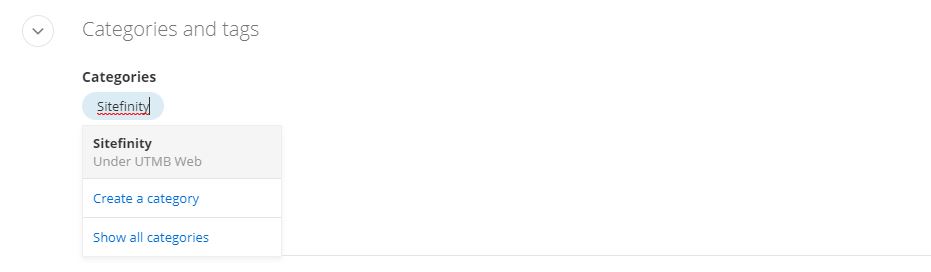
*NOTE: Any new category created should be saved under the site's parent category. Email sitefinity@utmb.edu for assistance in organizing new categories.
Adding Tags
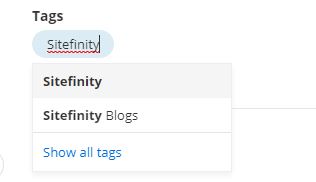
- Click the plus symbol under the Tags section.
- Begin typing a tag name to create a new tag or select a predefined tag. You can also select Show all tags to search through the predefined tags.
Layout Views
The widget component template
Learn how to do it:
-
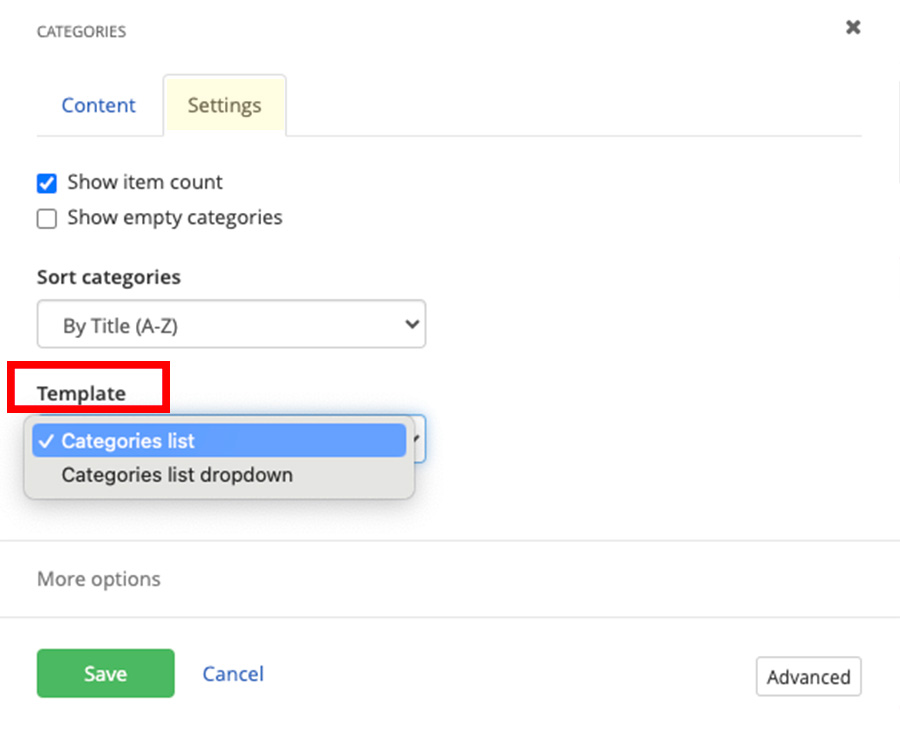
Selecting a Categories widget template to be displayed on a page
Within the edit view of a page, you can add a categories filter to a page. For the filter to be effective, you should have content on the page that has the categories applied to them (i.e. blog posts, list items, events).
- In the edit view of the page, click edit on the Categories widget.
- Click the Setting tab and then select the desired layout under the Template drop-down menu.
- In the edit view of the page, click edit on the Categories widget.
-
Selecting a Tags widget template to be displayed on a page
Within the edit view of a page, you can add a tag filter to a page. For the filter to be effective, you should have content on the page that has the tags applied to them (i.e. blog posts, list items, events).
- In the edit view of the page, click edit on the Tags widget.
- Select the desired layout under the Template drop-down menu.
- In the edit view of the page, click edit on the Tags widget.
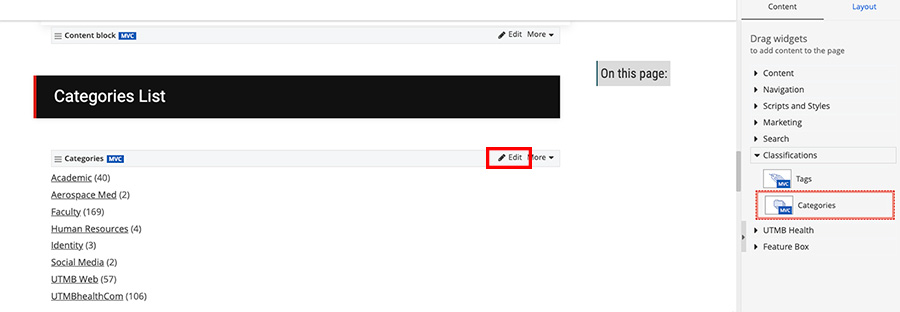
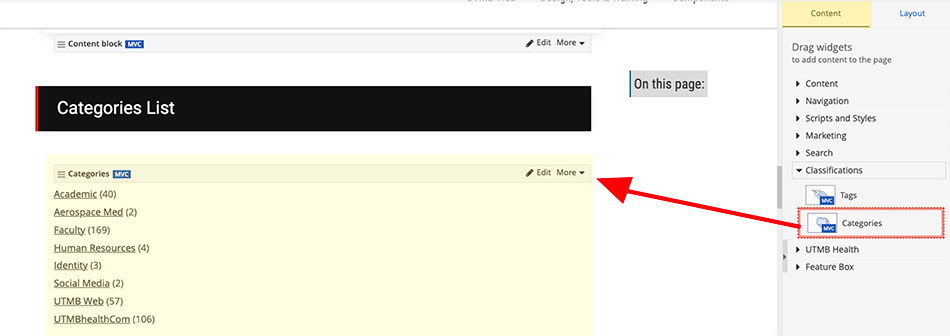
Categories List
- Academic (38)
- Aerospace Med (4)
- Faculty (170)
- Human Resources (4)
- Identity (3)
- Leadership (3)
- Social Media (2)
- UTMB Web (58)
- UTMBhealthCom (107)
Categories List Dropdown
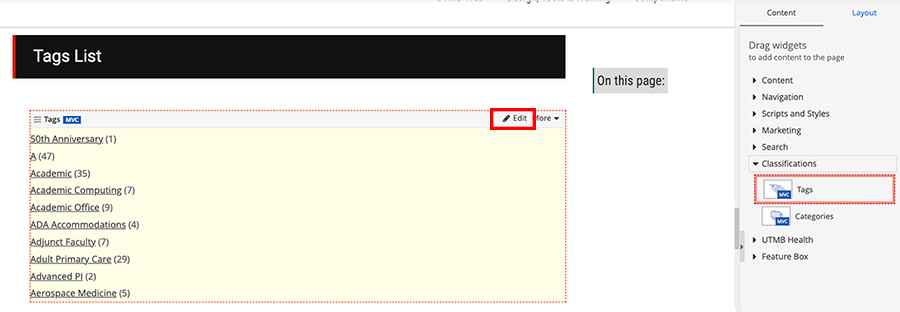
Tags List
Tags List Dropdown
Tags List - Cloud List
Tags List - Tag Cloud
Customizations
Customize with CSS Classes.
Learn how to do it:
-
Choose which categories to display
After you place the Categories widget on a page, open the widget designer by clicking the Edit button in the upper-right corner of the widget.
Under Which categories to display? select one of the following:
All categories
All categories are displayed in the list.Top level categories only
All top level categories are displayed in the list.All categories under paritcular category
All direct children of a specifically selected category are displayed in the list.
To select a category, click the Select button.Selected categories...
A custom selection of categories is displayed. To select one or more categories you want to display, click the Select button.Only categories used by content type...
A custom selection of categories is displayed. Only categories assigned to the content type items selected are displayed in the list.
In the Settings tab, you can modify the widget behavior:
Show item count
The number of items, to which the category is assigned is displayed.Show empty categories
Categories that are not assigned to any item are displayed.Sort categories
By default, the categories are sorted by category title (A-Z). You can select a different sorting criterion:- By Title (A-Z)
- By Title (Z-A)
- As set manually
This option is available only when you selected specific categories using Selected categories… option. If you select As set manually, categories are displayed in the selected order. - As set in Advanced mode
DO NOT use this setting
-
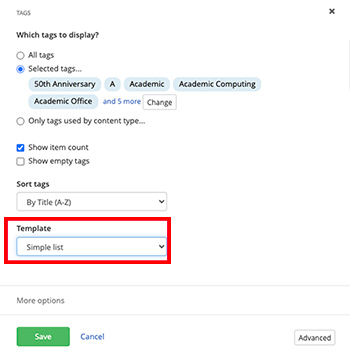
Choose which tags to display
After you place the Tags widget on a page, open the widget designer by clicking the Edit button in the upper-right corner of the widget.
Under Which tags to display? select one of the following:
- All tags
All tags will be displayed in the list. - Selected tags...
A custom selection of tags is displayed. To select one or more tags you want to display, click the Select button. - Only tags used by content type...
A custom selection of tags is displayed. Only tags assigned to the selected content type items will be displayed in the list.
- All tags
- Show item count
The count of all items to which the tag is assigned is displayed. - Show empty tags
Tags that are not assigned to any item are displayed. - Sort tags
By default, tags are sorted by their title (A-Z). You can select a different sorting criterion:- By Title (A-Z)
- By Title (Z-A)
- As set manually
This option is available only when you have selected specific tags using Selected tags… option. If you select As set manually, tags are displayed in the selected order. - As set in Advanced mode
DO NOT use this setting
Hide item count
Categories Refer to the Learn how to do it section above
Tags Refer to the Learn how to do it section above
Training
Add Tags and Categories to content
-
Add Categories and Tags
Adding categories/tags allows the user to click on a desired category/tag to filter the content on the page. It can also filter specific items to be displayed on a page. You can add multiple categories and tags to content items such as lists, blogs, events, and images.
Adding Categories
- Click the plus symbol under the Categories section.
- Begin typing a category name to choose a predefined category, select create a category* (see note below), or select show all categories to select from the category list
*NOTE: Any new category created should be saved under the site's parent category. Email sitefinity@utmb.edu for assistance in organizing new categories.
Adding Tags
- Click the plus symbol under the Tags section.
- Begin typing a tag name to create a new tag or select a predefined tag. You can also select Show all tags to search through the predefined tags.
Add Categories to a page
-
Add Categories widget to a page
Within the edit view of a page, you can add a categories filter to a page. You must apply the categories to a content item first.
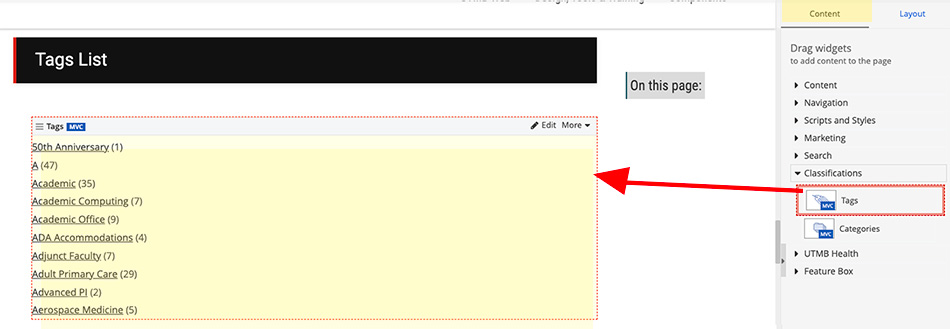
- On the right side menu, click the Content tab, click the Classifications drop-down menu and find the Categories widget. Click, hold and drag the Categories widget onto the desired part of the page, and then release the widget.
-
Selecting a Categories widget template to be displayed on a page
Within the edit view of a page, you can add a categories filter to a page. For the filter to be effective, you should have content on the page that has the categories applied to them (i.e. blog posts, list items, events).
- In the edit view of the page, click edit on the Categories widget.
- Click the Setting tab and then select the desired layout under the Template drop-down menu.
- In the edit view of the page, click edit on the Categories widget.
-
Choose which categories to display
After you place the Categories widget on a page, open the widget designer by clicking the Edit button in the upper-right corner of the widget.
Under Which categories to display? select one of the following:
All categories
All categories are displayed in the list.Top level categories only
All top level categories are displayed in the list.All categories under paritcular category
All direct children of a specifically selected category are displayed in the list.
To select a category, click the Select button.Selected categories...
A custom selection of categories is displayed. To select one or more categories you want to display, click the Select button.Only categories used by content type...
A custom selection of categories is displayed. Only categories assigned to the content type items selected are displayed in the list.
In the Settings tab, you can modify the widget behavior:
Show item count
The number of items, to which the category is assigned is displayed.Show empty categories
Categories that are not assigned to any item are displayed.Sort categories
By default, the categories are sorted by category title (A-Z). You can select a different sorting criterion:- By Title (A-Z)
- By Title (Z-A)
- As set manually
This option is available only when you selected specific categories using Selected categories… option. If you select As set manually, categories are displayed in the selected order. - As set in Advanced mode
DO NOT use this setting
-
Create a Categories/tags Subpage
For the categories/tags filtering to function properly, you must build a subpage so that when a user clicks the filter it'll render the filtered results in a separate page.
- Create a page
- You can name this page Categories or Tags, but the page title is your preference
- Put the page under the page with the categories/tags widget on it. This will be the categories/tags subpage.
- Be sure to uncheck Show in navigation
- Drag and drop the content widget that you will be adding categories/tags to. For instance, if you applied categories to blog posts, add the blog widget to this page.
- It is best practice to add the categories/tags widget again to this page in a right or left column. This allows the user to filter when they are on the filtered results page.
- Create a page
-
Render filtered results in the categories/tags subpage
Within the edit view of the categories/tags parent page, you'll need to select where the filtered results are rendered.
- Click edit on the categories/tags widget.
- On the Categories widget:
- Click the Setting tab and then click the Advanced button.
- Click the Model button.
- In the Base URL field add the URL to the page to the categories/tags parent page (i.e. https://www.utmbhealth.com/health-blog)
- In the UrlKeyPrefix field add _
- Click the Save button when finished
- On the tags widget:
- Click the Advanced button.
- Click the Model button.
- In the Base URL field add the URL to the page to the categories/tags parent page (i.e. https://www.utmbhealth.com/health-blog)
- In the UrlKeyPrefix field add _
- Click the Save button when finished
-
Make categories/tags a link
You can make the category/tag link to the subpage to display all content items with the selected category/tag.
- Go to the live category/tag subpage (created in the previous step), click on a category/tag filter, then copy that link. (i.e., https://www.utmb.edu/accessibility/digital/accessibility-news/!_/-in-category/categories/a11y/topics/)
- Add the link (without the specific category/tag) to the blog properties:
- Open the Blog or List properties:
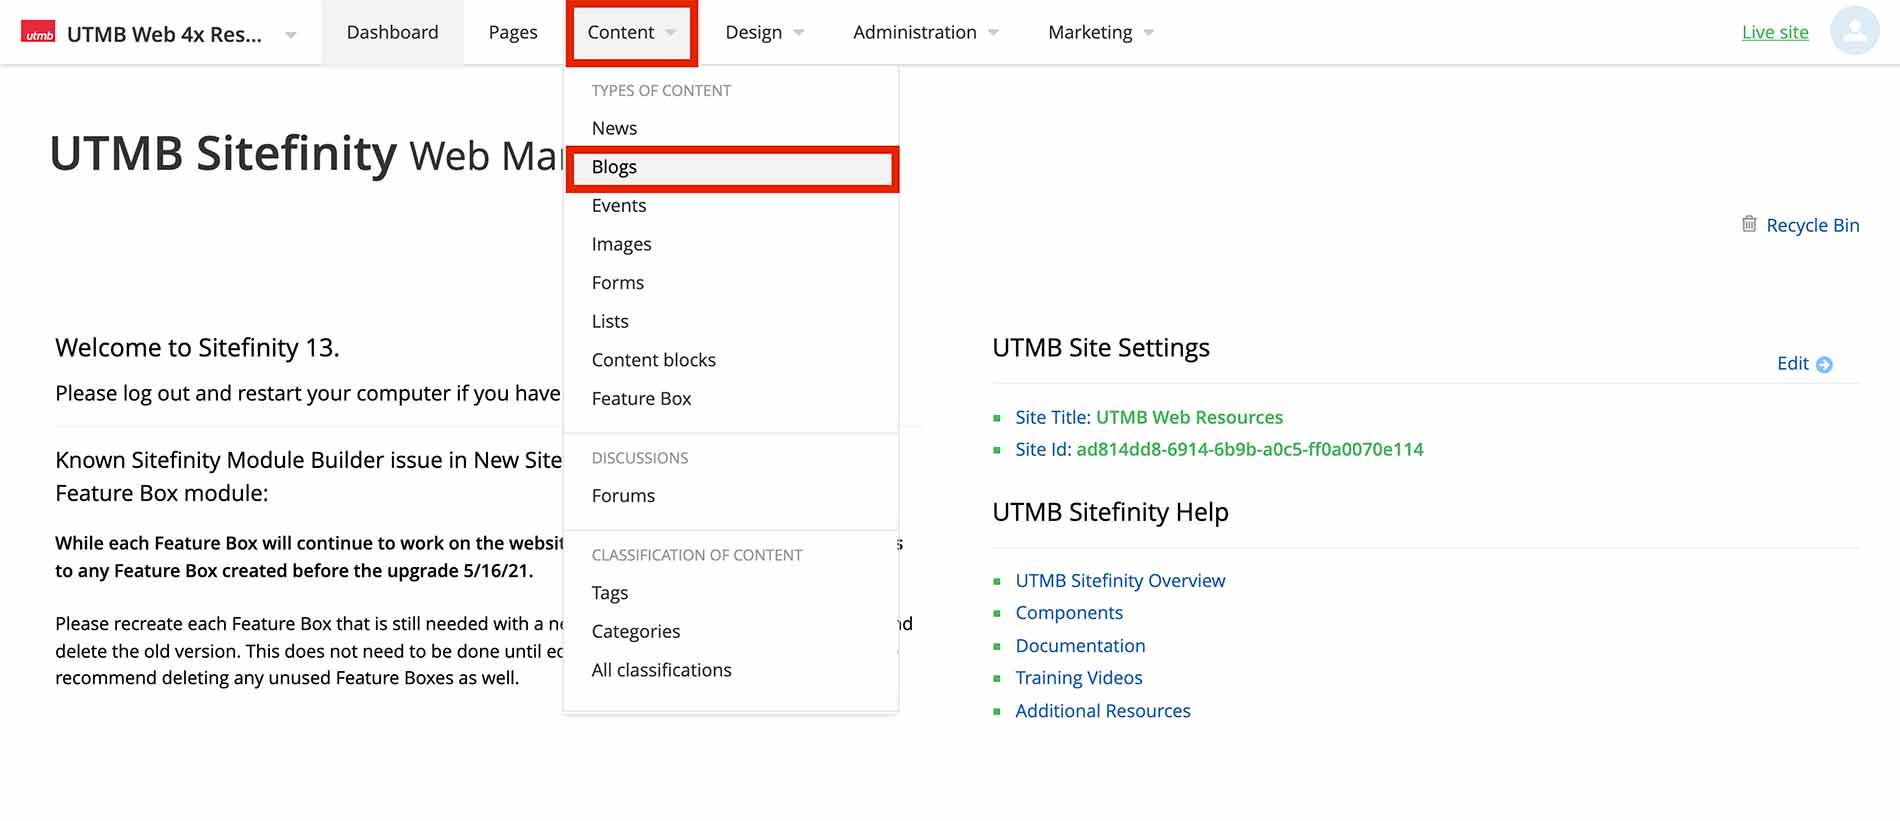
- For Blogs: Click the Content navigation menu item and then select Blogs.
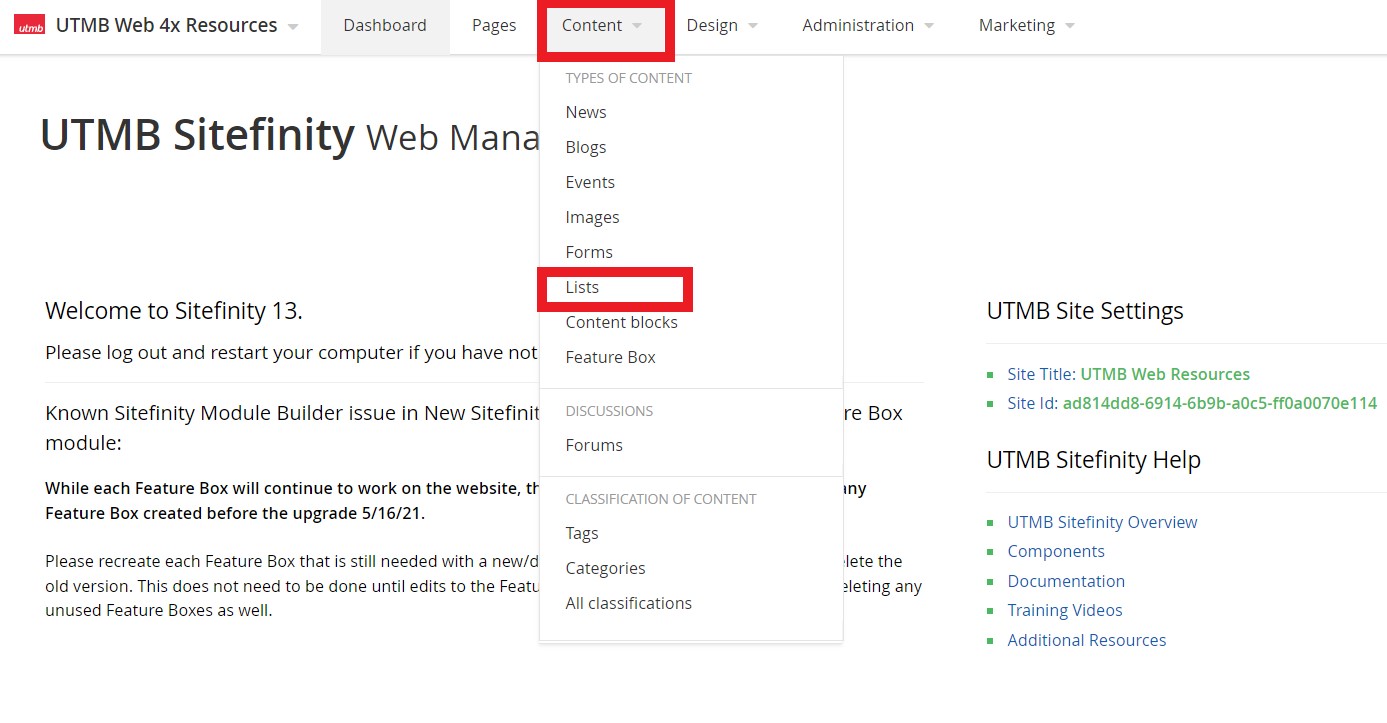
- For Lists: Click the Content navigation menu item and then select Lists.
- For Blogs: Click the Content navigation menu item and then select Blogs.
- To the far right of the blog/list that you are filtering, click the three dots under Actions and select Title & properties from the drop-down menu.

- Under the Custom fields section, paste the URL in the Categories URL or Tags URL fields. Be sure to remove any specific categories/tags from the URL and leave off the trailing "/".

- Click Save Changes
- Open the Blog or List properties:
Add Tags to a page
-
Add Tags widget to a page
Within the edit view of a page, you can add a tags filter to a page. You must apply the tags to a content item first.
- On the right side menu, click the Content tab, click the Classifications drop-down menu and find the Tags widget. Click, hold and drag the Tags widget onto the desired part of the page, and then release the widget.
-
Selecting a Tags widget template to be displayed on a page
Within the edit view of a page, you can add a tag filter to a page. For the filter to be effective, you should have content on the page that has the tags applied to them (i.e. blog posts, list items, events).
- In the edit view of the page, click edit on the Tags widget.
- Select the desired layout under the Template drop-down menu.
- In the edit view of the page, click edit on the Tags widget.
-
Choose which tags to display
After you place the Tags widget on a page, open the widget designer by clicking the Edit button in the upper-right corner of the widget.
Under Which tags to display? select one of the following:
- All tags
All tags will be displayed in the list. - Selected tags...
A custom selection of tags is displayed. To select one or more tags you want to display, click the Select button. - Only tags used by content type...
A custom selection of tags is displayed. Only tags assigned to the selected content type items will be displayed in the list.
- All tags
- Show item count
The count of all items to which the tag is assigned is displayed. - Show empty tags
Tags that are not assigned to any item are displayed. - Sort tags
By default, tags are sorted by their title (A-Z). You can select a different sorting criterion:- By Title (A-Z)
- By Title (Z-A)
- As set manually
This option is available only when you have selected specific tags using Selected tags… option. If you select As set manually, tags are displayed in the selected order. - As set in Advanced mode
DO NOT use this setting
-
Create a Categories/tags Subpage
For the categories/tags filtering to function properly, you must build a subpage so that when a user clicks the filter it'll render the filtered results in a separate page.
- Create a page
- You can name this page Categories or Tags, but the page title is your preference
- Put the page under the page with the categories/tags widget on it. This will be the categories/tags subpage.
- Be sure to uncheck Show in navigation
- Drag and drop the content widget that you will be adding categories/tags to. For instance, if you applied categories to blog posts, add the blog widget to this page.
- It is best practice to add the categories/tags widget again to this page in a right or left column. This allows the user to filter when they are on the filtered results page.
- Create a page
-
Render filtered results in the categories/tags subpage
Within the edit view of the categories/tags parent page, you'll need to select where the filtered results are rendered.
- Click edit on the categories/tags widget.
- On the Categories widget:
- Click the Setting tab and then click the Advanced button.
- Click the Model button.
- In the Base URL field add the URL to the page to the categories/tags parent page (i.e. https://www.utmbhealth.com/health-blog)
- In the UrlKeyPrefix field add _
- Click the Save button when finished
- On the tags widget:
- Click the Advanced button.
- Click the Model button.
- In the Base URL field add the URL to the page to the categories/tags parent page (i.e. https://www.utmbhealth.com/health-blog)
- In the UrlKeyPrefix field add _
- Click the Save button when finished
-
Make categories/tags a link
You can make the category/tag link to the subpage to display all content items with the selected category/tag.
- Go to the live category/tag subpage (created in the previous step), click on a category/tag filter, then copy that link. (i.e., https://www.utmb.edu/accessibility/digital/accessibility-news/!_/-in-category/categories/a11y/topics/)
- Add the link (without the specific category/tag) to the blog properties:
- Open the Blog or List properties:
- For Blogs: Click the Content navigation menu item and then select Blogs.
- For Lists: Click the Content navigation menu item and then select Lists.
- For Blogs: Click the Content navigation menu item and then select Blogs.
- To the far right of the blog/list that you are filtering, click the three dots under Actions and select Title & properties from the drop-down menu.
- Under the Custom fields section, paste the URL in the Categories URL or Tags URL fields. Be sure to remove any specific categories/tags from the URL and leave off the trailing "/".
- Click Save Changes
- Open the Blog or List properties: