Web Forms
Forms on websites are essential for collecting user information, facilitating transactions, gathering feedback, and enabling user authentication and content submissions. They help engage users, collect valuable data, personalize experiences, process transactions, and gather feedback for improvements. However, forms should be avoided for simple interactions, overly complex data collection, or when they create unnecessary steps or require highly sensitive information without adequate security. Proper use of forms enhances user experience and data collection while ensuring security and simplicity.
In Sitefinity
Within the Sitefinity system users have various options for Form integration:
- Sitefinity Forms
- Frevvo Webforms
- Microsoft Forms
The choice of which form to use should align with the form's specific requirements, complexity and needs as well as current business processes.
The Basics
Choosing the right form builder among Sitefinity Forms, Frevvo Webforms, and Microsoft Forms depends on your specific needs and the features each platform offers:
Sitefinity Forms
Sitefinity Forms seamlessly integrate with Sitefinity CMS (styles and responsive design), making it ideal for users already using this platform. Provides data and user management within the Sitefinity platform.
Note: Document attachments to forms and emailed form results are not possible with Sitefinity Forms.
Frevvo Webforms
Frevvo Webforms specialize in dynamic forms and automated workflows with advanced conditional formatting, making it suitable for business process automation. Offers drag-and-drop form creation with a focus on ease of use and quick setup.
Note: IT Services controls the production environment and support the creation of webforms. Please submit Service Requests and Incidents for Webforms through Ivanti. The WebForms team is part of the AIS- Enterprise Performance Systems (AIS-EPS) group in IT Services. Also, we recommend linking to a form with the provided link, embedding is not recommended.
Microsoft Forms
Microsoft Forms are easy to use with a straightforward interface, suitable for quick form creation. They Integrate well with other Microsoft products like Power Automate, Office 365, Teams, Excel and OneDrive and supports collaboration, allowing multiple users to create and edit forms simultaneously. MS Forms Provide basic analytics and visualization of form responses.
Note: MS Forms must be created in a TEAMS environment, not in an individual’s account.
Sitefinity Modules
With the Sitefinity CMS, you can create rich interactive forms straight in your browser. You can prompt visitors to provide their contact details, complete a survey, fill in questionnaires, thus collecting information in an easy and streamlined manner.
Editing the form’s responsive layout and structure without any code or HTML knowledge is simple utilizing a wide array of form widgets, such as textbox, multiple choice and dropdown lists. Once a form is created in the backend, simply drag and drop form widgets in to the page.
Sample Sitefinity Form
Create and Edit Forms
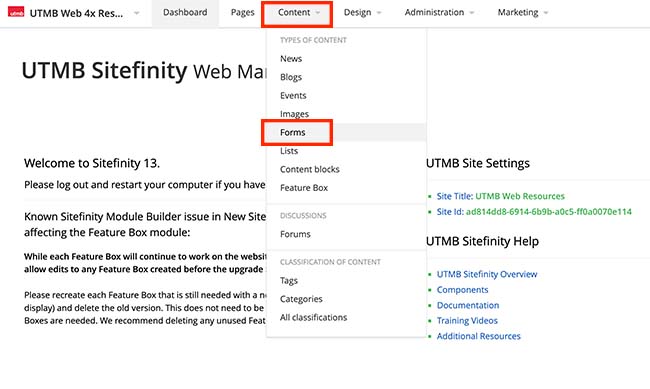
Manage forms on the Forms page, in the main menu at the top of the screen, click Content » Forms. You can see a list with all created forms together with actions you can perform on them. Use this page to create, design, and edit forms.
-
Create a Form
- Click the Content navigation menu item and then select Forms.
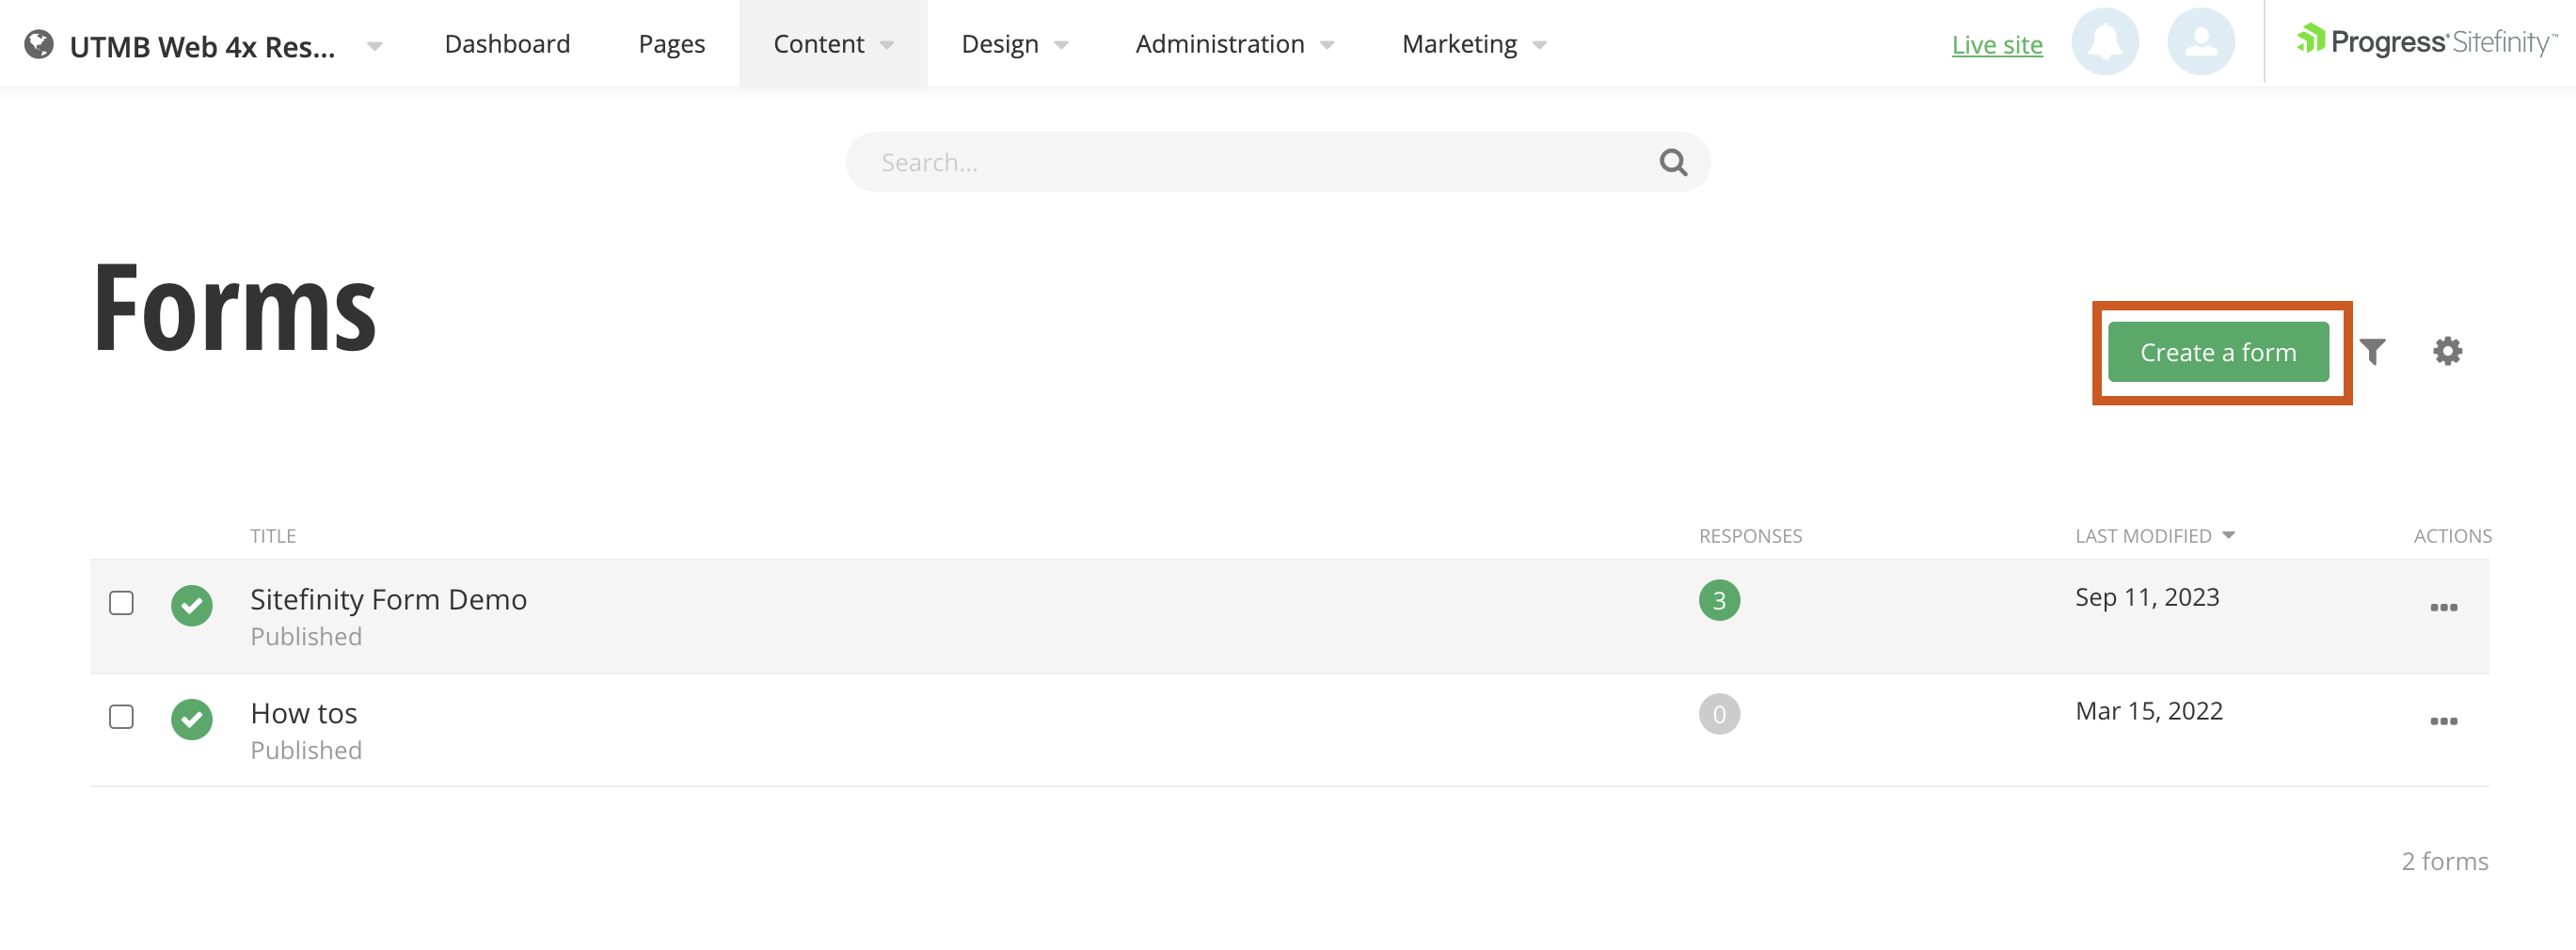
- Click the Create a form button
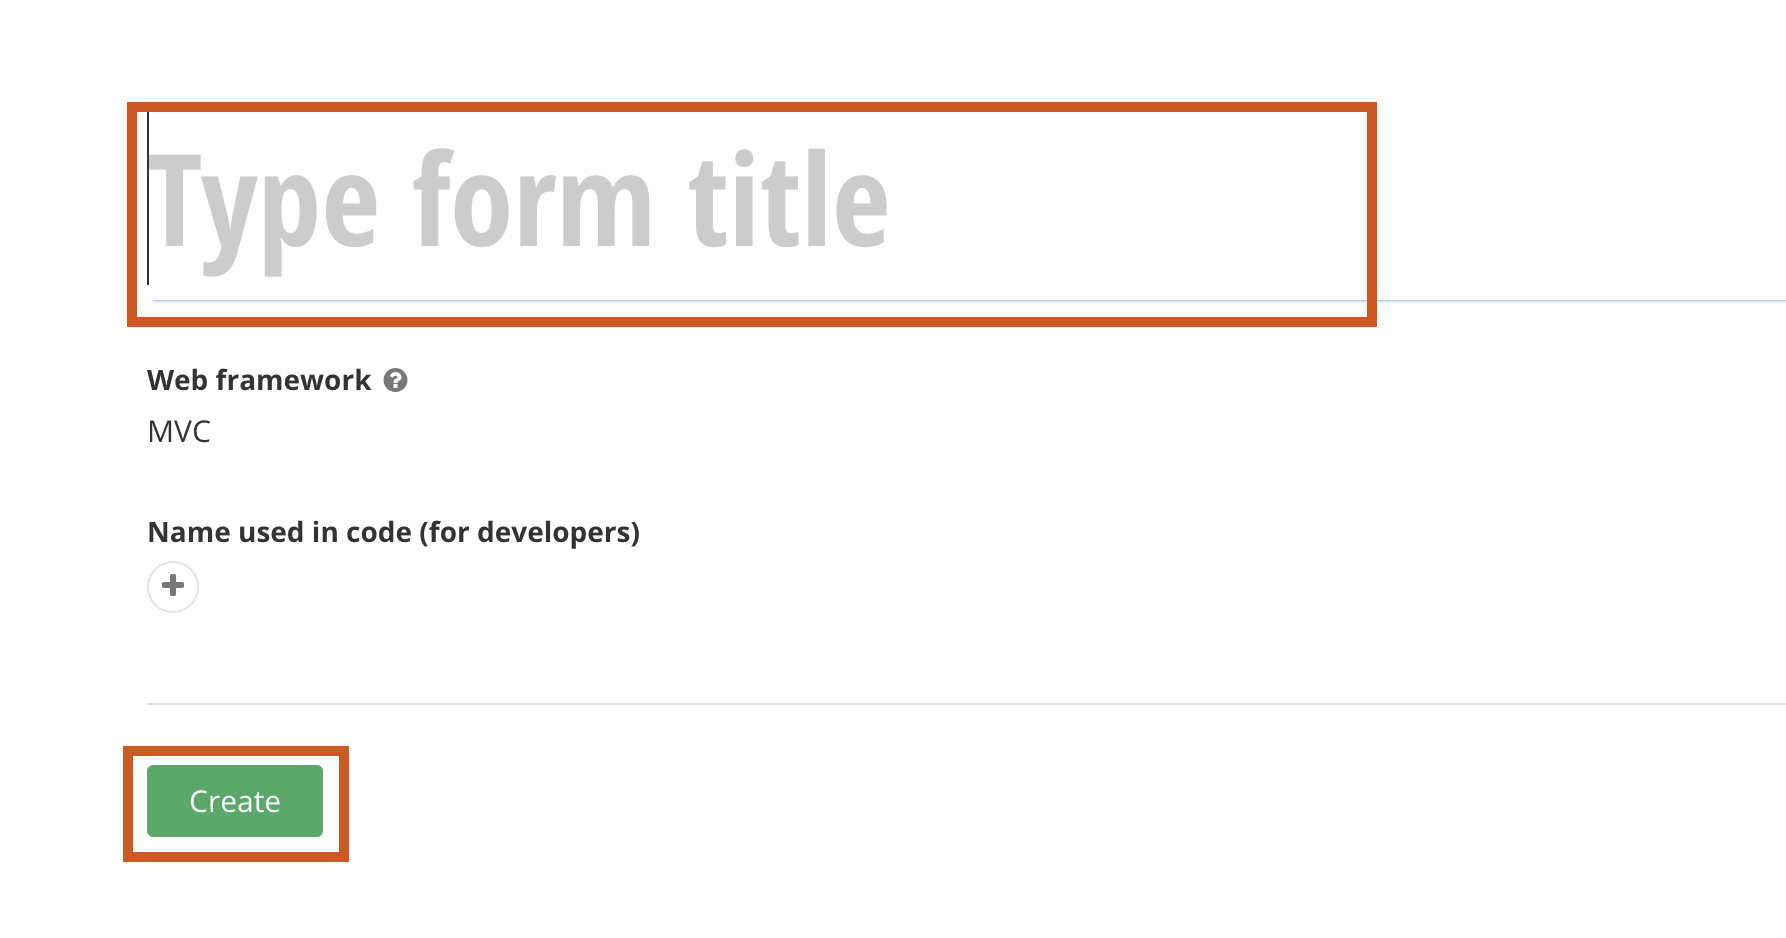
- Add a title and click the Create button
- Click the Content navigation menu item and then select Forms.
-
Add form fields
Within the edit view of a form, you can add common form fields to a form
- On the right side menu, click the Content tab, click the Common Controls drop-down menu. Click, hold and drag a form field onto the Body section of the form, and then release the form field.
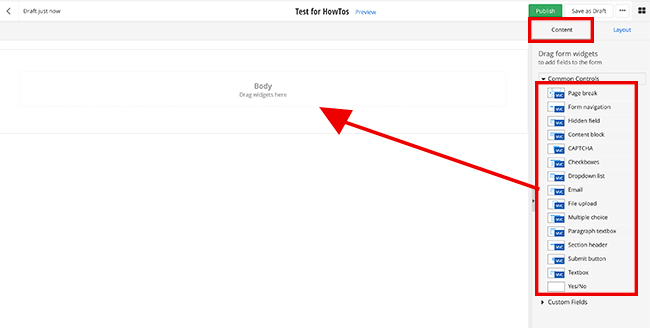
- Customize each form field by clicking Edit on the form field widget.
- Required for all UTMB Sitefinity forms: Add a CAPCHA before the Submit button on the form.
- On the right side menu, click the Content tab, click the Common Controls drop-down menu. Click, hold and drag a form field onto the Body section of the form, and then release the form field.
-
Form layout options
Within the edit view of a form, you can organize form fields by using various layout elements.
- On the right side menu, click the Layout tab, click the Grid widgets drop-down menu. Click, hold and drag a grid widget onto the Body section of the form, and then release the grid widget. The example shows the grid-6+6 grid widget which divides the section into 2 columns. Read more about the known issues for form layouts.
- There are several layout options. Be sure to experiment with the various layout options to find the layout that works best for the form. Learn more about layouts.
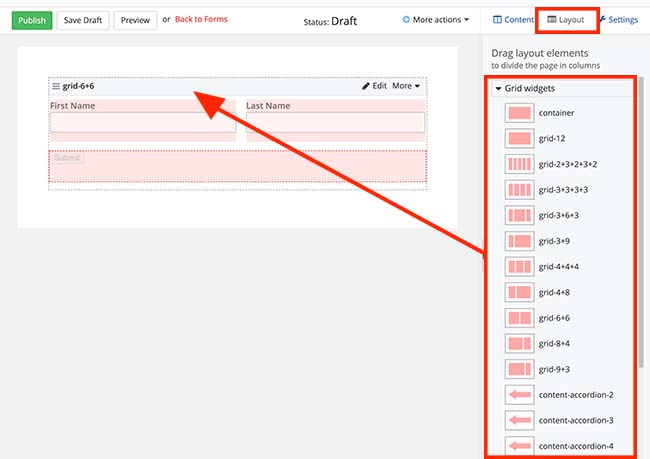
-
Form settings
Within the edit view of a form, you can update the form settings.
- On the right side menu, click the ellipses button (...) on the top-right of the page. Then select Title & properties from the drop-down menu.

- Settings options
- Restrict who can submit form entries
- Create a custom "After submission" message or redirect to another page
- Send email notification that a new form has been submitted
- Confirmation emails cannot be sent to the form respondent at this time
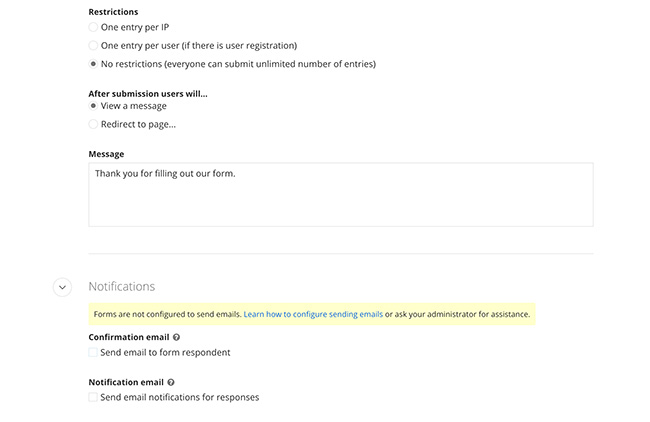
- On the right side menu, click the ellipses button (...) on the top-right of the page. Then select Title & properties from the drop-down menu.
Add Forms to a Page
-
Add a Form widget to a page
Within the edit view of a page, you can add the form widget on a page.
- On the right side menu, click the Content tab, click the Content drop-down menu and find the Form widget. Click,
hold and drag the Form widget onto the desired part of the page, and then release the widget.
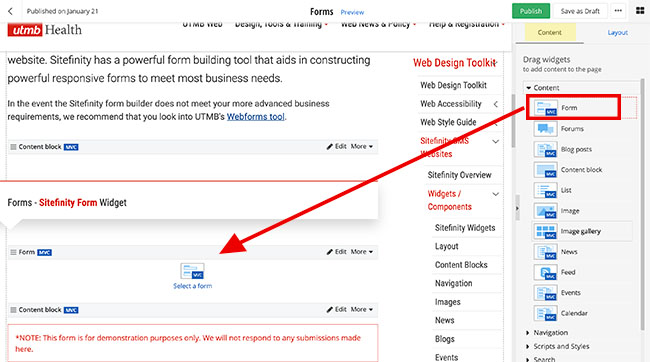
- On the right side menu, click the Content tab, click the Content drop-down menu and find the Form widget. Click,
hold and drag the Form widget onto the desired part of the page, and then release the widget.
-
Select the Form to display
- After you have added the form widget to a page, click the Edit button on the widget

- Select a form.
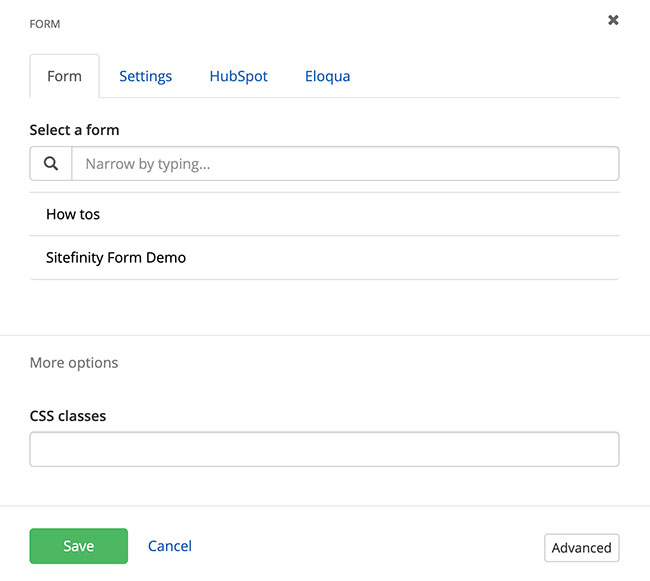
- Click the Save button when complete.
- After you have added the form widget to a page, click the Edit button on the widget
Manage Form Responses
-
Sitefinity - Form Administration 10/26/16
Form Administration PDF
Managing Form Responses – Duration: 09:55
Video Time-stamps.
- Notifications 00:20
- Logging in 01:33
- Coming from an email notification
- To log in to Sitefinity without a notification
- Managing responses 02:11
- Form Administrator and Form Entries Screens
- Getting to the Forms Administrator 02:32
- Forms Administrator – Response Management 03:02
- Form Entries 03:42
- Form Status Displayed: 03:58
- Form Entry Details Displayed: 04:40
- Form Entry Filter and Search: 05:07
- Form Entry Details Screen – Individual Responses 05:57
- Details 05:57
- Options:
- Close and Archive: 07:24
- Open and In Progress. 07:51
- Open and Not in Progress. 08:15
- Locked Form Entry – Avoiding Issues and Unlocking 08:54
HTML & pre-written classes
Building a form yourself requires a solid knowledge of HTML, CSS, JS, programming languages and a designated server.
At UTMB we use 2 CSS frameworks to build forms: UIkit and Bootstrap 3. Using one of these provided links, all available form style options should function within Sitefinity, given they are not conflicting with other items on the page.