Team Profiles: Detail

Before getting started learn the basics:

  • Create a Team

    You can create multiple Teams with multiple Team Members within each.

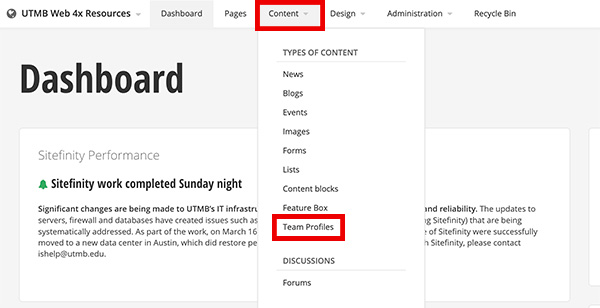
    1. Click the Content navigation menu item and then select Team Profiles

      Screenshot of Team profiles in the content menu
    2. Click the green Create a team button
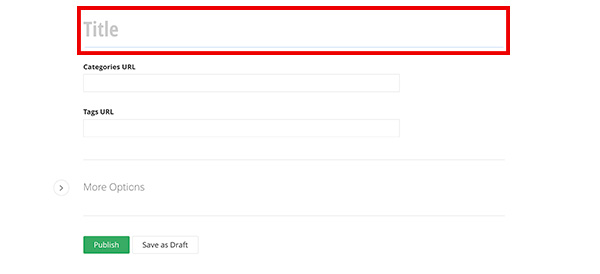
    3. Type a title and click the green Publish button
      Screenshot of Team profiles title field

    After you have created a team, you can now create team members.

  • Create and edit Team Members

    1. Within a Team, click the green Create a member button
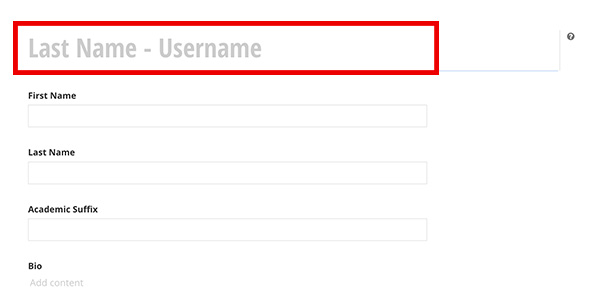
    2. Add a title. The title must be the member's last name with a dash and their UTMB username as it appears on their email address. eg. "Johnson - jbjohnso". This title will not be displayed on the live web page.
      Screenshot of Team member title field
    3. Add the First and last name.
    4. Add additional details as desired:
      • Academic Suffix
      • Bio
      • Position / Title:
        • Position / Title
        • Entity
        • Department
        • Division
      • Contacts:
        • Email
        • Phone
        • Mobile
        • Fax
        • CV Link
        • Find a Doctor Profile Link
          • Option for the button to display "Clinical Profile" or Schedule an Appointment"
        • Physical Address
        • Mailing Address
      • Education / Research:
        • Education
        • Research
        • Research Profile link
        • Research Experts RSS Feed URL
        • Publications Link
        • Publications RSS Feed URL
        • Lab Website Link
      • Related Media:
        • Photo
          OR
        • Photo Image URL Path
          • The link to an external photo. Note: This overrides the uploaded photo option.
      • Related Data:
        • Custom Links
      • Classification:
        • Categories
        • Tags
      • More Options:
        • Option to disable profile page
        • Redirect URL
          • If there is a URL in this field, it will override the "disable profile page" function
        • CSS for List Items
        • CSS for List Detail Page
    5. Click the Publish button when finished

Layout Views

The widget component template

Learn how to do it:

  • Create a profile page (Required)

    You must create a separate page to display the profile details. You will only need to create one page for all members.

    1. Create a new page. Name it "Profile" and uncheck the Show in Navigation option. Put the page under the page where your team members are listed.
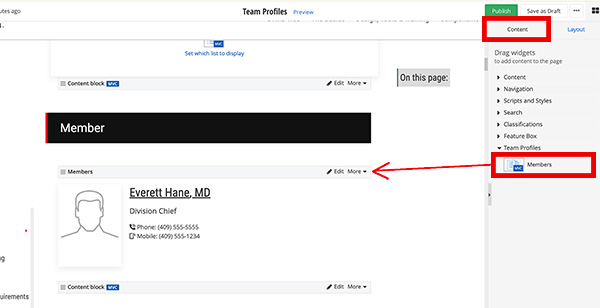
    2. Within the edit view of the profile page, on the right side menu, click the Content tab, click the Team Profiles drop down menu and find the Members widget. Click, hold and drag the Members widget onto the desired part of the page, and then release the widget.
      Screenshot of the Members widget on the page
    3. Publish the page.  You can now use this page to display team member profiles.

Member

This is the default profile detail view.

Portrait of Jackson Cross, MCSD
Phone: (409) 555-7777
Mobile: (409) 555-1234
Fax: (409) 555-5678
Physical Address:
1234 Sesame St
Galveston, TX 77551
Mailing Address:
5678 Overthere Way
Galveston, TX 77551

Jackson Cross, MCSD

Assistant Dean for Academic Programs, Professor Internal Medicine
The University of Texas Medical Branch
General Medicine
Digital Team
About Me

Lorem ipsum dolor sit amet, consectetur adipiscing elit. In euismod mi a augue ullamcorper auctor. Morbi libero sem, pulvinar vel consequat in, facilisis sit amet est. Nulla diam lorem, faucibus ut eros et, tempus venenatis dui. Quisque purus augue, rutrum eget dignissim posuere, efficitur eu enim. Morbi libero nulla, fermentum pretium erat et, hendrerit pellentesque lorem. Donec ac imperdiet mauris, in ullamcorper quam. Aenean quis justo justo. Pellentesque habitant morbi tristique senectus et netus et malesuada fames ac turpis egestas. Suspendisse finibus ligula et orci tempor aliquam. Nullam sed massa ut ex sagittis rutrum.

Etiam interdum dui ac turpis mollis dignissim. Donec tortor risus, gravida eget tincidunt gravida, elementum at neque. Aenean ut risus urna. Aenean malesuada sapien enim, at aliquam ipsum varius eget. Donec urna libero, finibus vel eleifend ac, volutpat vitae leo. Suspendisse mi nunc, rhoncus non tincidunt non, fringilla ac turpis. Nulla eleifend sit amet elit sed gravida. Integer consectetur accumsan turpis, cursus congue lectus ullamcorper quis. Quisque condimentum sem nec varius mattis. Quisque placerat ante id purus consequat varius. Fusce tincidunt quis ex non porta. Vivamus convallis eget velit et aliquam.
Education
Education Information: Etiam interdum dui ac turpis mollis dignissim. Donec tortor risus, gravida eget tincidunt gravida, elementum at neque. Aenean ut risus urna. Aenean malesuada sapien enim, at aliquam ipsum varius eget. Donec urna libero, finibus vel eleifend ac, volutpat vitae leo. Suspendisse mi nunc, rhoncus non tincidunt non, fringilla ac turpis. Nulla eleifend sit amet elit sed gravida. Integer consectetur accumsan turpis, cursus congue lectus ullamcorper quis. Quisque condimentum sem nec varius mattis. Quisque placerat ante id purus consequat varius. Fusce tincidunt quis ex non porta. Vivamus convallis eget velit et aliquam.
Research
Research Information: Mauris vitae erat id tortor venenatis fermentum. Cras turpis mi, commodo non posuere a, semper id tellus. Curabitur ultricies, orci quis rutrum imperdiet, urna neque aliquet ligula, a ullamcorper turpis risus nec est. Nam viverra libero ipsum, non tincidunt ex egestas et. Fusce non urna quis nibh maximus maximus sed vel lacus. Vestibulum quis fringilla metus. Etiam tincidunt augue risus, vitae ultricies lacus imperdiet sit amet. In gravida leo nibh, in gravida ipsum suscipit sit amet. Mauris sit amet finibus neque. Vestibulum at enim sed est dignissim pharetra at ut ligula. Pellentesque gravida consequat metus, ut facilisis leo.

Nulla semper, diam non bibendum volutpat, ante magna ultricies magna, at finibus lacus turpis quis nulla. Nulla ex ligula, maximus id diam et, convallis cursus justo. Curabitur in urna ante. Donec lobortis accumsan ipsum id pharetra. Cras dolor risus, fringilla eget efficitur vitae, euismod at ligula. Suspendisse ultrices massa vitae arcu lacinia, et dictum libero porta. Fusce scelerisque est vel volutpat tincidunt. Nullam pharetra dignissim erat. Nunc sed diam ipsum. Vestibulum quis pellentesque ante. Mauris venenatis nisi quis libero efficitur, at condimentum est venenatis. Sed scelerisque elit vitae dui feugiat, nec varius lorem accumsan.

Sed vel ex nibh. Donec ac est ligula. Fusce non nibh vitae sapien molestie tempor id tempus tortor. Vivamus ac ipsum et arcu eleifend elementum sagittis eget massa. Pellentesque vitae enim ac purus ullamcorper egestas. Orci varius natoque penatibus et magnis dis parturient montes, nascetur ridiculus mus. Suspendisse semper eget tellus id tempus. Quisque nec libero nec sem finibus gravida sit amet vel est. Etiam quis accumsan libero. Quisque accumsan est mi, et auctor sapien hendrerit at. Aenean suscipit imperdiet dui eu sodales.
Publications
Phone: (409) 555-7777
Mobile: (409) 555-1234
Fax: (409) 555-5678
Physical Address:
1234 Sesame St
Galveston, TX 77551
Mailing Address:
5678 Overthere Way
Galveston, TX 77551

Customizations

Customize with CSS Classes.

Learn how to do it:

  • Add CSS classes to a Team member profile page

    Within the edit view of the profile page, which is used to display the full member profile, you can customize how team member profiles display using CSS.

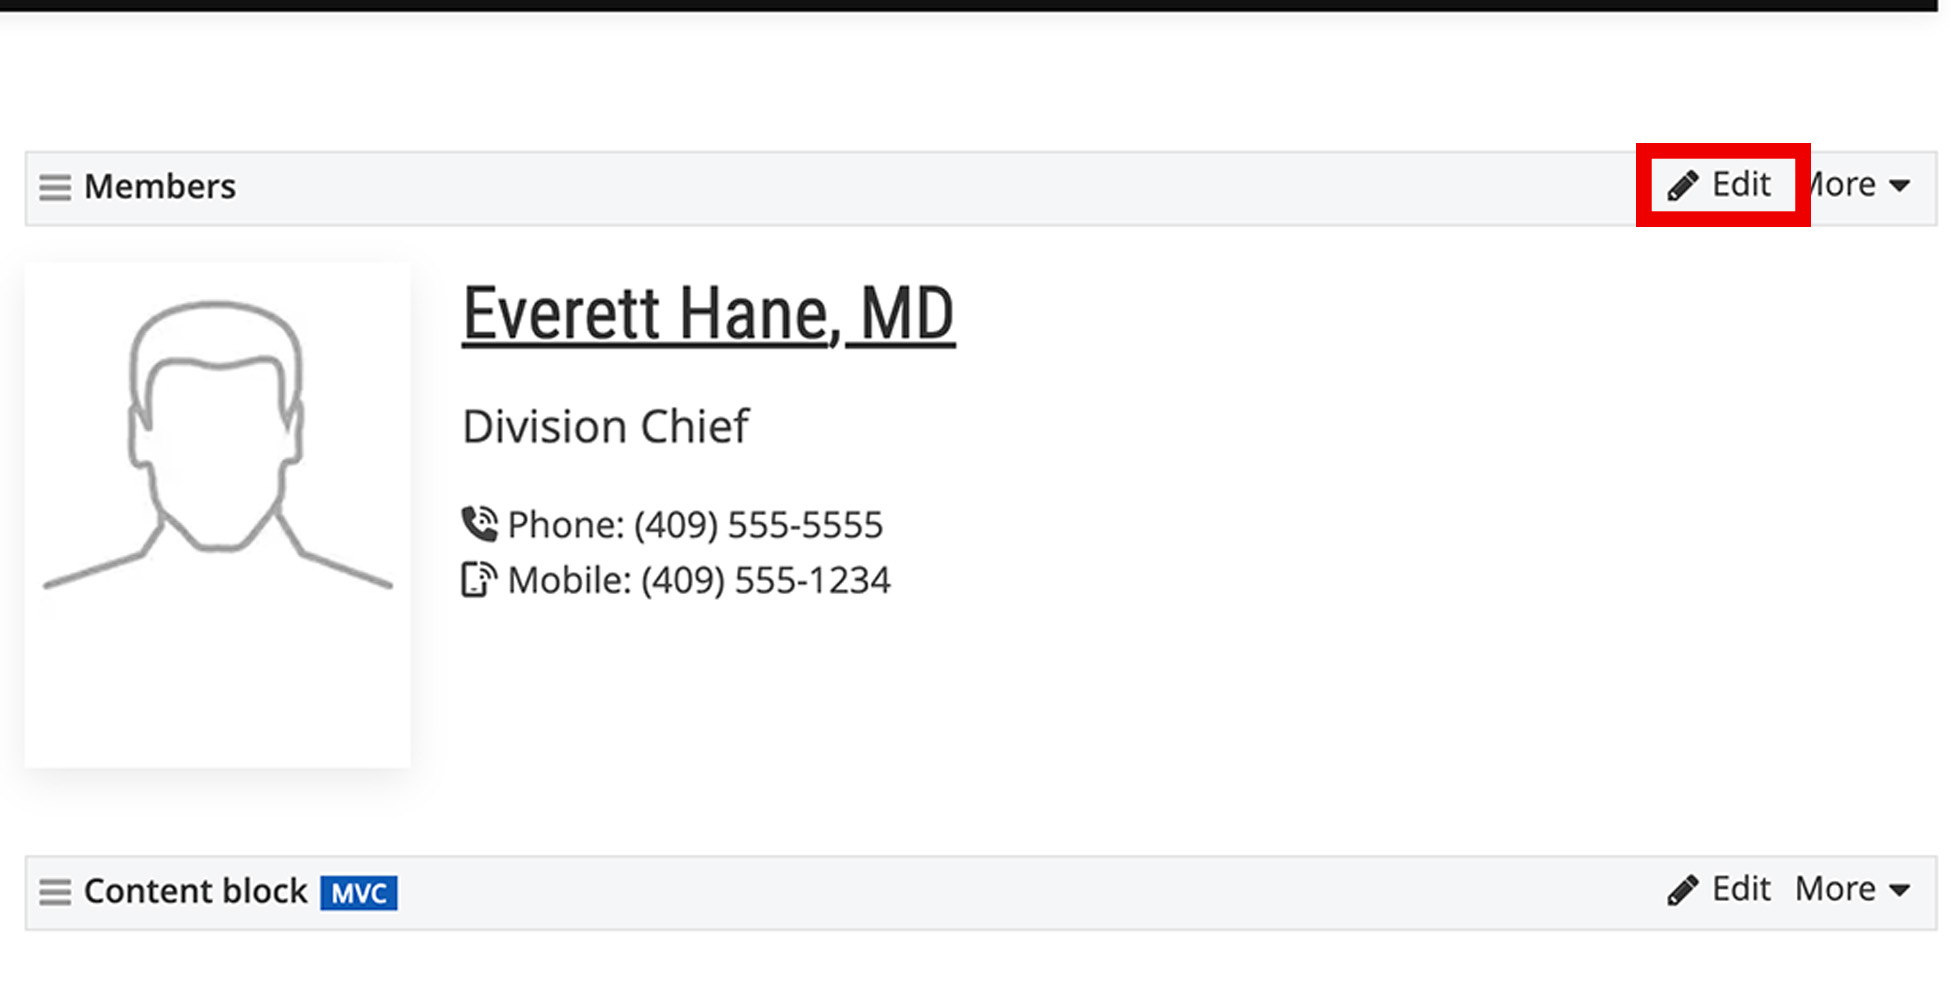
    1. After you have added the team members widget to the profile page, click the Edit button on the widget
      Screenshot of the edit button on the Teams Widget
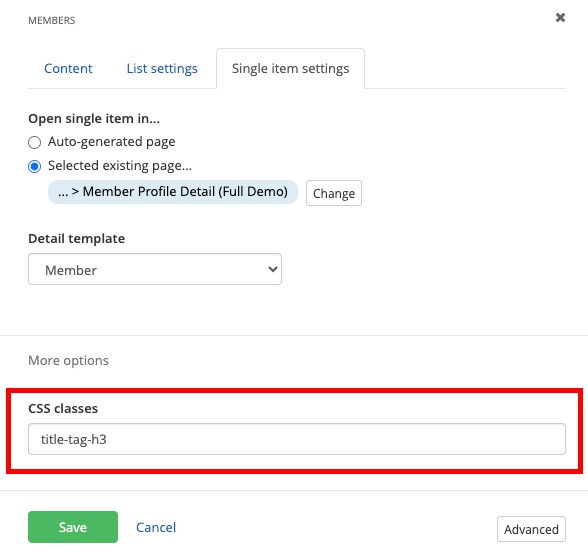
    2. Under the Single item settings tab, in the More options section add CSS classes separated by a space:
      Screenshot of the CSS classes field

Title Styles

ClassDescription
title-tag-h5 Formats the team member’s name as a heading.

Columns

ClassDescription
col-smallSets the left column width to 240px.
col-mediumSets the left column width to 270px.

Image Options

ClassDescription
img-xsmallSets the team member image width to 190px.
img-smallSets the team member image width to 220px.
img-mediumSets the team member image width to 250px.
img-largeSets the team member image width to 280px.
img-xlargeSets the team member image width to 300px.

Content Options

Position / Title

ClassDescription
add-info-hideHides the entity, department and division.
add-info-entity-hideHides the entity.
add-info-dept-hideHides the department.
add-info-div-hideHides the division.

Categories and Tags

ClassDescription
cats-hideHides categories.
tags-hideHides tags.
meta-hideHides categories and tags.
meta-leftAligns categories and tags left.
meta-rightAligns categories and tags right.
meta-centerAligns categories and tags center.

Buttons / Links

ClassDescription
icons-hideHides default icons.
labels-hideHides contact labels.
pro-links-sideMoves all links to the left column.

Button Colors

Replace the * with an available color option.
ClassDescription
all-btn-*Makes all buttons a color.
lnk-cv-btn-*Makes CV button a color.
lnk-find-a-doc-btn-*Makes Find A Doctor Profile button a color.
lnk-experts-btn-*Makes Research Profile button a color.
lnk-publications-btn-*Makes Publications button a color.
lnk-lab-btn-*Makes Lab Website button a color.

Training

Create and Edit Team Members

  • Create a Team

    You can create multiple Teams with multiple Team Members within each.

    1. Click the Content navigation menu item and then select Team Profiles

      Screenshot of Team profiles in the content menu
    2. Click the green Create a team button
    3. Type a title and click the green Publish button
      Screenshot of Team profiles title field

    After you have created a team, you can now create team members.

  • Create and edit Team Members

    1. Within a Team, click the green Create a member button
    2. Add a title. The title must be the member's last name with a dash and their UTMB username as it appears on their email address. eg. "Johnson - jbjohnso". This title will not be displayed on the live web page.
      Screenshot of Team member title field
    3. Add the First and last name.
    4. Add additional details as desired:
      • Academic Suffix
      • Bio
      • Position / Title:
        • Position / Title
        • Entity
        • Department
        • Division
      • Contacts:
        • Email
        • Phone
        • Mobile
        • Fax
        • CV Link
        • Find a Doctor Profile Link
          • Option for the button to display "Clinical Profile" or Schedule an Appointment"
        • Physical Address
        • Mailing Address
      • Education / Research:
        • Education
        • Research
        • Research Profile link
        • Research Experts RSS Feed URL
        • Publications Link
        • Publications RSS Feed URL
        • Lab Website Link
      • Related Media:
        • Photo
          OR
        • Photo Image URL Path
          • The link to an external photo. Note: This overrides the uploaded photo option.
      • Related Data:
        • Custom Links
      • Classification:
        • Categories
        • Tags
      • More Options:
        • Option to disable profile page
        • Redirect URL
          • If there is a URL in this field, it will override the "disable profile page" function
        • CSS for List Items
        • CSS for List Detail Page
    5. Click the Publish button when finished

Add Team Members to a Page

Team Members page (list view)

  • Add Team members to a page

    Within the edit view of a page, you can add the team members widget to display team members posts.

    1. On the right side menu, click the Content tab, click the Team Profiles drop down menu and find the Members widget. Click, hold and drag the Members widget onto the desired part of the page, and then release the widget
      Screenshot of the Members widget on the page
  • Select which Team to display

    Within the edit view of a page, you can select which team(s) display.

    1. After you have added the team members widget to a page, click the Edit button on the widget
      Screenshot of the edit button on the Teams Widget
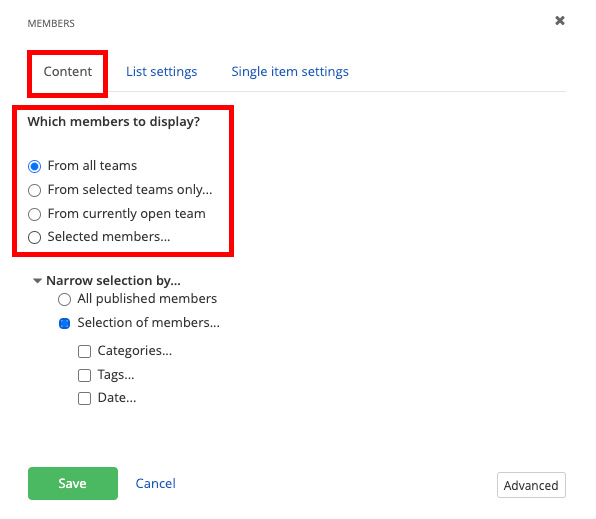
    2. Under the Content tab, select which team to display
      • From all teams: This is the default setting. This will display all members from all teams on the website.
      • From selected teams only: you can specify which teams to display
      • From currently open team: do not use this setting
      • Selected members: you can select one or more individual members to display

      Screenshot of which members to display choices
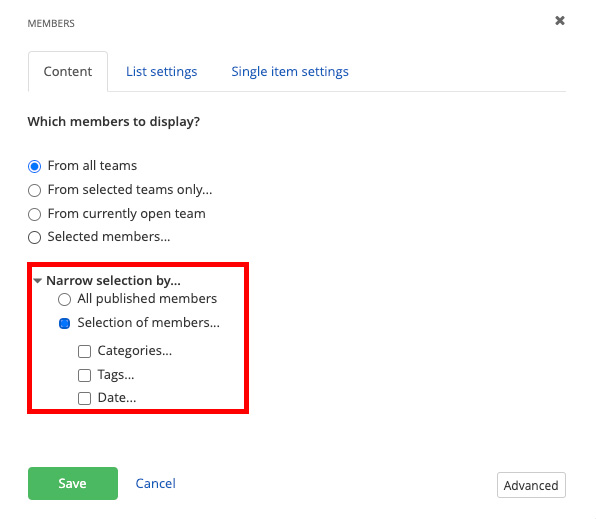
    3. Narrow selection further
      • All published members: This is the default setting. This will display all published members.
      • Selection of members: you can add filters for categories, tags, and/or published dates. You must add categories and/or tags to the members before you can add the filter to the Team Profiles widget.
        Screenshot of Team profiles widget filter options
    4. Click the Save button when finished.
  • Set the Team members paging & limit the number of items to display
    1. After you have added the team members widget to a page, click the Edit button on the widget
      Screenshot of the edit button on the Teams Widget
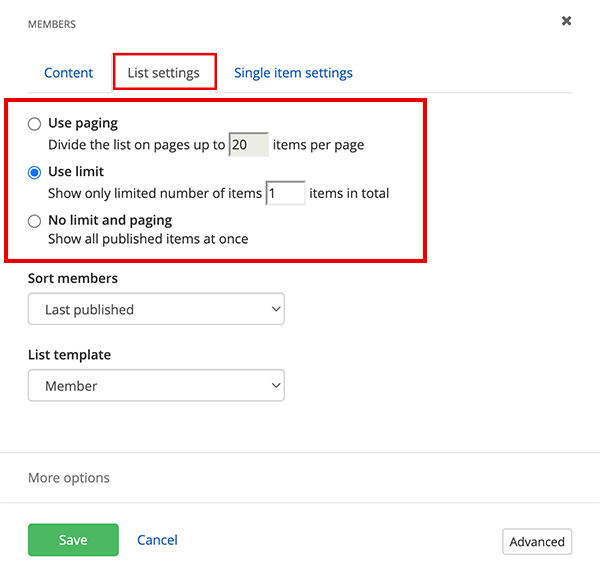
    2. Under the List Settings tab, select the paging and limit settings.
      • Use paging: This is the default setting with up to 20 items per page displaying. You can edit the number of items displayed.
      • Use Limit: You can limit the number of items displayed.
      • No limit and paging: Shows all published items at once. This setting is not recommended.
        Screenshot of Team Profiles - widget paging options
  • Sort Team members on a page
    1. After you have added the team members widget to a page, click the Edit button on the widget
      Screenshot of the edit button on the Teams Widget
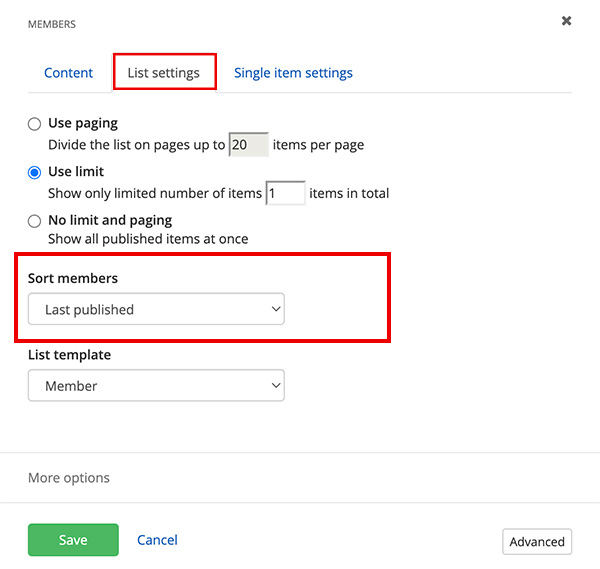
    2. Under the List Settings tab, select sort members settings.
      • Last published on top: This is the default setting. Sorts the latest members that have been published in descending order by date.
      • Last modified on top: Sorts the latest members that have been edited and saved in descending order by date.
      • By Title (A-Z): Sorts by the title field of the member.
      • By Title (Z-A): Sorts by the title field of the member.
      • As set manually: Sorts by the the order of the members in the Team. You can manually reorder members.
      • As set in advanced mode: Do not use this setting
        Screenshot of Team Profiles - widget sorting options
  • Select the Team members template (layout view)

    Within the edit view of a page, you can customize how team members display..

    1. After you have added the team members widget to a page, click the Edit button on the widget
      Screenshot of the edit button on the Teams Widget
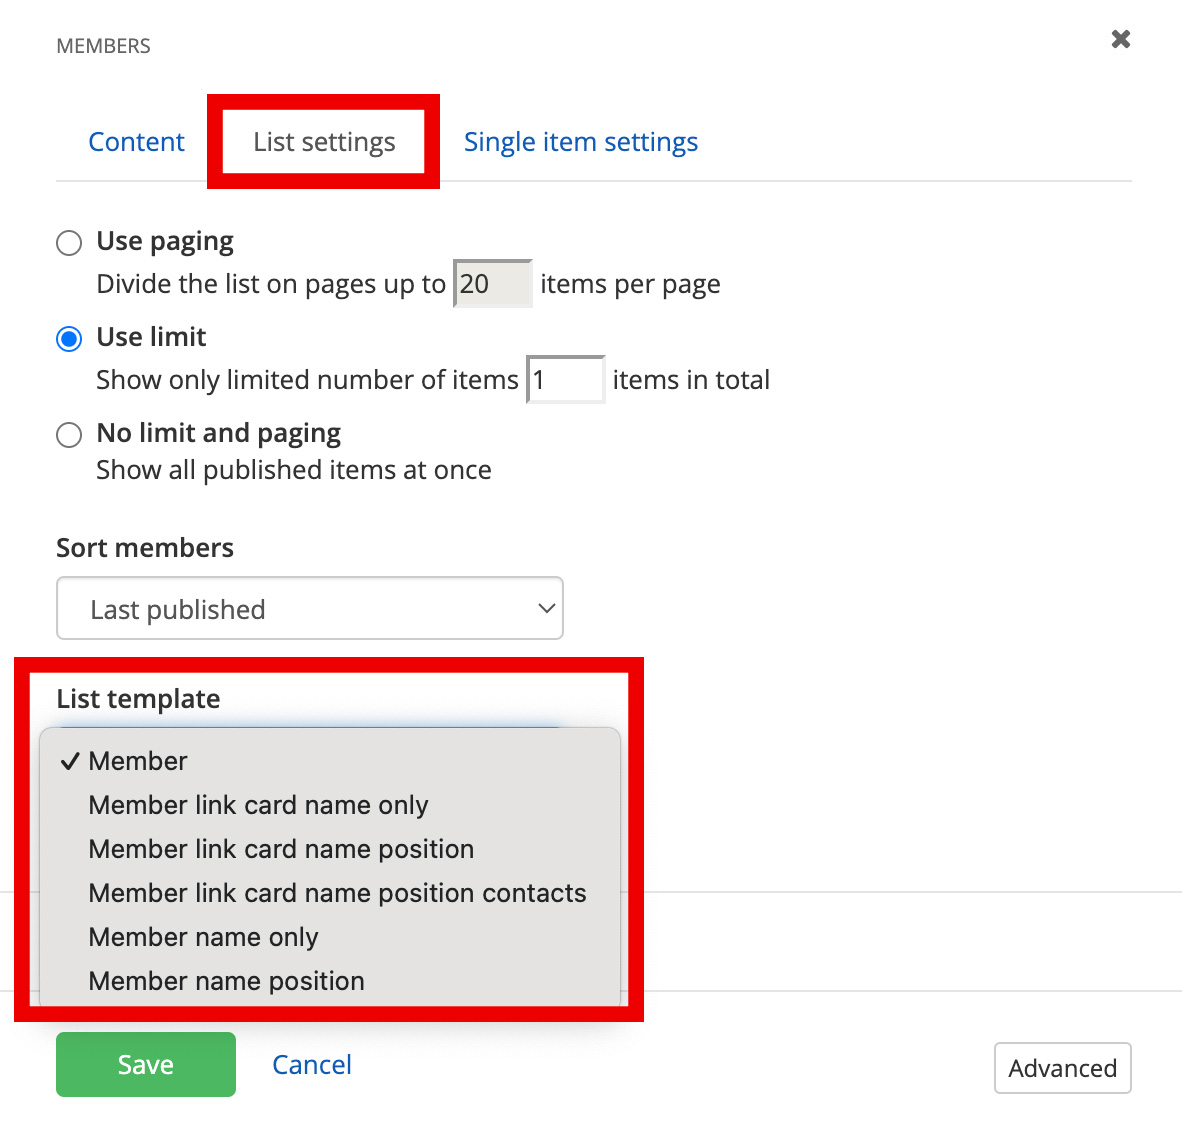
    2. Under the List settings tab, select the list template.
      Screenshot of Team Profile List settings
  • Add CSS classes to a Team members widget
    1. After you have added the team members widget to a page, click the Edit button on the widget
      Screenshot of the edit button on the Teams Widget
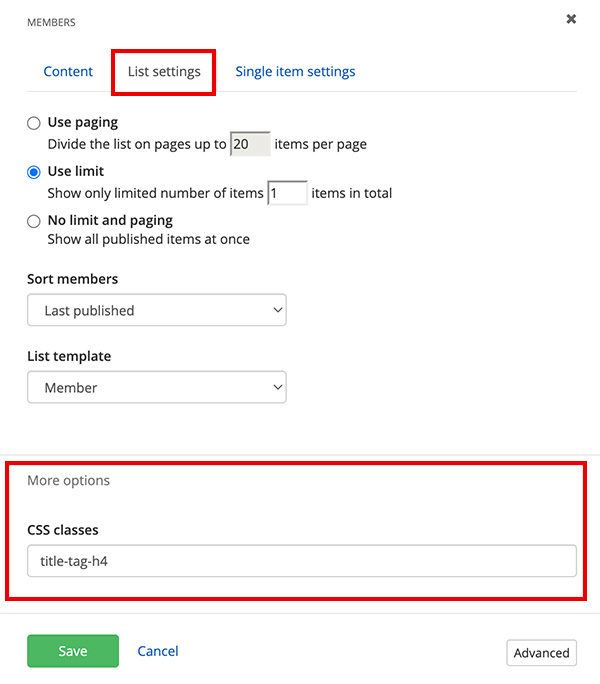
    2. Under the List Settings tab, add CSS classes in the More options section.
      • Insert CSS classes in the CSS classes field. Multiple CSS classes can be added but must be separated by a space. View pre-written classes.
        Screenshot of Team Profiles - widget css field
  • Customize how the team member profile displays

    Within the edit view of a page, you can customize how team member profiles display and select the page that it opens in. You must create a separate page, called a profile page which is used to display the full member profile, with the team member widget added to it first.

    1. After you have added the team members widget to a profile page, click the Edit button on the widget
      Screenshot of the edit button on the Teams Widget
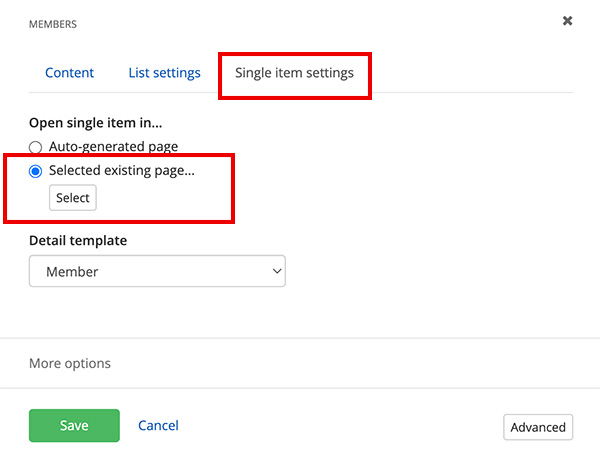
    2. Under the Single item settings tab, select the page that the profile opens in.
      • Auto-generated page: This is the default setting and will open the profile within the same page. DO NOT use this setting.
      • Selected existing page: Select the profile page with the team members widget on it.
        Screenshot of Team Profiles - widget profile page settings

Profile Page (detail view)

  • Create a profile page (Required)

    You must create a separate page to display the profile details. You will only need to create one page for all members.

    1. Create a new page. Name it "Profile" and uncheck the Show in Navigation option. Put the page under the page where your team members are listed.
    2. Within the edit view of the profile page, on the right side menu, click the Content tab, click the Team Profiles drop down menu and find the Members widget. Click, hold and drag the Members widget onto the desired part of the page, and then release the widget.
      Screenshot of the Members widget on the page
    3. Publish the page.  You can now use this page to display team member profiles.
  • Add CSS classes to a Team member profile page

    Within the edit view of the profile page, which is used to display the full member profile, you can customize how team member profiles display using CSS.

    1. After you have added the team members widget to the profile page, click the Edit button on the widget
      Screenshot of the edit button on the Teams Widget
    2. Under the Single item settings tab, in the More options section add CSS classes separated by a space:
      Screenshot of the CSS classes field

Explore Other Team Profile Options:

On this page: