Team Profiles: Members List
Before getting started learn the basics:
-
Create a Team
You can create multiple Teams with multiple Team Members within each.
- Click the Content navigation menu item and then select Team Profiles
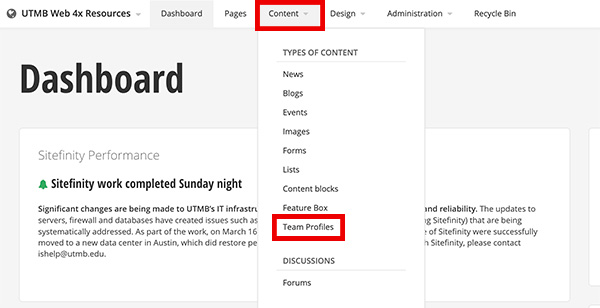
- Click the green Create a team button
- Type a title and click the green Publish button
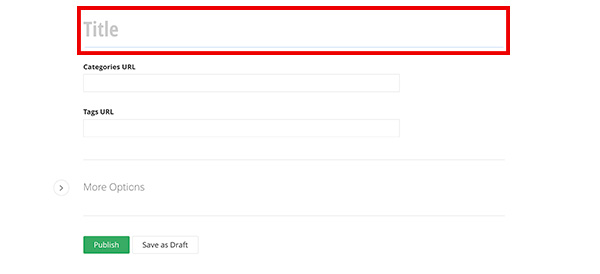
After you have created a team, you can now create team members.
- Click the Content navigation menu item and then select Team Profiles
-
Create and edit Team Members
- Within a Team, click the green Create a member button
- Add a title. The title must be the member's last name with a dash and their UTMB username as it appears on their email address. eg. "Johnson - jbjohnso". This title will not be displayed on the live web page.
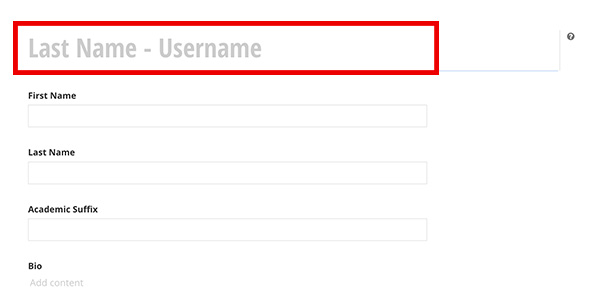
- Add the First and last name.
- Add additional details as desired:
- Academic Suffix
- Bio
- Position / Title:
- Position / Title
- Entity
- Department
- Division
- Contacts:
- Phone
- Mobile
- Fax
- CV Link
- Find a Doctor Profile Link
- Option for the button to display "Clinical Profile" or Schedule an Appointment"
- Physical Address
- Mailing Address
- Education / Research:
- Education
- Research
- Research Profile link
- Research Experts RSS Feed URL
- Publications Link
- Publications RSS Feed URL
- Lab Website Link
- Related Media:
- Photo
OR - Photo Image URL Path
- The link to an external photo. Note: This overrides the uploaded photo option.
- Photo
- Related Data:
- Custom Links
- Classification:
- Categories
- Tags
- More Options:
- Option to disable profile page
- Redirect URL
- If there is a URL in this field, it will override the "disable profile page" function
- CSS for List Items
- CSS for List Detail Page
- Click the Publish button when finished
Layout Views
The widget component template
Learn how to do it:
-
Select the Team members template (layout view)
Within the edit view of a page, you can customize how team members display..
- After you have added the team members widget to a page, click the Edit button on the widget
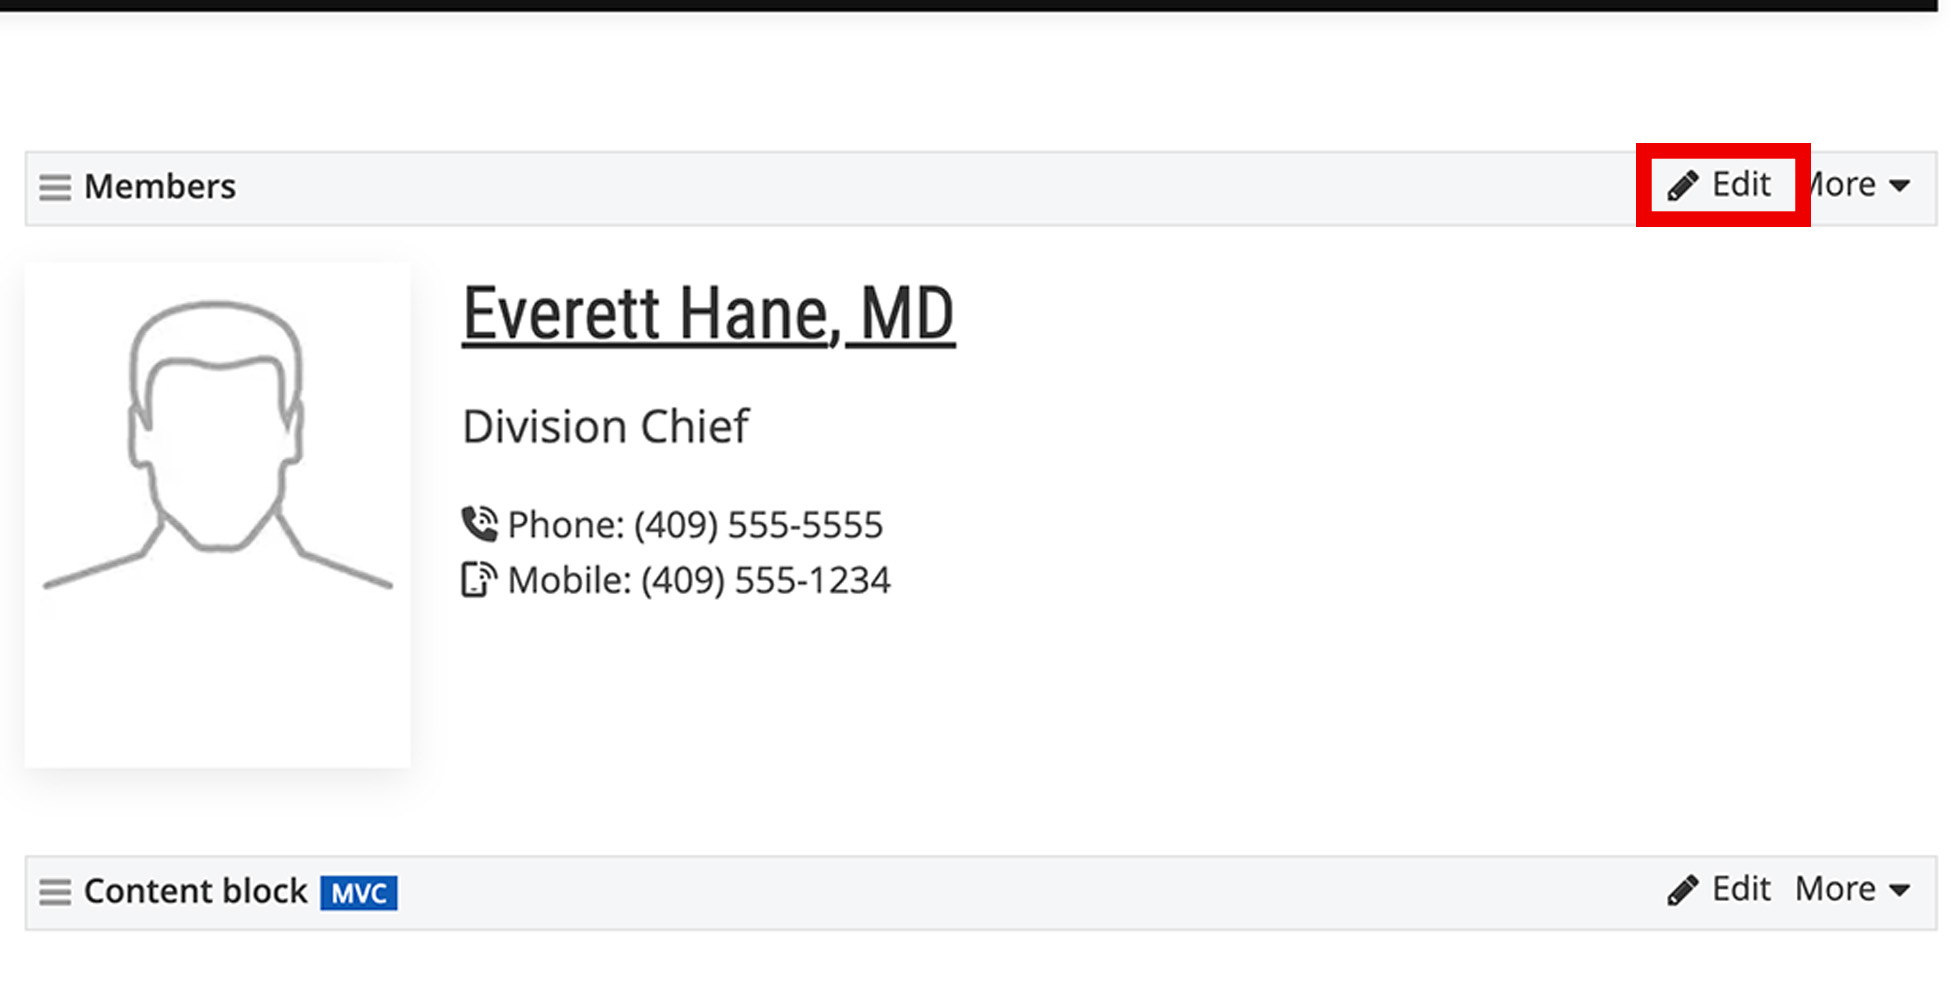
- Under the List settings tab, select the list template.
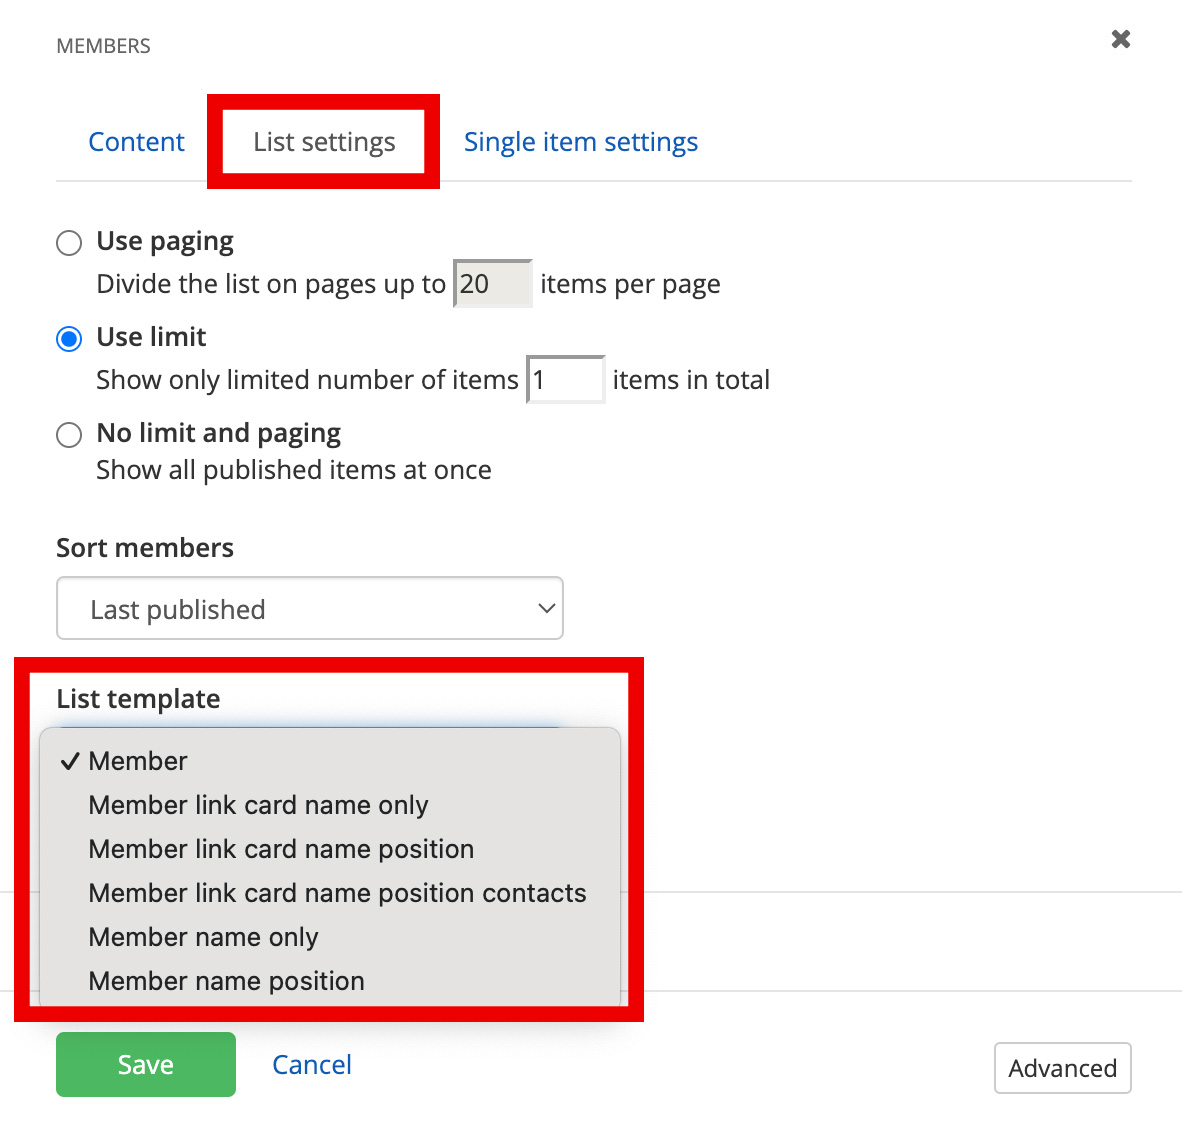
- After you have added the team members widget to a page, click the Edit button on the widget
Member

Member link card name only
Member link card name position
Member link card name position contacts
Member name only
Member name position

Everett Hane, MD
Customizations
Customize with CSS Classes.
Learn how to do it:
-
Add CSS classes to a Team members widget
- After you have added the team members widget to a page, click the Edit button on the widget

- Under the List Settings tab, add CSS classes in the More options section.
- Insert CSS classes in the CSS classes field. Multiple CSS classes can be added but must be separated by a space. View pre-written classes.
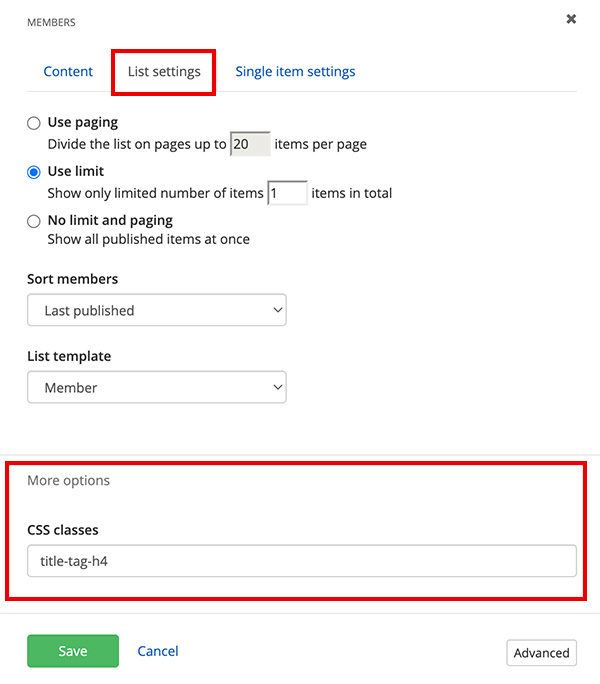
- Insert CSS classes in the CSS classes field. Multiple CSS classes can be added but must be separated by a space. View pre-written classes.
- After you have added the team members widget to a page, click the Edit button on the widget
Columns
2 Columns: list-col-md-6
4 Columns + Masonry: list-col-md-3 + list-masonry
Title Styles
img-top
Small: item-title-small
Medium: item-title-medium
Large: item-title-large
Make Heading Tag: title-tag-h5
The h5 in the class name can be switch out to h2, h3, h4, h6 and so on. Adding the class title-tag-h5 to an element will semantically change its title to a level 5 heading, which is typically used to represent a subsection under a heading of a higher level. This helps structure the content hierarchically, improving accessibility and SEO. It signals the intent to present the text as a heading of level 5, aiding screen readers and search engines in interpreting the content's meaning and importance. Learn more about headings.
Left align title: title-left
Right align title: title-right
Image Options
Image Top: img-top
Float Image Right: img-right
Circle Image: img-circle
Hide Image: img-hide
large Image: img-large (default)
Medium Image: img-medium
Small Image: img-small
Extra Small Image: img-xsmall
Content Dividers
These classes should only be used with the Member, Member name only, and Member name position layouts.
Divider: item-divider
Card: item-card
Content Options
img-hide
Align all content
Verticle Align Content: info-valign-center
Center Text: text-center
Position / title fields
Hide Position: position-hide
Align Position Left: position-left (default)
Align Position Center: position-center
Align Position Right: position-right
Show Position / Title fields : add-info-show
Everett Hane, MD
Hide Entity : add-info-show add-info-entity-hide
Hide Department: add-info-show add-info-dept-hide
Hide Division: add-info-show add-info-div-hide
Contacts fields
Hide Contacts: contacts-hide
Contacts Inline: contacts-inline
Hide email: contacts-email-hide
Hide phone: contacts-phone-hide
Hide mobile: contacts-mobile-hide
Hide fax: contacts-fax-hide
Align Contacts Left: contacts-left (default)
Align Contacts Center: contacts-center
Align Contacts Right: contacts-right
Categories and Tags
Display Categories: cats-show
Display Tags: tags-show
Display Categories on Top: cats-show cats-top
Display Categories on Bottom: cats-show cats-bottom
Hide Profile Page
Hide Profile Page Link: no-profile To apply this only to individual team members, add the class to the CSS for List Items field of each team member
Everett Hane, MD
Lila Montgomery, BA
Savannah Winters
Training
Create and Edit Team Members
-
Create a Team
You can create multiple Teams with multiple Team Members within each.
- Click the Content navigation menu item and then select Team Profiles

- Click the green Create a team button
- Type a title and click the green Publish button

After you have created a team, you can now create team members.
- Click the Content navigation menu item and then select Team Profiles
-
Create and edit Team Members
- Within a Team, click the green Create a member button
- Add a title. The title must be the member's last name with a dash and their UTMB username as it appears on their email address. eg. "Johnson - jbjohnso". This title will not be displayed on the live web page.

- Add the First and last name.
- Add additional details as desired:
- Academic Suffix
- Bio
- Position / Title:
- Position / Title
- Entity
- Department
- Division
- Contacts:
- Phone
- Mobile
- Fax
- CV Link
- Find a Doctor Profile Link
- Option for the button to display "Clinical Profile" or Schedule an Appointment"
- Physical Address
- Mailing Address
- Education / Research:
- Education
- Research
- Research Profile link
- Research Experts RSS Feed URL
- Publications Link
- Publications RSS Feed URL
- Lab Website Link
- Related Media:
- Photo
OR - Photo Image URL Path
- The link to an external photo. Note: This overrides the uploaded photo option.
- Photo
- Related Data:
- Custom Links
- Classification:
- Categories
- Tags
- More Options:
- Option to disable profile page
- Redirect URL
- If there is a URL in this field, it will override the "disable profile page" function
- CSS for List Items
- CSS for List Detail Page
- Click the Publish button when finished
Add Team Members to a Page
Team Members page (list view)
-
Add Team members to a page
Within the edit view of a page, you can add the team members widget to display team members posts.
- On the right side menu, click the Content tab, click the Team Profiles drop down menu and find the Members widget. Click, hold and drag the Members widget onto the desired part of the
page, and then release the widget
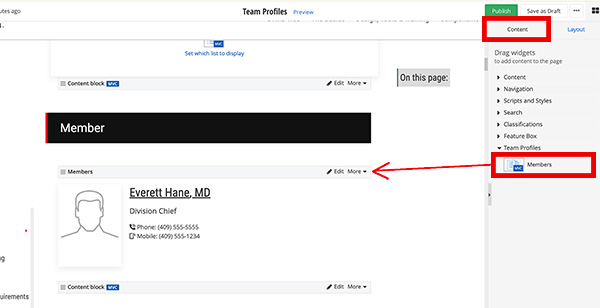
- On the right side menu, click the Content tab, click the Team Profiles drop down menu and find the Members widget. Click, hold and drag the Members widget onto the desired part of the
page, and then release the widget
-
Select which Team to display
Within the edit view of a page, you can select which team(s) display.
- After you have added the team members widget to a page, click the Edit button on the widget

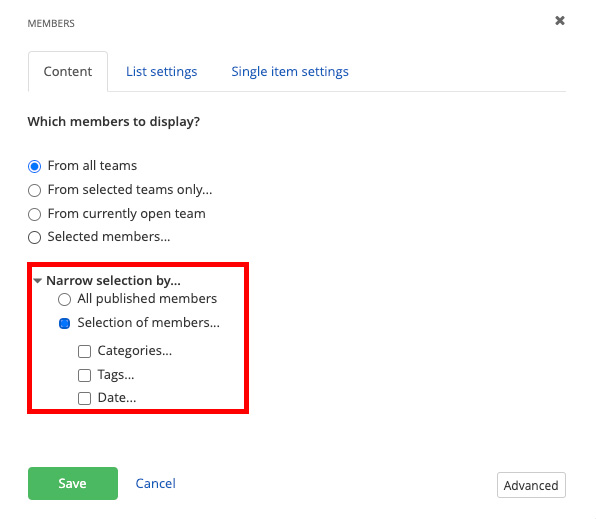
- Under the Content tab, select which team to display
- From all teams: This is the default setting. This will display all members from all teams on the website.
- From selected teams only: you can specify which teams to display
- From currently open team: do not use this setting
- Selected members: you can select one or more individual members to display
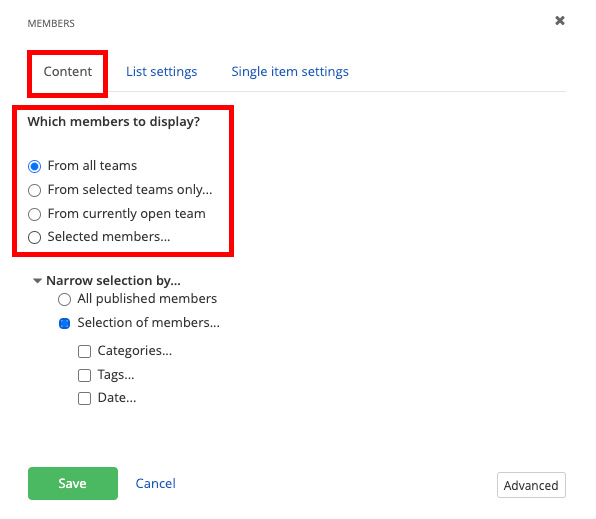
- Narrow selection further
- All published members: This is the default setting. This will display all published members.
- Selection of members: you can add filters for categories, tags, and/or published dates. You must add categories and/or tags to the members before you can add the filter to the Team Profiles widget.
- Click the Save button when finished.
- After you have added the team members widget to a page, click the Edit button on the widget
-
Set the Team members paging & limit the number of items to display
- After you have added the team members widget to a page, click the Edit button on the widget

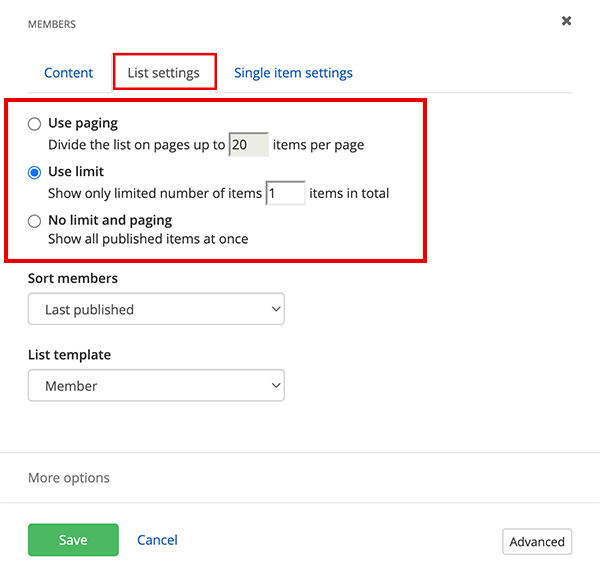
- Under the List Settings tab, select the paging and limit settings.
- Use paging: This is the default setting with up to 20 items per page displaying. You can edit the number of items displayed.
- Use Limit: You can limit the number of items displayed.
- No limit and paging: Shows all published items at once. This setting is not recommended.
- After you have added the team members widget to a page, click the Edit button on the widget
-
Sort Team members on a page
- After you have added the team members widget to a page, click the Edit button on the widget

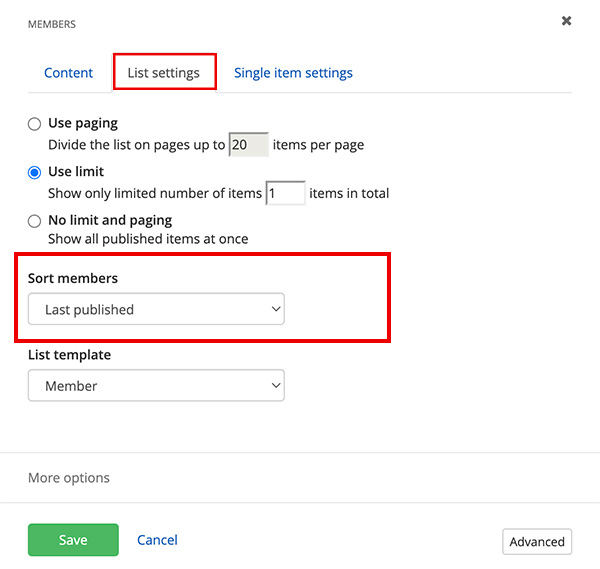
- Under the List Settings tab, select sort members settings.
- Last published on top: This is the default setting. Sorts the latest members that have been published in descending order by date.
- Last modified on top: Sorts the latest members that have been edited and saved in descending order by date.
- By Title (A-Z): Sorts by the title field of the member.
- By Title (Z-A): Sorts by the title field of the member.
- As set manually: Sorts by the the order of the members in the Team. You can manually reorder members.
- As set in advanced mode: Do not use this setting
- After you have added the team members widget to a page, click the Edit button on the widget
-
Select the Team members template (layout view)
Within the edit view of a page, you can customize how team members display..
- After you have added the team members widget to a page, click the Edit button on the widget

- Under the List settings tab, select the list template.

- After you have added the team members widget to a page, click the Edit button on the widget
-
Add CSS classes to a Team members widget
- After you have added the team members widget to a page, click the Edit button on the widget

- Under the List Settings tab, add CSS classes in the More options section.
- Insert CSS classes in the CSS classes field. Multiple CSS classes can be added but must be separated by a space. View pre-written classes.

- Insert CSS classes in the CSS classes field. Multiple CSS classes can be added but must be separated by a space. View pre-written classes.
- After you have added the team members widget to a page, click the Edit button on the widget
-
Customize how the team member profile displays
Within the edit view of a page, you can customize how team member profiles display and select the page that it opens in. You must create a separate page, called a profile page which is used to display the full member profile, with the team member widget added to it first.
- After you have added the team members widget to a profile page, click the Edit button on the widget

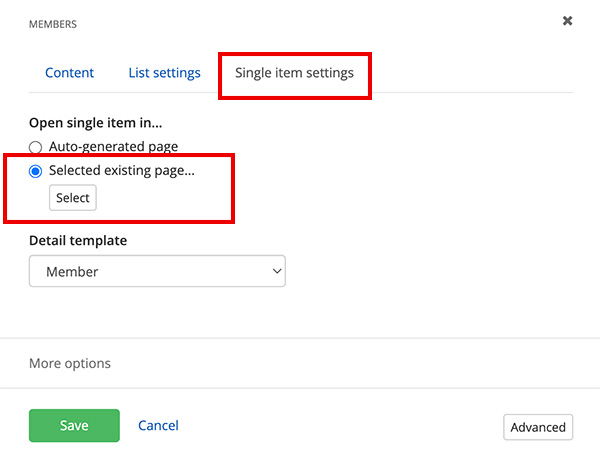
- Under the Single item settings tab, select the page that the profile opens in.
- Auto-generated page: This is the default setting and will open the profile within the same page. DO NOT use this setting.
- Selected existing page: Select the profile page with the team members widget on it.
- After you have added the team members widget to a profile page, click the Edit button on the widget
Profile Page (detail view)
-
Create a profile page (Required)
You must create a separate page to display the profile details. You will only need to create one page for all members.
- Create a new page. Name it "Profile" and uncheck the Show in Navigation option. Put the page under the page where your team members are listed.
- Within the edit view of the profile page, on the right side menu, click the Content tab, click the Team Profiles drop down menu and find the Members widget. Click, hold and drag the Members widget onto the desired part of the page, and then release the widget.

- Publish the page. You can now use this page to display team member profiles.
-
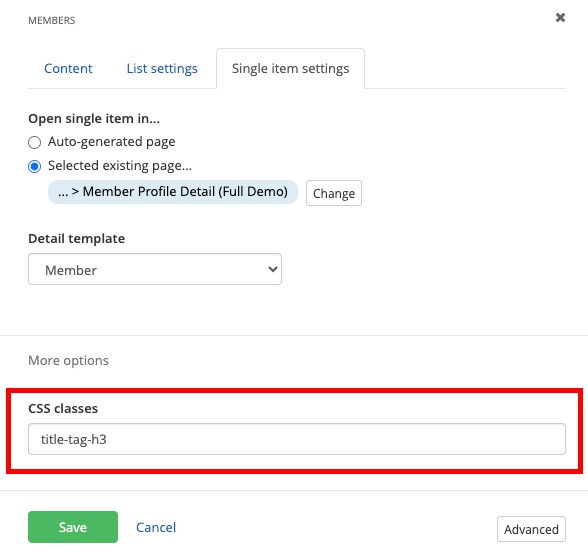
Add CSS classes to a Team member profile page
Within the edit view of the profile page, which is used to display the full member profile, you can customize how team member profiles display using CSS.
- After you have added the team members widget to the profile page, click the Edit button on the widget

- Under the Single item settings tab, in the More options section add CSS classes separated by a space:
- After you have added the team members widget to the profile page, click the Edit button on the widget
