Site Search
Search functionality on a website is crucial for enhancing user experience and efficiency. It allows visitors to quickly find specific information or products without navigating through complex menus, thereby improving convenience and satisfaction. For large websites, search serves as a vital navigation aid, helping users bypass extensive content and find what they need swiftly. This time efficiency not only satisfies impatient users but also increases engagement and potentially boosts conversions.
In Sitefinity
Within the Sitefinity system, users have the ability us use the site-wide search by default or add internal search which will search content within their Sitefinity site. Please note, this does require well thought-out content planning as well as Administrator assistance to set up the site index.
The Basics
Search All Sites
![]() UTMB has adopted a site-wide search appliance, which is managed by IT Services. Access this search functionality by clicking the magnifying glass at the upper right of most UTMB websites.
UTMB has adopted a site-wide search appliance, which is managed by IT Services. Access this search functionality by clicking the magnifying glass at the upper right of most UTMB websites.
This search option will only index and deliver results from UTMB websites. Having issues with search results? Read search tips & trick and learn how to add featured links.
Pro tip: Users can also choose to use the Google search option on the search pop-up screen by selecting the Google ratio button before hitting the enter key. This option will take you away from the UTMB site and deliver a google search page with results.
Internal Site Search
To configure the website’s internal search, users must first define a search index and then drop the Search box and Search results widgets somewhere on the website page.
Customize the search index settings to perform a search based on a specific field of any content type.
Search Index
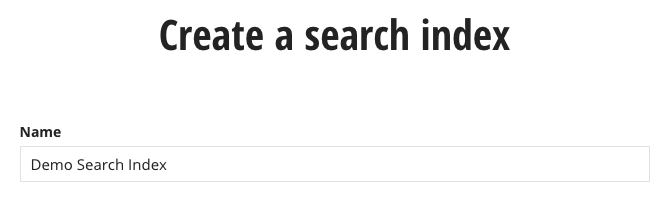
To create a search index, administrators will follow the steps below after the content is created and added to the pages to be searched on the website:
- Go to Administration > Search Indexes
- Then click Create a search index

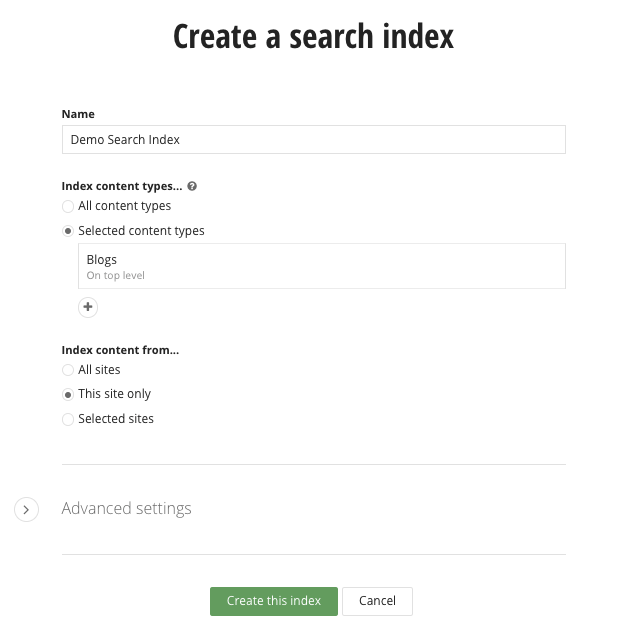
- Give the Index a Name, ie: Demo Search Index
- Select the content type to be index. Either choose All content types or Select content types.
- If choosing to select certain types of content, click the + (plus sign) and then choose the desired content type and click use selected

- Choose to index this site only
- Click the Create this search index button to complete
- Back on the Search Indexes page, find the Search Index you created
- Click the 3 dots to the right of the title, and select Reindex action to activate this index
- Note: Indexing/Reindexing may take several hours. If you have created the search index before you have published a content item, you must reindex.
Search Results Page
The Search Results widget is used to configure where and how to display the results of a search that a user performed on your website.
First, create a search a results page by creating a child page of your search page, leaving it out of the navigation, then continue to the next steps.
Configure the Search Results widget:
- Drag and drop the Search results widget on to the page
- In the upper-right corner of the widget, click the Edit button to open the widget designer
- Select one of the following options:
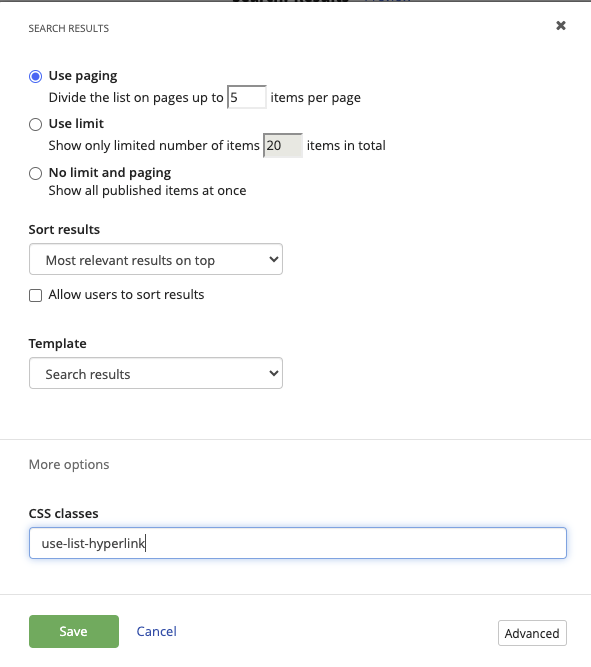
- Use paging: This option divides the search results list in several pages. Each page contains up to 20 items. You can change the number of items per page.
- Use limit: This option shows only a limited number of search result items. The default number of items is 20 items in total. You can change the total number of items displayed.
- No limit and paging: This option shows all published items at once.
- From the Sort results dropdown menu, select the option you want to use.
- By default, the most relevant results are listed on top of the list. You can change this default sorting behavior to Newest first or Oldest first.
- To enable users to change the default sorting behavior on the frontend, select the Allow users to sort results checkbox.
- Under Template, select the template you want to use to display the search results on the page (only one option currently).
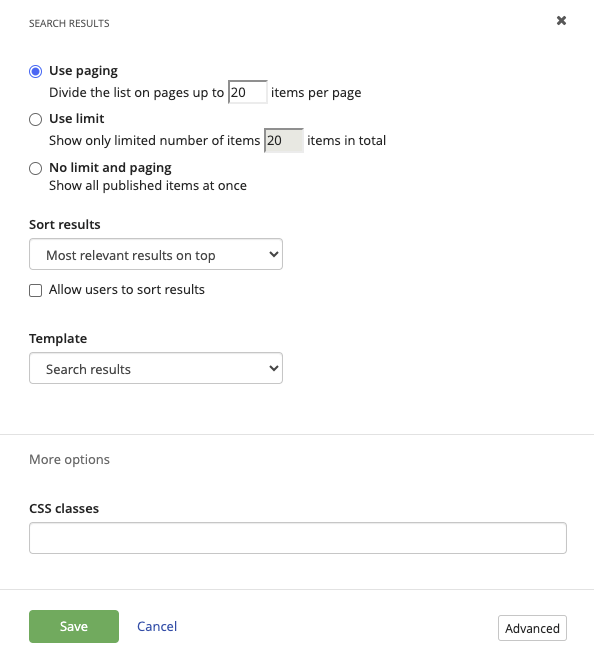
- Click Save.
Search Bar
The Search box widget to enables users to search for content on your website. The widget must be added to the page or template in the area where it should display based on the design chosen. Once the widget is on a page, a text box for entering search keywords is displayed.
Configuring the Search box widget:
 Drag and drop the Search Box widget on to a page or template
 - In the upper-right corner of the widget, click the Edit button to open the designer of the Search box widget.
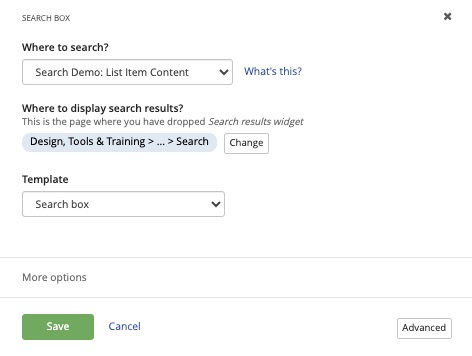
- Expand the Where to search? dropdown menu and select the search index you want to use for this search box.
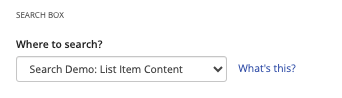
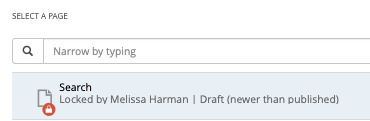
- Under Where to display search results?, click the Select a page button. From the list of pages, select the page to display search results (the page created in the previous step) and click Done selecting.
- Click Save.
Test the Search Functionality
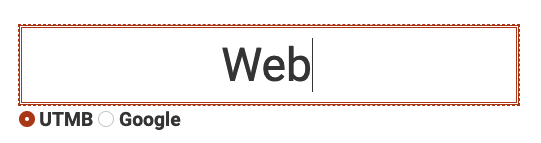
This Search Bar is using a Search Index only searching content in Blogs from this site. The results will render in a child page of this page containing the Search Results widget.
To test, begin typing the word Web, immediately, result suggestions will begin to populate. Users can choose to click on one of the suggestions or just hit enter to see all possibilities. Click enter to be taken to the results page and see all blog posts which have Web in the title or content. Click the back arrow to get back to the Search page
Customizations
Searching Lists
This Search Bar is using a Search Index only searching content in List items on this site. The results will render in a child page of this page containing the Search Results widget.
Additional Steps for Link Lists
The Search index needs to know about the fields:
- Open search index
- Click Advanced
- In Additional fields for indexing, add "Hyperlink" (capital H is required)

- Save and Reindex
On the search results page:
- Edit the Search Results widget
- Click Advanced
- Then click Model
- Add the following text in the following 2 places:
- HighlightedFields = Title;Content;Hyperlink; (case sensitive)
- SearFields = Title;Content;Hyperlink; (case sensitive)
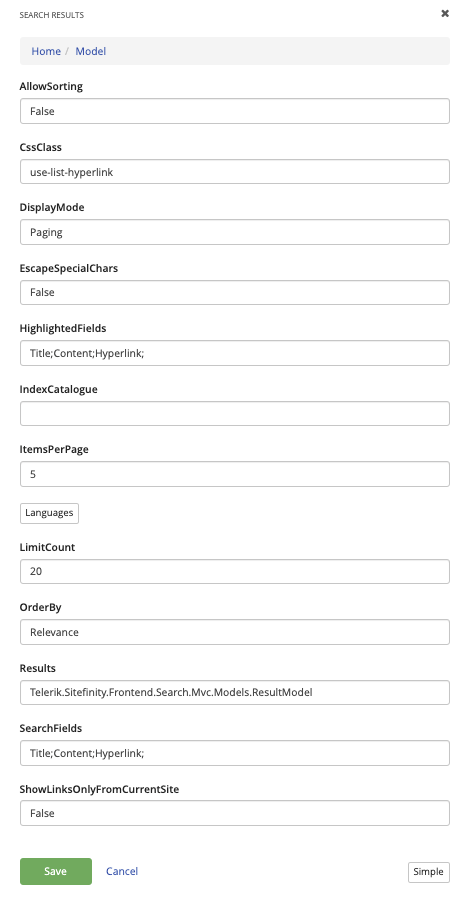
- Click Simple
- Then click More options and add use-list-hyperlink to the field
- Save and Publish the page
Test the Search Functionality
To test, begin typing the word Hello, immediately, result suggestions will begin to populate. Users can choose to click on one of the suggestions or just hit enter to see all possibilities. Click enter to be taken to the results page and see all list items which have Web in the title or content. Click the back arrow to get back to the Search page.
Note: clicking on links for these search results will not render a desirable layout as the content is not built for the purpose of searching.